

Everyone knows the healthy habits we should practice regularly, like flossing our teeth, cleaning the litter box, and recycling bottles and cans. But too often, we’re in a rush and skip the routine. Similarly, there are healthy habits for working in InDesign that can make your life much easier. If you don’t practice these software habits, your teeth won’t fall out, the cat won’t attack you, and the recycle police won’t arrest you, but you will deprive yourself of some of InDesign’s power.
To make it easy for you to adopt these habits, I’ve supplied several InDesign files that you can download and practice on.
Habit 1. Use Master Pages
How do you get page numbers on each page of your document? Or add a header with chapter information? Or change the margins on the page? Do you do it manually, directly on the document pages? That’s not so bad if it’s a three- or four-page document. But for anything longer, master pages will make your life much easier.
Every document starts out with a default master page called “A Master.” Double-click that page in InDesign’s Pages panel and you’ll see the master page layout. A facing-page document has a left-hand and right-hand page (Figure 1). For non-facing page documents, there is a single page. You know you’re on the master page because A-Master appears at the bottom of the document window.

Figure 1: The A Master page in InDesign
Power Tip: You can override master page elements on document pages. To select a master page object on a document page, hold Cmd-Shift (Mac) or Control-Shift (Windows) and click on the master page item. This releases the item from the master page protection so that you can modify it.
Power Tip: To move frames along with the guides on the new master page, choose Layout > Layout Adjustment and make sure Layout Adjustment is turned on.
Download the master page goodies: Click here to download this article’s Goodies Package and you’ll find the InDesign document “Sample Master Pages,” which includes three master pages. Understanding how these master pages work will help you make the most of master pages in your own projects.
Here’s what you’ll find in the “Sample Master Pages” document: The master applied to all the pages is called “Body Text Master.” This is the master page that contains the page number for document pages. Move the text frame to a new position or change the typeface and the changes will be applied to all the document pages.
The second master page, called “Running Header Master,” is based on the Body Text master. Changes you make to the Body Text master will also appear on this second master.
The third master page, “Chapter Opener Master,” is not based on the Body Text master. It doesn’t have a page number and it has different margins.
Apply these masters to the document pages by dragging the master onto a document page in the Pages panel. You’ll see how the page numbers, running headers, and margins change when you apply each master. You can also make changes to the master page elements and see how they update on the document pages.
Habit 2. Text Styles
What master pages do for layouts, paragraph and character styles do for text. Instead of selecting all the text in a paragraph to apply formatting, paragraph styles let you simply click inside a paragraph and click a paragraph style to apply all sorts of complicated formatting. No more going up to several different menus and dialog boxes.
When you create a new document, InDesign gives you a default paragraph style called Basic Paragraph (Figure 2). Don’t use it! It causes unpredictable results, especially when pasting text from one document to another.
Figure 2: Evil, evil Basic Paragraph.
Instead, try this easy way to create a custom paragraph style: Format the text the way you want it to appear, and then choose New Paragraph Style from the Paragraph Styles panel menu. In the dialog box that appears (Figure 3), name the style something recognizable. Click OK.
Figure 3: The New Paragraph Style dialog box.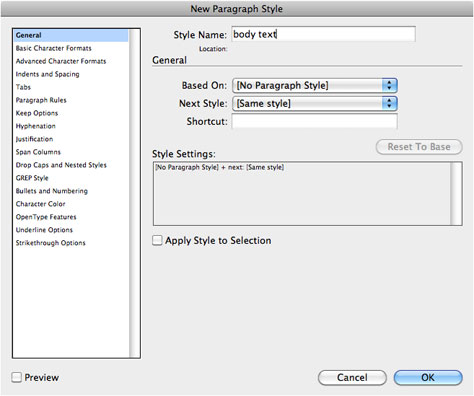
To apply the style, select the text you want to format with this paragraph style and click the name of the style in the Paragraph Styles panel (Figure 4). The text instantly changes.
Figure 4: The new paragraph style you created.
To create a character style, format an individual word or phrase and then choose New Character Style from the Character Style panel menu. Name the style and click OK. I create character styles for such formatting as bold, italic, and colors.
Here’s the best part about paragraph and character styles: When you modify a style in the Paragraph or Character Styles panels, everything to which you’ve applied that style changes, regardless of where it is in the document. The text reformats faster than you can say, “Clients can’t make up their minds.”
Power Tip: To apply a paragraph style to several unlinked text frames at once, select the frames with the Selection tool and click the paragraph style in the panel. This applies the style to all the text in the frames.
Download the style goodies: Click here to download this article’s Goodies Package and you’ll find the InDesign document “Sample Text Styles,” which contains text with styles applied. Reformat the body text style and watch how the text changes. Notice that the text for the body text indented style changes even though it has been formatted with a different paragraph style. This is because the body text indented style is based on body text.
Habit 3. Nested Styles
Nested styles and nested line styles are simply ways to apply character styles to text without first selecting the text you want formatted. You’ll find them in the Paragraph Style dialog box under the category Drop Caps and Nested Styles.
There are two types of these styles. The first, nested styles, let you apply formatting to all the text up to or including a certain character or text break. For the example in Figure 5, I told InDesign to bold the beginning of a paragraph up to the first colon.
Figure 5: An example of a nested style.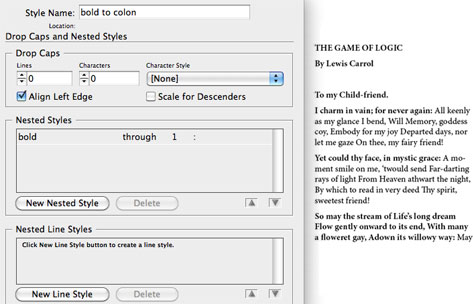
The second type is the nested line style. It tells InDesign to format a certain number of lines in the text with a particular character style. This is useful when you want to format the first line of text with a specific character style, such as bold, and have the remaining lines in a regular weight.
Power Tip: Instead of applying a character style, use the nested styles’ repeat feature to repeat the character style in a pattern. For instance, a nested line style could include instructions for InDesign to format one line in bold, the next in italic, and the next in regular, and then repeat this sequence throughout the text (Figure 6). This is extremely helpful for repeating text patterns in phone books, price lists, and the like.
Figure 6: Nested line styles are ideal when text patterns repeat.
Download the nested style goodies: Click here to download this article’s Goodies Package and you’ll find the InDesign document “Nested Styles,” which contains text with three paragraph styles applied. Open each of these paragraph styles and click the category for the nested styles. In one of the paragraph styles, I used a nested style to format the first three words in the bold character style. Change the setting for one sentence and see how it changes the paragraph. Make similar changes for the other paragraph styles.
Habit 4. Snippets and Libraries
Many designers use the pasteboard around their InDesign pages as storage for text, images, and other objects. But this is problematic because these elements take up space in the file, and they can cause confusion when the job goes to print.
There are two cleaner ways to store elements that you expect to use more than once. A snippet is an element (or several elements) that you or someone else generates using the File > Export > Snippet command. You can easily drag the snippet into any InDesign file by choosing File > Place or simply clicking and dragging the snippet file onto the InDesign page (Figure 7).
Figure 7: You can click and drag snippets.
The second storage device is a library. Choose File > New > Library and a panel will appear over the document you’re working with (Figure 8). Like snippets, you can drag any items into a library. However, libraries are more powerful because you can search the library for types of items or names of items.
Figure 8: The Library panel.
You can share both snippets and libraries with other people.
Power Tip: One drawback of snippets is that you can’t preview them in your operating system’s Finder or Explorer. However, you can preview the contents of a snippet in Adobe Bridge.
Download the snippets and library goodies: Click here to download this article’s Goodies Package and open the compressed file “Snippets and Libraries,” which contains several snippets and a library. Use the Place command to add those snippets to your own InDesign document. Add your own elements to the page, and then select them and use the Export command to export them as snippets.
Open the library file and drag those elements onto your InDesign document. I named these items so you can click the Show Subset icon (it looks like binoculars) at the bottom of the library panel to search for specific item names and object types.
Habit 5. Multiple Page Sizes
Say you’re working on a corporate identity that includes a business card, letterhead, and envelope. Do you separate each of those elements into its own file and deal with the file-management headaches? Or do you keep them in one big file, each element floating on a page that’s correctly sized for only the largest piece of the identity?
Neither method is ideal. Fortunately, starting with InDesign CS5, you can solve both problems by putting all elements in one InDesign file and customizing the size of each page to match the element.
It’s simple. Use the Page tool to select the page you want to change (Figure 9), and then enter new measurements for the width and height in the Measurements panel (Figure 10). The page adjusts accordingly (Figure 11).
Figure 9: Use the Page tool to select the page…
Figure 10: enter new measurements…
Figure 11: and InDesign changes the page to the new dimensions.
Power Tip: You can use the Page tool to move pages around. In the Measurements panel, click Objects Move with Page to ensure that objects don’t get separated from their page.
Download the multiple page size goodies: Click here to download this article’s Goodies Package and open the document “Sample Multiple Page Sizes,” which contains several pages with different elements for a corporate identity program.
Use the Page tool to move the pages around. The last page of the document is oversized. Use the Page tool to change the size according to the instructions above.
This article was last modified on January 5, 2026
This article was first published on August 18, 2011
Commenting is easier and faster when you're logged in!

Recommended for you
Marrying Types: Five-Part Harmony
Finding two typefaces that work well together can be a challenge, but how about...

Conquer Type-Killer Colors
The characters in the fonts we use have very distinct shapes, finely and painsta...

TypeTalk: The Best of 2013
In the world of fonts, January is a month of lists. Whether they’re called Best...