

Porting an application as complex and powerful as Photoshop to a phone is, of course, impossible. And yet Adobe has managed to achieve just that: Photoshop for iPhone, coming five years after Photoshop for iPad, is a truly extraordinary feat of elegance and sophistication. There’s a free version available from Apple app stores, although the subscription of $7.99 a month (or $69.99 a year) – free to existing Creative Cloud subscribers – gets you the full range of tools, including Generative AI and powerful selection methods. When you open an image in the app all you’ll see is Layer properties, Select area, Retouch, Paint and Size. But don’t be fooled by its apparent simplicity: all the essential tools are there, intelligently tucked away behind an interface that gives you just what you need, when you need it.
Choose an Image
You can start with an image from your own photo library, generate one from scratch, or choose from the vast collection of Adobe Stock. Here, I’ve searched for “woman in a café” as my starting point (left image). Tap the Tap Select button, and in a couple of seconds every identifiable object in the scene is given its own thumbnail. Here (center), the woman, her hat, the flowers and her drink are all shown as separate objects. Tap to add them to your selection, or tap the minus icon to deselect them. You can also select using a Quick Select brush, Lasso, Object Select, Rectangle, Ellipse and Magic Wand. Tap the tick, and you’ll see the familiar “marching ants” around your selection (right). Tapping “Apply as mask” will then mask out everything that isn’t selected. Of course, you can always refine the mask later with a Brush, Quick Select tool or Lasso. 
Add a New Layer
Tap the + button and you’ll be given the option to add an Empty layer, a Fill layer, a Type layer, and Adjustment layer or an Image layer (left). Choosing the latter lets you add an image from your choice of source: in this case, a photo of one of the Great Pyramids from my image library. By default this will appear at the top of the layer stack; but tapping the Layers icon will open a list, making it easy to drag it below the woman layer (center).
The image I chose is too dull compared to the bright lighting on the woman, but choosing to add an Adjustment layer gives the option of Hue and Saturation, Brightness and Contrast, Black and White, Color Balance, Exposure, Curves and Vibrance. I chose Curves, and its see-through graph appears directly over the image. You can adjust it as you like, while still being able to see the image behind (right). 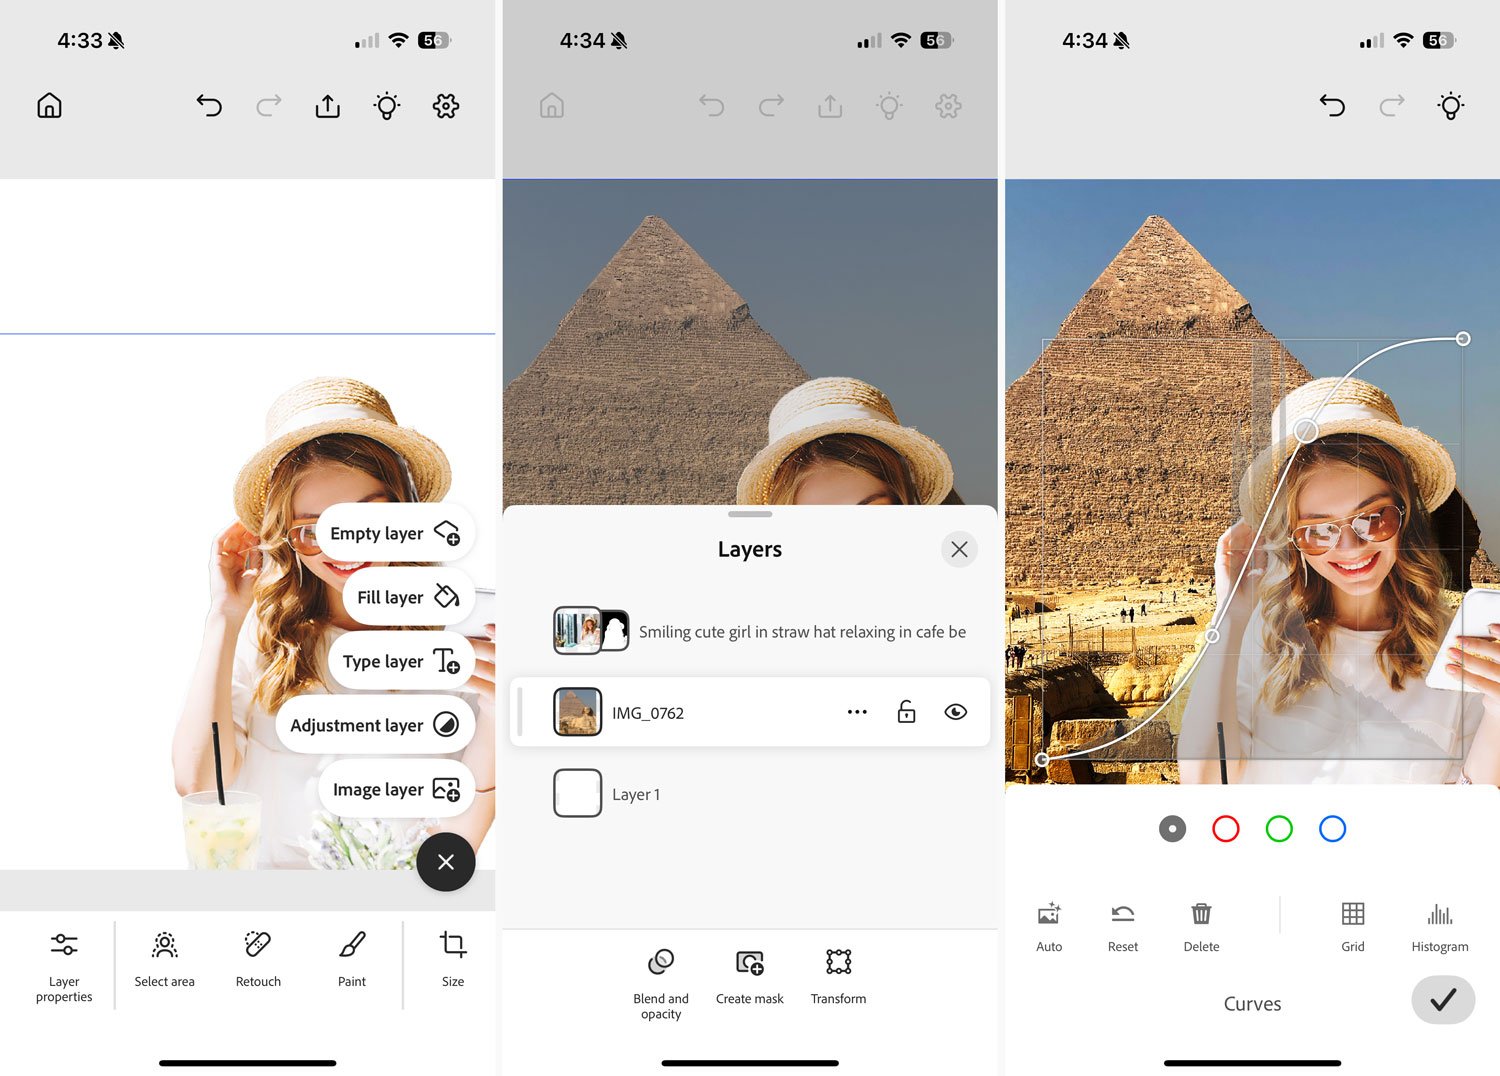
Fix the Blemishes
My photo of the pyramids has some unwanted people in the distance, and they’re a distraction (left). Tapping the Retouch button gives access to the Spot heal tool, which is ideal for removing these unwanted elements. You can drag to set the size of your brush, and a useful extra here is the Smart Scale option, which makes the brush the same size no matter how zoomed-in you are (center). This means you can zoom right in (by pinching, naturally) to paint in detail, or zoom out to cover a larger area. It’s a lot more straightforward than having to keep changing the brush size. Once you’ve selected the unwanted area, it’s removed in an instant (right). you could also choose the Remove button or the Clone stamp if you want a different sort of control. 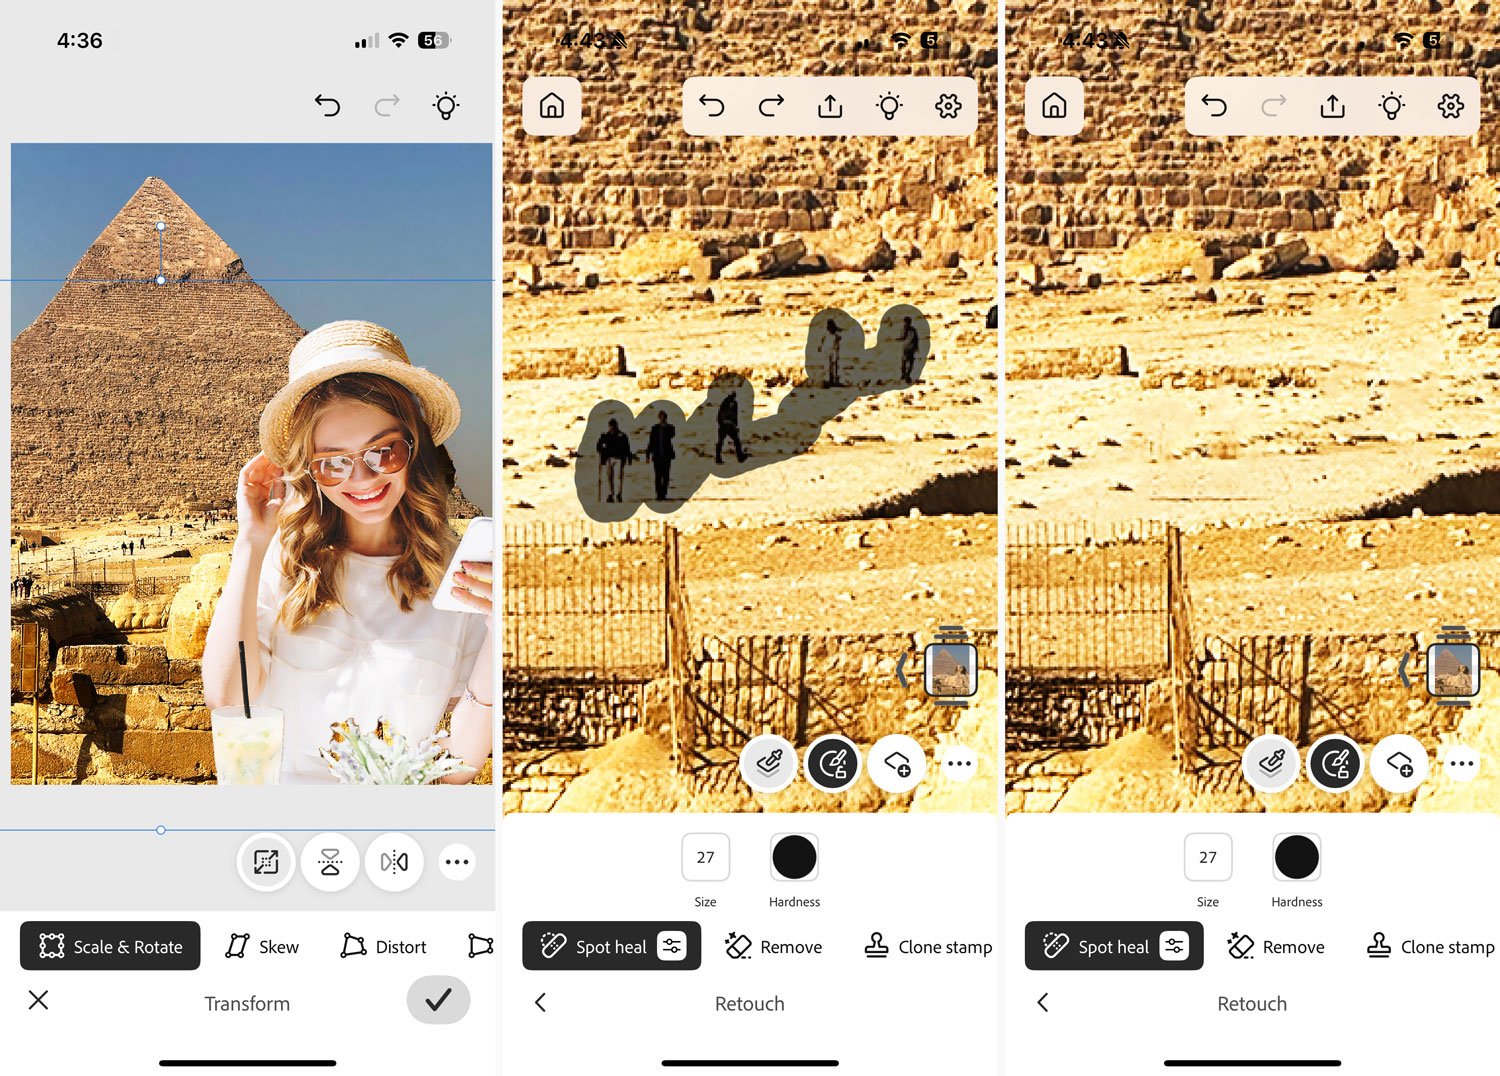
Extend the Background
I decided I wanted my pyramid more in the middle, so I moved it over – but this meant leaving an empty gap on the left side of the image. Selecting this area was straightforward with the Rectangle selection tool (left). After making the selection, a Generative fill button allows you to fill the area using Firefly, Adobe’s AI tool. You can type a text prompt if you want something specific or, as in this case, just leave the prompt blank and it will simply “uncrop” the image (center).
But there’s a problem here: the Curves adjustment used the pyramid layer as a clipping mask, and now it’s clipped to the generated layer instead. Happily, this is easily fixed: opening the Layers list and tapping on the three dots next to the layer allows you to perform a range of functions. In this case, Unclipping the Adjustment layer allows it to apply to all layers beneath (right). 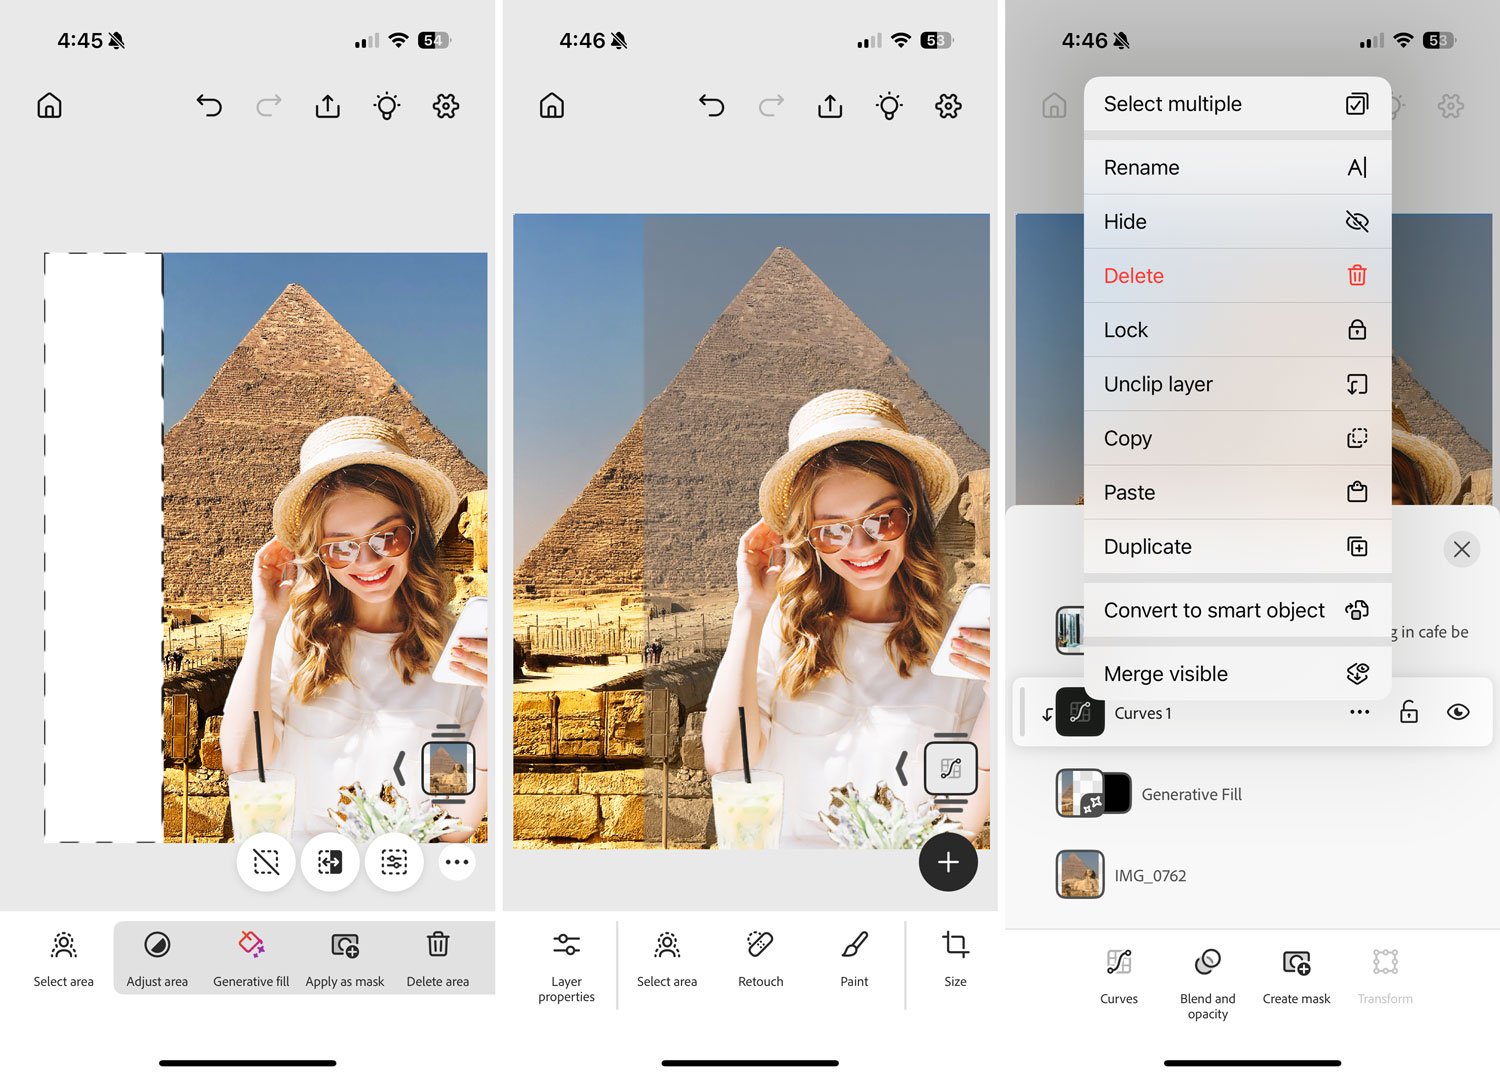
Add Some Text
Photoshop has access to the entire Adobe Fonts library. Papyrus seemed like an obvious choice for my Egypt title (left). Of course, you get full control over alignment, size, color and style, as well as line height, tracking, and horizontal/vertical scale.
The text looked too stark, and needed blending in with the image. Choosing the Blend and Opacity button allows you to change both the layer mode – in this case, I chose Linear burn – as well as a slider for the opacity (center). I didn’t like the way the tail of the letter P stuck over the woman’s hat. Again, this is a simple fix: opening the Layers panel allowed me to drag the layer down beneath the woman layer for a perfect result (right). 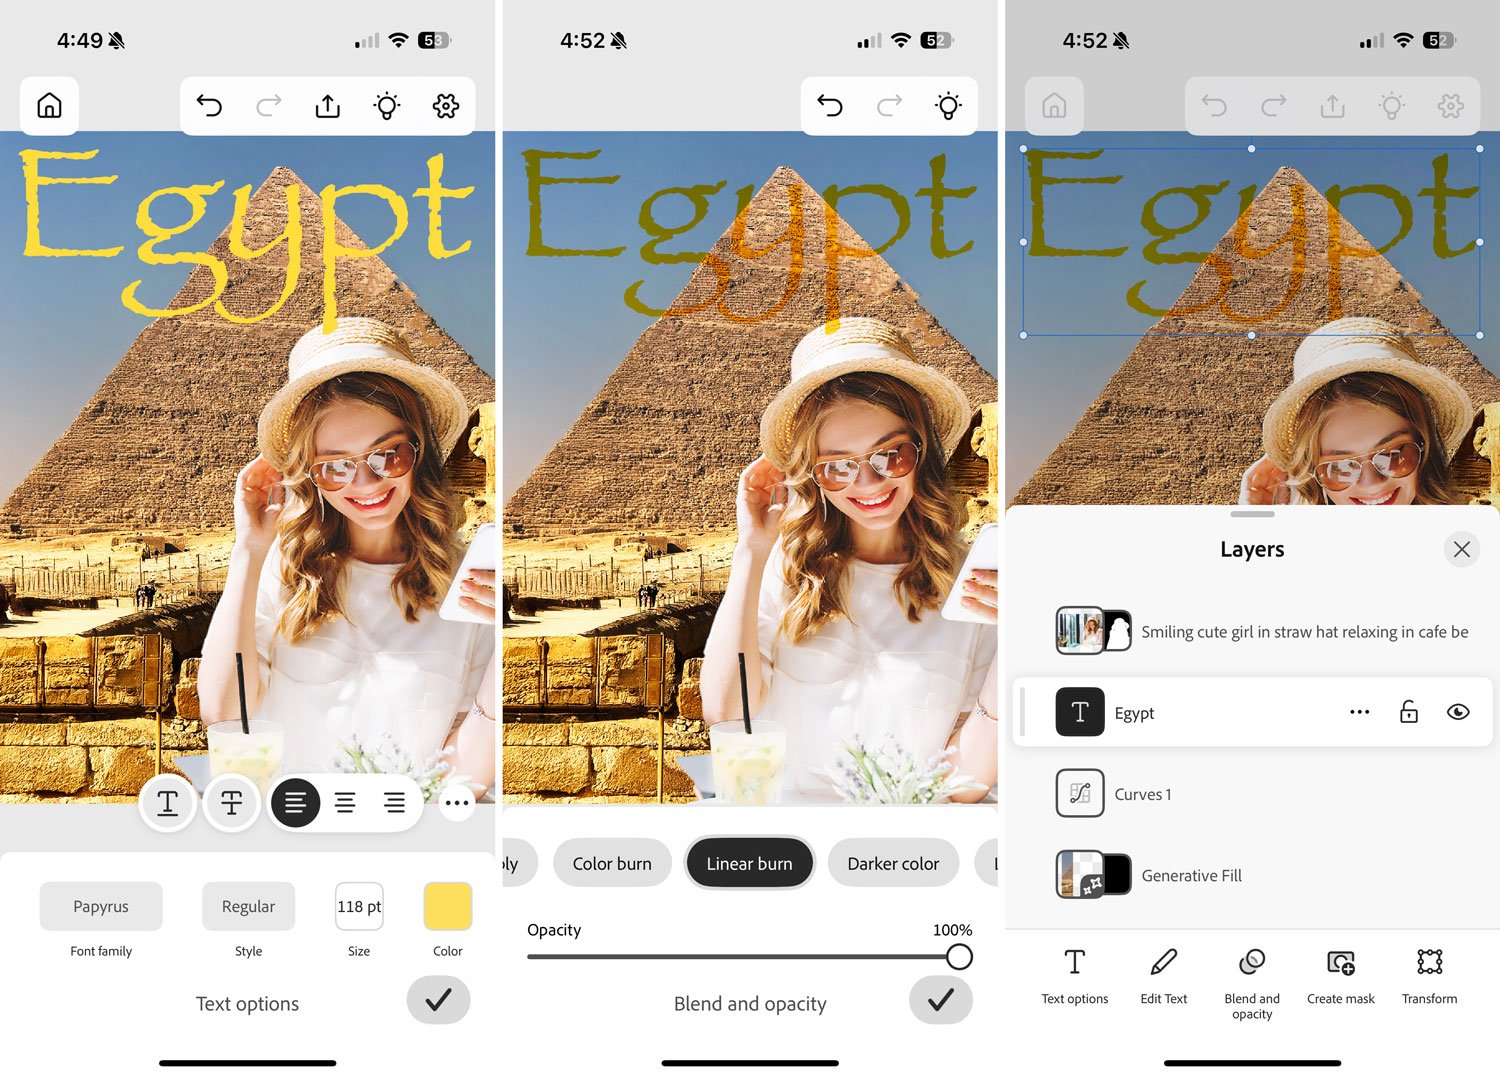
Photoshop in Your Pocket
Photoshop for iPhone is a truly extraordinary app, its power hidden by the simplest of interfaces. It provides much of what you need to edit images on the fly, including an Eyedropper tool to sample colors, three methods of choosing colors (color wheel, sliders and your own saved swatches), as well as Lighten and Darken brushes – the equivalent of Dodge and Burn – to adjust your images selectively.
Much has been done to keep your images editable. All adjustments are created as Adjustment layers, so you can edit them at any time. And you can even convert layers to Smart Objects, allowing you to scale, rotate and distort them without ever losing the integrity of the original.
This isn’t, of course, the full version of Photoshop as seen on the desktop. There are no filters, for instance, not even Blur or Sharpen, which is an omission that we hope will be rectified in future releases. But as all images are stored in Adobe’s Cloud, you can easily open and edit in the desktop version later, or in the free web version of Photoshop if you don’t have a Creative Cloud subscription.
It’s been a long time coming, but Photoshop for iPhone is a joy to use. Every aspect has been engineered from the ground up for ease of use, and the uncluttered interface adapts to your requirements at each point in the edit. Android users, take heart: a version for your phones is on the way.
This article was last modified on February 25, 2025
This article was first published on February 25, 2025
Commenting is easier and faster when you're logged in!

Recommended for you

InCopy as an InDesign “Reader”
Are there people at your workplace who don’t use InDesign but occasionally...

New Plug-In Brings Speed & Sophistication to InDesign's Find/Change Functionality
Automatication has released the InDesign plug-in Multi-Find/Change lets you mana...
InDesign Type: Choosing the Right Leading
By understanding and applying a few key principles, you can determine the proper...