

Aperture 1.0 was released last November, and though the program received many positive reviews for its breakthrough ideas regarding photography workflow and management, version 1.0 also took some knocks for its raw conversion quality, slow performance, and the fact that it forced you to import images into its managed library. With a managed library, the number of images that you can import into Aperture 1.0 is limited by the amount of space on the single volume where the library is held.
Apple responded quickly to these complaints, and within a couple of months, the company released version 1.1, which addressed the raw quality problems with a new, additional raw converter. It let you choose between converters and included excellent raw fine-tuning adjustments, including the unique Boost control that let you specify how much gamma correction to apply to converted raw files.
Now, less than a year after its initial release, Apple has produced another significant upgrade, in the form of Aperture 1.5. This free update adds several significant new features and, most importantly, addresses the issue of Aperture’s closed library architecture. The result is a program that should quell the fears of any users who were hesitant to switch to Aperture due to image-management concerns.
Please note that this is not a review of Aperture 1.5. While I have tested a late beta, I’m reserving my final opinion and product rating until I can thoroughly test the shipping version.
Window Layouts are SO Last Year
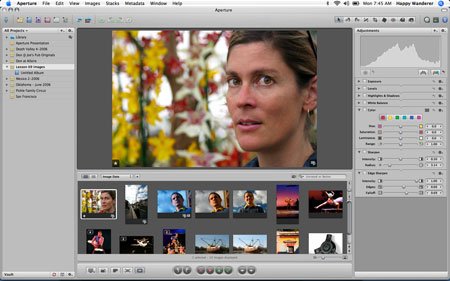
Overall, Aperture’s interface has not changed significantly (Figure 1). You’ll see some different icons here and there, and many keyboard shortcuts have been altered, but the program maintains its single window interface with its separate Projects, Browser, and Viewer panes. Version 1 provided several pre-defined pane layouts that you could easily switch between using buttons on the program’s main Toolbar. These shortcuts simply changed the size of each window and were intended to provide you with an easy way to get a layout that was optimized for thumbnail browsing, editing, or key wording. In the end, most users found they only used one or two of these, so Apple has wisely dispensed with them. Gone are the window layout Toolbar buttons and associated menu commands.

Figure 1. Aperture’s interface remains largely unchanged, though you will find some tweaks here and there. For a larger view, click on the image.
In their place, Apple provides three separate options: Basic layout, which is the same as version 1.0’s Standard layout; Maximize Browser, which gives you a browser pane that fills the whole window (though the Projects pane is still visible); and Maximize Viewer, which fills the entire Aperture window with a Viewer pane (figure 2). You can switch between these using a menu option, or with keyboard shortcuts. Experienced users will need a day or two to grow accustomed to the new shortcuts, but the change is a welcome streamlining.
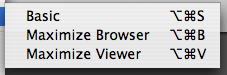
Figure 2. Aperture now provides three simple window layouts, accessible via menu or keyboard shortcut.
Version 1.5 sports some other minor but well-conceived interface changes. As in previous versions, the Inspector pane defaults to being divided into separate Adjustments and Metadata palettes. Now, though, you can elect to view either of these palettes individually, affording you more room to see either a very long list of edits, or a very long list of metadata.
In a further effort to reduce screen clutter, the keyword shortcut buttons on the right side of the Control Bar can now be toggled with a simple keyboard shortcut or menu command (Figure 3).

Figure 3. Aperture now gives you the option of uncluttering the Control Bar by hiding the keywording buttons.
Loupe de Loupe
Aperture’s Loupe tool provides an effective way to get a 100% view of any image or thumbnail visible on-screen, and version 1.5 includes a second Loupe tool with additional functionality.
You can still activate the Loupe by pressing the ` key, but you can now toggle between the regular loupe and the new Centered Loupe, by pressing Command-~. The centered loupe lacks the offset source point of the old loupe, making it feel a little more like a real loupe (Figure 4).
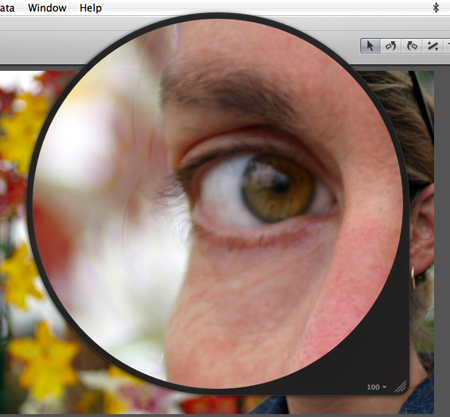
Figure 4. The new Centered Loupe tool gives you another way to get close to your images.
Like the old loupe, you can change the magnification of the Centered Loupe, but the new loupe provides a much-needed magnification readout, so you know the current zoom level. The same keyboard shortcuts work for changing the size and magnification of both loupes, but the Centered Loupe also provides a pop-up menu (Figure 5) for changing zoom level and options.
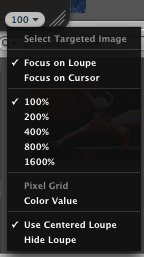
Figure 5. You can select options and zoom levels from the Centered Loupe’s pop-up menu.
Perhaps the nicest feature of the Centered Loupe is the Focus on Cursor option, which magnifies the area underneath the cursor, rather than directly underneath the Loupe. While this is similar to how the old Loupe works, Focus on Cursor lets you put the loupe anywhere on your screen and then simply hover your cursor over the area you want magnified (Figure 6). This allows you to see both a magnified and zoomed out version of your image at the same time. The old loupe was often in the way, meaning you had to spend time re-arranging interface elements.
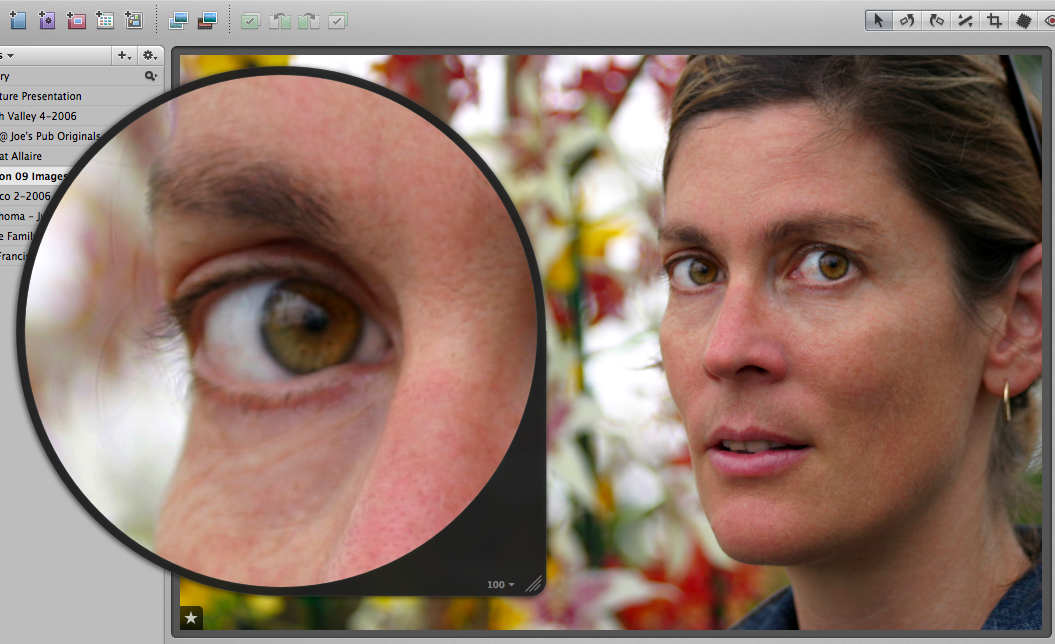
Figure 6. In Focus on Cursor mode, you can leave the centered loupe wherever you want and see a magnified view of the area beneath the cursor. Click on the image for a larger view.
Both loupes let you magnify the image in the Viewer pane (or in full-screen mode) as well as any thumbnail visible in the Browser pane. Consequently, Aperture’s loupes make it simple to quickly view full-resolution crops of any image that you have in your library. For example, with the loupe, you can very easily examine a batch of bracketed images to find the sharpest or best exposed shot, without having to manually open or select each document. This is a great timesaver that makes working with Aperture feel like working with real slides.
While the new loupe is a good addition, Aperture’s Viewer pane still needs more zoom levels. When in the Viewer pane or full-screen mode, the only options are fit to screen and 100%.
Would You Like that Managed or Unmanaged?
Before Aperture 1.0 shipped, the rumor mills were abuzz with stories of a forthcoming “iPhoto Pro” product from Apple. When that product finally arrived in the form of Aperture, it bore little resemblance to iPhoto in terms of interface, but it did keep one annoying iPhoto “feature” — the managed library. In Aperture 1.0, when you imported an image, that file was copied into the Aperture library, a Package file kept (by default) in your Pictures folder.
An OS X package is really just a regular folder, but one that appears as a document. You can open a package by control-clicking on it and selecting Show Package Contents, which will open up the package in a regular Finder window. If you open the Aperture library package, you’ll see all of your images (along with lots of other supporting files) and you can freely copy them to other locations (Figure 7). So, while many users are afraid that importing into the Aperture library meant consigning their files to a proprietary structure, the fact is that you can pull them out at any time. Apple’s intent with this managed library scheme was to make sure that you couldn’t move files out from under Aperture, resulting in broken links in the Aperture library.
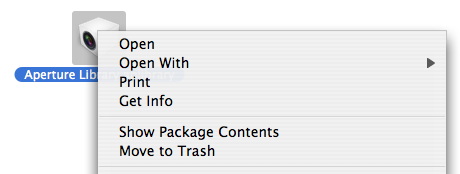
Figure 7. The Aperture managed library is a package kept, by default, in the Pictures folder. You can open it by right-clicking on it and choosing “Show Package Contents”.
One problem with Aperture’s managed library is that it was confined to a single volume. Once your hard drive was full, you were out of luck (unless you used a hack, such as my Aperture Library Spanner). For a working photographer who produces hundreds of images per job, the single-volume limitation was an Aperture deal-breaker.
Another limitation of Aperture’s managed library is the fact that it requires all images to be on your local drive. This means you can’t archive images on off-line volumes and still view them in your library, as you can with a cataloging program such as iView Media Pro or Extensis Portfolio.
With version 1.5, Apple has not only fixed all of these problems, it have also provided tools that give you incredible flexibility in managing your library. The new library controls open up many new options for defining complex Aperture workflows.
Aperture still maintains a library package, and when you import you still have the option of “embedding” your images into your library — copying them into the library package, just as Aperture 1.0 did. Now, though, the Import dialog box also has the option to import the file as a reference (Figure 8). When you import as a reference, the imported file is left in its original location, and a link is stored inside of your Aperture’s library.
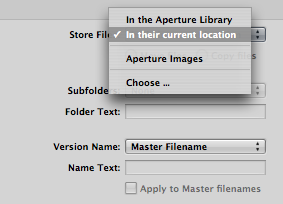
Figure 8. The Import dialog now lets you import images as references — leaving the originals wherever they are.
Note, too, that Aperture now lets you rename your files during import. In addition to a number of predefined presets, Aperture 1.5 includes an excellent Naming Presets editor that lets you easily define complex renaming operations (Figure 9).
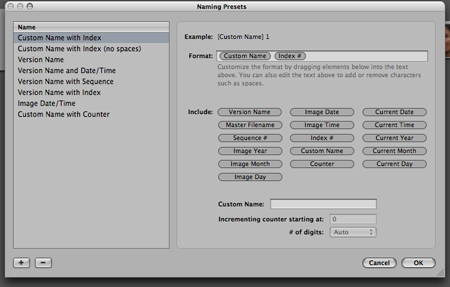
Figure 9. Aperture 1.5 includes excellent, thorough file renaming options.
Referenced files can be on any currently mounted volume whether those are hard drives, optical disks, or network servers. The most obvious immediate advantage of importing references is that your Aperture library is no longer limited to the size of the volume that it’s stored on.
If Apple had stopped right here, it would have appeased many users who were hesitant to make the switch to the program. Instead, though, the company went quite a bit farther.
In designing a referenced library system, one of the problems that must be solved is how to deal with broken links. If a volume goes off-line, or the user moves a file, what should Aperture do?
To address this problem, Aperture creates a full-res preview of every image you import. This preview is stored as a JPEG file inside your Aperture library. When the source file for a referenced image is available, Aperture builds its screen image in real-time from that original file, just as it does with images stored in its internal library. If a referenced image is not available, then Aperture shows the full-res preview. This means that even if a volume goes offline, you’ll still be able to see full-res versions of every image in your library.
Offline images even allow a fair amount of editing: You can rotate them, rate them, and apply keywords and any type of IPTC metadata. You cannot perform any type of image editing. Aperture’s library scheme is not a proxy system — it needs the original master files to perform adjustments and corrections — but you can freely organize and sort offline images. What’s more, if you’re working with a high-res camera, the full-res previews will probably provide all of the data you need to create Web galleries.
If you select an image that’s offline, Aperture’s editing tools and adjustments are simply grayed out, so there’s no confusion as to whether you’re editing an on-line or off-line image — you simply can’t edit an offline image.
Images imported as references sport a small badge that’s similar to the alias icon in the Finder. The badge changes if the volume that contains the image goes off-line. If you somehow manage to break the link to the image (something that is very hard to do, even if you move or rename the volume the image is stored on) then a third type badge is displayed (Figure 10).

Figure 10. From left to right, badges indicating a referenced file, an offline referenced file, and a referenced file with a broken link.
Aperture’s full-res previews mean that you will never see an empty thumbnail, and the simple badges make it easy to determine whether your images are available or not. You won’t ever deal with a dialog box that says, “I don’t know where this image is, go find it.” Like tunes, Aperture provides a Show in Finder command that opens the directory with your imported image.
The Aperture’s Preferences dialog box provides controls for specifying the compression ratio used for the program’s full-res previews (Figure 11). By default, you’ll find that an 8-megapixel image requires a preview that’s roughly 1 megabyte in size. If you’re hurting for space, you can dial in more compression and get the preview image down to around 400K. If you’d rather opt for the best possible quality, you can choose very low compression, yielding a preview around 9MB. You can even change these settings project by project and image by image. If you’re about to import a thousand referenced images and you’re short on space, you can dial down the preview size.
Figure 11. Aperture’s Preferences dialog lets you control the quality and file size of the JPEG previews that Aperture generates for referenced images.
The Update Preview command rebuilds the preview of the current selection using the current preview settings. So you can also free up space by rebuilding previews of images using higher compression settings.
Finally, the Delete Preview command throws the previews out altogether. If space is a premium, once you’ve made your picks you can simply delete the previews for all of your reject images. The references will still be in your library, and you can always build new previews later if you want them (Figure 12).

Figure 12. You can control previews on an image-by-image basis, rebuilding or deleting them as desired.
Aperture’s reference architecture is so well-implemented that it really doesn’t feel significantly different from working with embedded images. However, there is one important caveat: referenced images are not backed up into Aperture Vaults, the program’s built-in backup system. While your previews, versions, and all metadata are backed up, the original referenced master file is not, so you’re responsible for backing that up on your own.
Finally, one of the best features of Aperture’s new referenced scheme is that you don’t have to use it if you don’t want to. All of the managed library functionality is still present, and works just like it always did. In fact, you can easily mix and match referenced and embedded images within the same project. So, you can opt for the complete workflow management (including backups) of embedded images, or the flexibility of referenced images.
Master-File Management
While Apple has done an exceptional job of giving Aperture a referenced library system that’s very difficult to break, there will still be times when you want to move your master images. For example, at the end of a project, you may want to move original referenced masters to a CD or DVD, or to another hard drive. To facilitate this, Aperture 1.5 has two new commands:
Consolidate Masters takes all of the masters in a project and moves them into the internal library. This is great when you want to back up a project using a vault, or export a project to give to someone else.
The Relocate Masters dialog box gives you a simple but very powerful tool for moving your masters while preserving all links to your library. Along the way, you can use Aperture’s automatic renaming, and even tell it to generate a hierarchy of folders. After moving, your Aperture library will still look exactly the same. Aperture will simply reference your images in the new location that you specified.
When links do get broken, the Manage Referenced Files dialog box makes short work of relinking images (Figure 13).
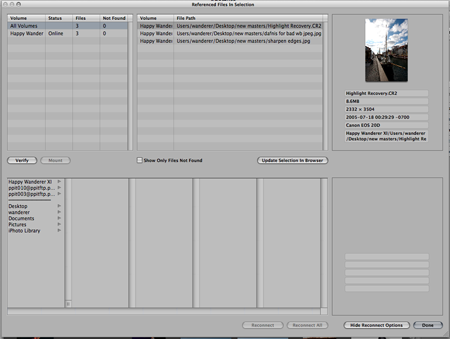
Figure 13. The Managed Referenced Files dialog box quickly relines broken reference links.
With this thorough attention to referenced file control, you can now work with Aperture in many different ways:
- A workgroup can keep its images on a central server and import them into Aperture as references. Because Aperture never alters master files, multiple users can work off of the same master data files.
- Because masters can be moved offline at the end of a project, but full-res previews remain in the Aperture library, Aperture can take the place of cataloging apps, such as Extensis Portfolio.
- When you need access to your master files from another application, such as an image editor or RIP, you can leave your master files outside of the library, as references, so that other apps can work with them alongside Aperture.
The new architecture has major implications for photographers who work with a desktop machine and travel with a laptop. If you keep all of your images on an external drive and import them as references into Aperture, then you can simply move the drive between your machines. There’s still the matter of the Aperture library itself, but if you store that on the external drive as well, you can move the whole thing — images and library — from computer to computer by simply moving your external drive.
If you prefer to have independent, separate libraries, there’s another option, which is to use a folder-synching program. I’m not prepared to say that this works, as I’ve only been working with a beta of Aperture, but in my initial tests, it appears that if your sync program can look inside packages, then you can easily keep multiple libraries synchronized. I’ll have more to say about this after testing the release version.
Another Take on Managed Libraries
Finally, Aperture provides a third way to import your images, which is to import them as embedded images, but store them in the Pictures folder, rather than in the Aperture library package. When importing, you’ll have the option to choose Pictures folder, rather than referenced or embedded (sorry, my beta doesn’t have this option, so I can’t show a screenshot). Aperture will create a new folder in your Pictures folder, and name it after the current project, and your imported images will be copied there.
This option offers a compromise between fully managed and referenced. When importing this way, Aperture is managing your images and they’ll be included in any backups, but they’re sitting within a normal folder, which means you can easily access them from other applications. For users who like the managed system, but have never gotten comfortable with the concept of Packages, this scheme will be a great relief.
New Edits
Version 1.5 includes several enhancements to the program’s image-adjustment features, including two new adjustments.
The new Color adjustment works like Photoshop’s Hue/Saturation dialog. You can pick a color temperature to work with and then independently adjust hue, saturation, and luminance. A Range slider lets you refine the spread of the color range that you’re editing (Figure 14). As in Photoshop, this is a simple yet powerful mechanism for making selective color adjustments.
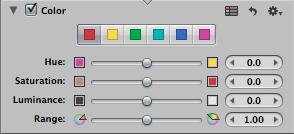
Figure 14. The new Color adjustment lets you adjust the hue, saturation and brightness of specific color tones in your image.
The new Edge Sharpen adjustment adds an alternative to version 1’s Sharpen filter (which is still included in 1.5). While Sharpen was a straight Unsharp Mask scheme, the new adjustment lets you confine sharpening to just edge tones in your image — it’s akin to running an Unsharp Mask filter though a Find Edges mask in Photoshop (Figure 15). This is a much more subtle sharpening tool that is especially useful for portrait and low-light shots, where sharpening skin tones or sensor noise is something to be avoided.
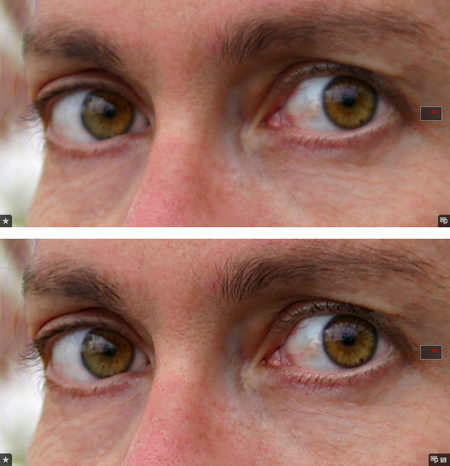
Figure 15. The new Edge Sharpen adjustment lets you constrain sharpening to just the edges of an image.
Other editing enhancements include the ability to save a preset for any type of adjustment, even Raw Fine Tuning. For regularly applying the same adjustments, this can be an easier alternative to the program’s Lift and Stamp tools.
Speaking of Lift and Stamp, Aperture 1.5 can copy crop and straighten data from one image to another.
You can now export master files with sidecar XMP files that are fully compatible with Bridge and Photoshop, giving you a powerful, easy way to export Aperture-applied metadata to people who don’t have Aperture. Version 1.5 can’t import XMP sidecar files; however, it can import metadata from DNG files. If you’re working with raw files you can roll them into DNGs first. If you’re working with non-raw files and have already applied metadata in Bridge or Photoshop, you’ll have to re-enter it in Aperture, after importing.
Printing has one addition in the form of a resolution dialog box within the Print dialog. When I test printing with the shipping version of 1.5, I’ll report on that.
Aperture has two new output options. You can now drag images from Aperture onto the Desktop or into other apps to export a full-res JPEG preview. Apple has also built an export API into Aperture, co other companies can create complex export plug-ins. These plug-ins will appear in the File menu along with the other Export options. For example, a magazine might create a plug-in that, on export, automatically applies specific metadata tags, resizes and exports using a specific format, and then uploads to a particular FTP site.
Performance
Unfortunately, I haven’t had a chance to adequately test performance. I have used betas of the program on 17- and 15-inch Mac Book Pros. On the 17-inch, the program was speedy and responsive. I’ve not tested as extensively with the 15-inch Mac Book Pro. My experience of Aperture 1.1 on the 15-inch Mac Book Pro is that it’s conspicuously slow, so I’m anxious to test the shipping version of 1.5.
After the release, I’ll do more vigorous testing on a range of platforms. So far, the update seems faster, but I’m not prepared to say how much.
Apple has changed the system requirements for Aperture 1.5, so that you can now run the app on MacBooks and MacMinis. If you have a Mac that has been unable to run Aperture, you’ll want to carefully check the new system requirements to see if version 1.5 is now compatible. Obviously, performance on these machines may be limited, due to their lesser video cards.
What I Think — For Now
This is a very important upgrade for Aperture. Version 1.0’s library limitations were enough to keep many photographers from using the program. The new library options do more than just fix the previous version’s limitations, they allow you to easily work with images and libraries across multiple machines, and to create more sophisticated Aperture-driven production pipelines than version 1 allowed.
Apple has thrown in a lot of perks with this upgrade, including the new loupe and interface enhancements. The fact that the upgrade is free makes these even more enjoyable.
However, the program still lacks any masking and selective-editing tools. For these types of edits, you’ll need another image editor. This is more a point-of-information than a complaint. For a product that’s less than a year old, Aperture has a very large feature set — just be aware that it’s not yet a stand-alone system. Version 1.5 still includes the Open In External Editor command, which gives you a simple way to round-trip images into another editor. But now there’s an additional option: If you’re working on a referenced file, you can simply open it in another program (no exporting required) and then rebuild the preview once you’re back in Aperture.
Apple has done a very good job of including adjustment tools that let you make fairly selective edits: the five-point Levels adjustment, the new Color and Edge Sharpen adjustments. Nevertheless, the addition I’d most like to see next is selective editing tools.
In addition to the new features, this upgrade is important for what it says about Apple’s commitment to the product. Aperture has had to suffer some strange rumors and innuendo in the last few months. Yet, in less than a year, Apple has released two major, free upgrades that addressed many users’ concerns, and the fixes for these problems have been elegant and well-conceived. Plainly, Apple is listening to working photographers, and dedicating the resources to manifest those features.
As with the original version, the program’s non-modal interface; true real-time, non-destructive raw workflow; and excellent organizational tools put it head and shoulders above the competition in terms of easy, efficient workflow management and post-production.
This article was last modified on January 18, 2023
This article was first published on September 25, 2006
Commenting is easier and faster when you're logged in!

Recommended for you

Google Slashes Prices on the Nik Collection
Last fall, Google announced that it had acquired Nik Software, makers of the pop...

Create Parallax Video Effects in Photoshop with Qlilipn
We’re well used to seeing parallax effects on modern websites, where images scro...
How to Turn a Photo into Graffiti with Photoshop
You can turn any photograph into a piece of graffiti artwork in Photoshop, witho...