Find Text, Change to Graphic
Find/Change is not just for text or object attributes. A frequently-overlooked feature, Change to Clipboard Contents, is your key to quickly inserting hundreds of repeated inline graphics, replacing their text...

Some publications call for many inline graphics, to illustrate things, to mark the beginning of new sections, or to call out a special type of text. Lots of textbooks use them, and software books too, like the one David and I wrote (InDesign Breakthroughs — hey people I know it has “CS1/CS2” in the title but the content is timeless! Go buy it!).
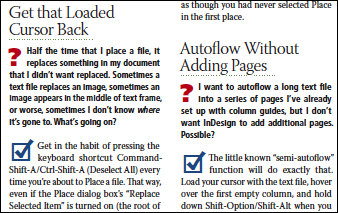
Anyway here’s a screenshot from our book showing a good example of what I’m talking about, the questions and checkmarks we used instead of the tired old Q’s and A’s:
When you’re in charge of designing or producing the publication in InDesign, adding the graphics is your job, not the writer’s. Text comes to you in the form of a Word document with codes that stand in for the inline graphics. It is your job to find each code, select it, delete it, copy the inline graphic you’ve got stashed on the pasteboard, paste it inline, tweak its position and text wrap, and then go on to the next one. Hundreds of times.
There is a faster way to do the job. A MUCH faster way. Use Find/Change!
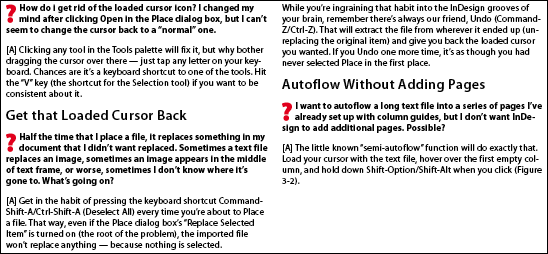
First, import the text with the placeholder codes into the layout and format it. In the excerpt below, the [?] is a placeholder for the red question mark graphic, and the [A] is standing in for the blue checkmark — one example of something that occurs hundreds of times in the full document.
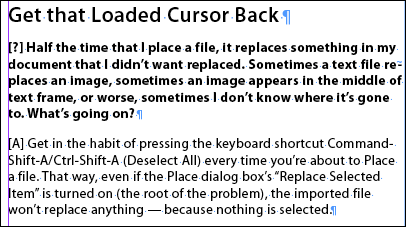
After you format the text, manually insert one example of each type of inline graphic you’ll need to deal with. Format the inline graphic perfectly, including its vertical offset and text wrap. Here’s the question mark:
At this point it’s a good idea to select the graphic and create a new Object Style using it as a source. Apply the new style to the graphic before the next step, when you copy it for Find/Change. That way, the style itself is part of the formatting, and all the instances InDesign inserts will carry it, making them easy to adjust later on by editing their object style. (None of this is required, though, for the tip to work.)
Next, select the formatted inline object, copy it to the clipboard (Edit > Copy), and open the Find/Change dialog box.
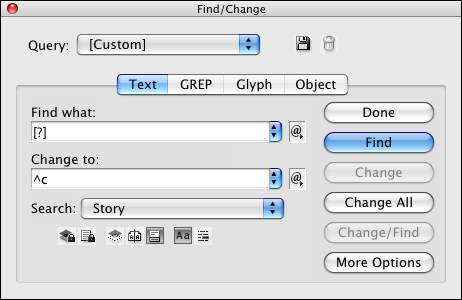
In the Find What field, enter the code that stands for the graphic, and anything else you want to replace with the graphic. In this case, I included the trailing space after the code. I don’t want a space after the graphic.
In the Change To field, enter “^c” (without the quotes), which is Find/Change-ese for “What I’ve got in my clipboard, including its formatting.”
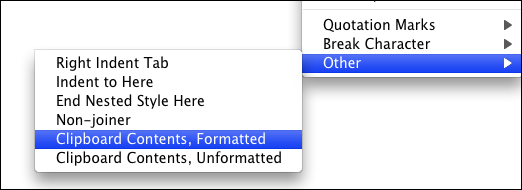
If you forget the code for clipboard contents, you can choose it from the Change To fly-out menu of special codes, in the Other category. Here’s the bottom of the menu.
Finally, as usual with Find/Change runs, start slow. First click Find, then Change, to make sure it’s working — what gets replaced is what you want. When you’re confident, click Change All.
Do the same thing with the other graphics you need to insert — copy the formatted example to the clipboard, then use Find/Change to do the tedious work for you in a couple seconds flat.
Unfortunately, the Find What field doesn’t accept clipboard contents, only Change To. Still, you can save a heckuva lot of tedious production work just with Change To! (And it’s available in Find/Change GREP, too.)
This article was last modified on December 19, 2021
This article was first published on August 28, 2008
Commenting is easier and faster when you're logged in!
Recommended for you

InDesign Magazine Issue 106: Hidden Color Tools
We’re happy to announce that InDesign Magazine Issue 106 (February 2018) is...

Why Drop Shadows Don’t Rotate and Scale
When you rotate an object that has a drop shadow (or an other kind of directiona...

This Week in InDesign Articles, Number 22
Some great early-February articles and videos about InDesign. Don't miss 'em!


