

Adobe Digital Publishing Suite automatically generates a Table of Contents entry for each article you create. However, to generate the thumbnail image for the TOC entry, it simply shrinks a square region of the upper-left corner of the first screen of the article, not necessary an attractive option. You can override this by creating a 70 pixel x 70 pixel png or jpeg image, selecting the article in the Folio Builder panel, and choosing Article Properties from the Folio Builder panel menu.

A small section of a DPS table of contents with custom thumbnail images.
If you have a folio with many articles, creating these images in Photoshop or Illustrator can get pretty tedious, especially when the basic elements of content that you probably want in the image are right in front of you in your InDesign layout. Here’s how to create these small images right in InDesign.
1. Select the pieces of content that you wish to include in the thumbnail image, and copy them to the clipboard.
2. Create a new InDesign file. Choose the Digital Publishing intent (if you are using CS6 or CC), and create a custom page size of 70px by 70px.

Fill in the New Document dialog box as shown. Note that the Page Size is a tiny 70 px by 70 px.
3. Paste the content onto the new page. The objects will paste in very large in relation to the tiny page size, so you will need to scale the objects down.
4. Arrange the objects on the 70px page as desired.
5. Choose File > Export, and choose either JPEG or PNG for the file format. (PNG export requires CS6 or newer.) Fill in the dialog box as shown below. Be sure to choose 72 for the resolution. This will cause an image that is precisely 70px by 70px to be exported.
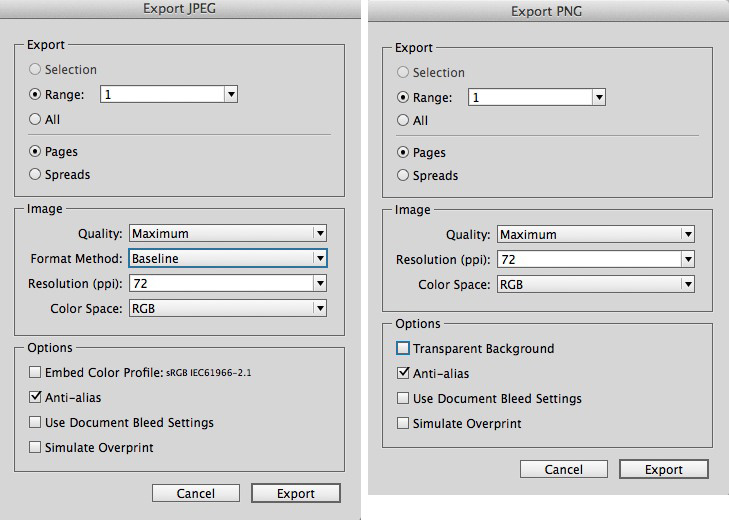
This is how you should fill the Export dialog boxes for JPEG export (left) or PNG export (right).
When should you use JPEG and when should you use PNG? If you want an image to have a transparent background, in other words if you want the regions of the page that don’t contain objects to be transparent, then you need to choose PNG and select the Transparent Background option. PNG images with a transparent background provide a way to add interest to a TOC with non-square icons. See this blog post for more info.
But if you don’t care about a transparent background, then you can use either JPEG or PNG. InDesign uses a different anti-aliasing algorithm for JPEG vs. PNG, so you will sometimes get visibly different results with one versus the other. I haven’t been able to determine what causes it, but sometimes the PNG output is slightly more jagged than the JPEG output. For best results, you might want to export both formats and compare the results.

Exported PNG thumbnail (left) and JPEG thumbnail (right) enlarged 200% to show detail.

Exported PNG thumbnail (left) and JPEG thumbnail (right) enlarged 200% to show detail.
If you do this frequently, you might be interested in a script I wrote that automates this process with just a couple of clicks. See the new “Digital publishing pack 2” set of scripts.
This article was last modified on December 30, 2021
This article was first published on February 2, 2014
Commenting is easier and faster when you're logged in!

Recommended for you

TIFF vs PSD vs EPS vs PDF vs…
What file format should you use when using InDesign? Which ones to avoid?

Using Animated GIFs in InDesign
You can place animated GIFs in your InDesign document. How you get them to work...

This Week in InDesign Articles, Number 57
Some articles, some tips, some videos... a smorgasbord of InDesign info!