


Curves Ahead
Now that we’ve measured this image’s original values for highlights and shadows (155R 163G 164B and 7R 5G 4B, respectively) and have chosen aimpoints of 245R 245G 245B for the highlights and 10R 10G 10B for the shadows, we can use the Curves command to remap the original values to the desired aimpoints. Open the Curves dialog box (Cmd-M on the Mac or Ctrl-M on Windows); then select the red channel, either from the Channel pull-down menu at top or from the keyboard (Ctrl-1 in Windows or Cmd-1 on the Mac).
Click the shadow point in the bottom left corner, which starts with Input and Output values of 0. In this case, the shadow value measured in the red channel (and shown in Sampler #2) is 7, and the aimpoint is 10, so enter 7 in the Input field and 10 in the Output field. This has the effect of changing all pixels with a brightness of 7 to a brightness of 10 and remapping the brightness of all other pixels proportionally.
Next, click the highlight point in the top right corner, which starts with Input and Output values of 255. The measured highlight value in the red channel was 155 (as shown in Sampler #1); it needs to be remapped to the highlight aimpoint of 245, so enter 231 in the Input field and 245 in the output field. The result is a straight curve that leaves the image too dark and fails to add enough contrast in the important three-quarter tone and shadow areas.
A better solution is to move the shadow point only part way to the left and to drag the curve up in the midtones to produce the desired highlight value. This has the added benefit of increasing contrast in the image’s darker areas.
With the red channel corrected, proceed to the green channel, either from the pull-down Channel menu or the keyboard (Cmd-2 on Mac or Ctrl-2 on Windows). Click the shadow point at the bottom left and drag it to remap an Input value of 5 (the original shadow value) to an Output value of 10 (the aimpoint). Similarly, click the highlight point at the top right and remap an Input value of 163 to an Output value of 245.
Now move to the blue channel, remapping an Input shadow value of 4 to an Output value of 10, and remapping a highlight value of 164 to 245. Click OK to see the result (Figure 4-25), which is distinctly brighter than the original, with greatly improved contrast and color balance.
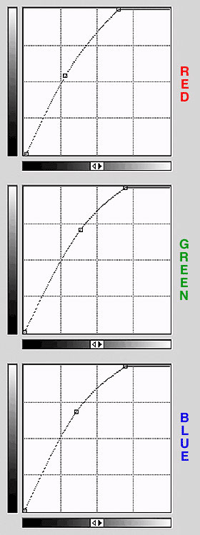
Figure 3: After adjusting the highlight and shadow in the red channel, remap the highlight from 231 to 245 and the shadow from 0 to 10 (top). Similarly, remap the highlight in the green channel from 231 to 245 and its shadow from 1 to 10 (middle), and remap the highlight in the blue channel from 201 to 245 and its shadow from 0 to 10 (bottom). The results are shown below.

To further improve detail in the key areas of interest, you may want to apply an adjustment layer with a second curve that isolates the three-quarter tones and slightly increases brightness in this area (see figure 4).
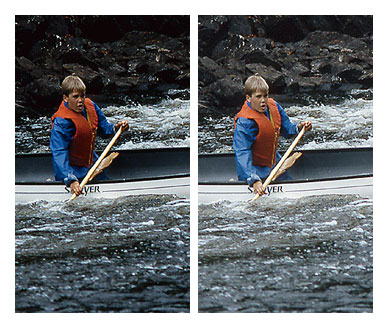
Figure 4: One of the main advantages of applying curves on an adjustment layer is that you can later fine-tune the correction without degrading quality by forcing Photoshop to remap the image’s tonal values again. The first curve has brought the image’s tonal values much closer to the required highlight and shadow aimpoints (top). A second curve further tweaks the three-quarter tones, bringing out additional detail (bottom).
Peachpit Press is offering this book at a discount to creativepro.com readers. Follow this link.
This article was last modified on January 3, 2023
This article was first published on November 6, 2002
Commenting is easier and faster when you're logged in!

Recommended for you

Designing A Logo for Every Size & Usage
Designing a typographic logo, or word mark, isn’t as simple as coming up with on...
How to Create Kaleidoscopic Patterns in Photoshop
If you’ve been using Photoshop for a while, you’ve probably realised by now you...

Google Slashes Prices on the Nik Collection
Last fall, Google announced that it had acquired Nik Software, makers of the pop...