
Enhancing Illustrator with Astute Graphics Plug-ins
This powerful suite of tools will amp up your Illustrator capabilities.


This article appears in Issue 9 of CreativePro Magazine.
It’s hard to believe but Adobe Illustrator has been around for over 30 years! And while most of us who use it daily recognize it as the most capable vector art program in existence, we also acknowledge its shortcomings. Every Illustrator pro has a laundry list of wishes and complaints about the functions we yearn for it to do better (and functions that simply don’t exist).
Fortunately, we can often use third-party plug-ins to fill in the gaps and add missing functionality. In this article, I’ll show what you can do with the massive suite of plug-ins produced by Astute Graphics, where I worked for four years as Training and Community Manager. But don’t worry, I promise this isn’t a sales pitch. Yes, I have the inside information, but now I’m a paying customer—and a very satisfied one.
How Do You Measure a Plug-in’s Worth?
For me, software plug-ins have to fulfill four criteria in order to become essential to my work—and worth the investment. They must enhance existing features, add new practical functionality, and open up new creative avenues. And finally, they must save me time! More than anything, increased efficiency is what pays back the cost of the plug-ins.
Astute Graphics’ plug-ins tick all four boxes, but they’re not the only add-ons I employ. I also use extensions and scripts and other third-party plug-ins, such as Fontself, Logo Package, and products from Nimbling, to supplement my Illustrator use. All are valuable tools that save me time and make me more creative. If you want to explore the wider world of Illustrator plug-ins, check out this page at the Adobe website, as well as rj-graffix, and this one on the Astute Graphics site (the folks at Astute aren’t afraid to shine a light on great solutions by other developers).
The full suite of 21 Astute Graphics plug-ins comes as a single annual subscription. While I understand the “subscription fatigue” some folks are feeling these days, I am a fan of this model. I don’t mind paying monthly or yearly for software that is constantly developed and deployed. Long gone are the days of waiting 18 months for the next upgrade.
The Astute suite offers a full year of complete access to every plug-in (including updates), plus resources like brushes, textures, and graphic styles for a flat $139. A 60% discount for students is available, and four plug-ins—MirrorMe, DirectPrefs, AstuteBuddy, and Autosaviour—are completely free.
Also, while the Astute suite is promoted as “21 plug-ins,” in reality we are talking about 32 individual tool panels as well as the additional tools available only in the Illustrator Toolbar (Figure 1).

Figure 1. Installing the full suite of Astute Graphics plug-ins adds many new tools to the Toolbar and panels in the Window menu.
For example, VectorScribe isn’t a standalone tool. It’s actually a collection of four separate tools—Dynamic Corners, Dynamic Shapes, Dynamic Measure, and PathScribe—each with its own panel (Figure 2).
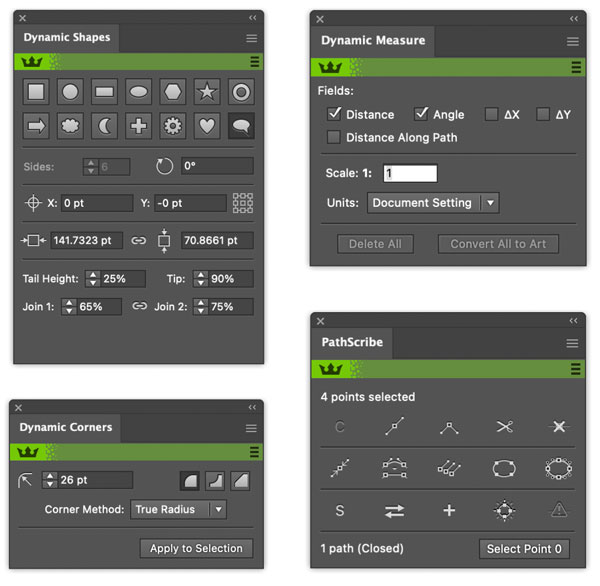
Figure 2. The four component panels of VectorScribe
It’s not much of an exaggeration to say Illustrator feels like a different program with the full Astute suite installed. So, yes, that means there’s a lot to learn—but that’s a good thing! It takes a while to get a handle (pun intended) on things, but once you’re up and running with all the new tools, you’ll wonder how you lived without them.
To address this learning curve, Astute Graphics offers extensive video tutorial support for the plug-ins, plus an intuitive installation manager. You can install all the tools or any subset. To avoid being instantly overwhelmed, I recommend installing five to ten of the plug-ins first, starting with the ones you think you’ll find most useful right off the bat, along with some of the bonus resources (Figure 3).

Figure 3. The Astute Manager is your one-stop shop for installing plug-ins and extra goodies.
The Astute Graphics plug-ins vary widely in terms of complexity: Some are very basic, others require a deep understanding of working with vectors, so be advised.
Tip: I recommend creating a workspace for your plug-ins setup (Window > Workspace > New Workspace). That way, you can choose to make them available or to hide them all easily to go back to the regular Illustrator interface you’re used to. You can also quickly uninstall any of the plug-ins via the Astute Manager, for a more permanent method of decluttering.
My Favorite Astute Graphics Plug-ins
OK, now that we’ve got the lay of the land, let’s dig into my favorite plug-ins in the Astute Graphics suite.
Autosaviour
One of the first tools I set up after installing the Astute suite is Autosaviour (aka “the lifesaver”). Yes, Illustrator now offers the native ability to automatically save documents locally or in the cloud (in File Handling preferences), but Autosaviour takes things even further, with custom settings for each document, a visible timer, and the ability to store up to 999 versions of a document anywhere, with custom file naming conventions that you define. And if you’re the kind of person who prefers to do things yourself, you can just have it remind you to save manually. With Autosaviour, you can stop worrying about saving your work and focus on doing it (Figure 4).

Figure 4. The Autosaviour panel shows the time since a document was last saved and gives you quick access to customize its settings for autosaves and backups.
Astute Buddy panel
Another useful addition for nearly every Astute Graphics plug-in is the Astute Buddy panel, which lists the keyboard shortcuts for each tool, so you can memorize them and do things even faster and easier.
The panel automatically detects the tool you’re using and displays the shortcuts for that tool (Figure 5). If only Illustrator had its own version of this!

Figure 5. Astute Buddy panel showing the available keyboard shortcuts when using MirrorMe plug-in
ColliderScribe
ColliderScribe vastly improves how Illustrator handles the alignment, selection, and snapping of items to each other. It adds four tools to the Selection tool group—the Super Marquee tool, the Snap to Collisions tool, the Rotate at Collision tool, and the Rotate to Collision tool, along with the Space Fill panel.
The Super Marquee tool provides incredibly powerful ways to make easy and complex selections, including selection randomization (Figure 6).
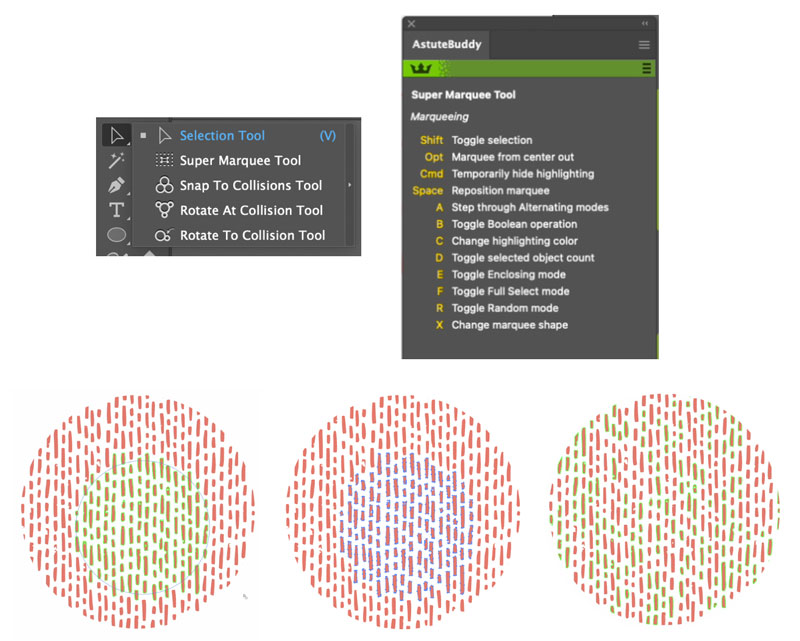
Figure 6. The Super Marquee tool offers a dizzying array of options for making selections (as noted in the Astute Buddy panel), including random selections, elliptical or rectangular marquee shapes, and the ability to select only objects fully enclosed by the marquee.
The Collision tools offer features like snapping two shapes together at any point, with a visual annotation to denote the success of the action; rotating items along a path at designated spacing; or even placing shapes at a specified distance from each other.
The super handy Space Fill panel fills shapes with other shapes, giving you control over randomizing the new objects. Space Fill’s shapes are live (nondestructive), so you can experiment with your settings without destroying your original object.
InkFlow
If you enjoy drawing in Illustrator, especially creating lettering or simple sketches, you’ll have a lot of fun with Inkflow. It offers four preset pen types: ballpoint, brush, calligraphic, and marker (Figure 7-8). Each comes with its own controllable and realistic ink simulation capabilities, including pressure, tilt, and bearing controls. It’s the perfect tool for using with a tablet from Xencelabs or Wacom.

Figure 7. You can create a unique hand-lettered effect by tracing over text with InkFlow.
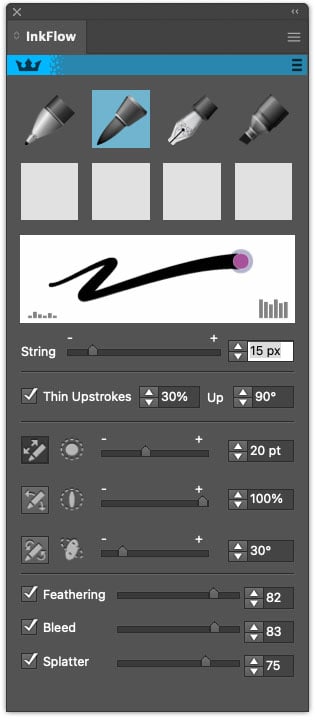
Figure 8. The settings in Inkflow’s panel let you simulate almost any kind of brush or pen look.
Once you find a group of settings you like, you can save them as a preset to use over and over again. I also love the splatter and bleed controls, which can give your work a touch of realism. If you want to try your hand at custom lettering, Ian Barnard has some free worksheets you can download at his website.
Phantasm
Phantasm was the first Astute Graphics plug-in, and the company was built off the back of it. It has several mind-blowing features.
First, the color control is something I am amazed Adobe has not built into native Illustrator. Being able to adjust hue, saturation, and lightness in your artwork and keeping that control live is incredibly useful for trying different color options in your artwork. But for me, the best tool in the entire Astute suite is the halftone engine in Phantasm. It allows you to add multiple halftone styles to your artwork, controlling every possible aspect of the halftone. You can use almost anything to make your own bespoke symbols in the halftone pattern—even a font (Figure 9)! It’s all fully editable via the Appearance panel at all times. These effects work on placed photos as well as vectors. Honestly, I could write a whole article just about how cool Phantasm is. Once you try it, you’ll realize how much you’ve needed functionality like this since you started using Illustrator.

Figure 9. Phantasm gives you unparalleled control over color and halftone effects.
Stipplism
Much like the Phantasm halftone, Stipplism can lend a realistic stipple effect to your artwork, either with simple round style stipples or using your own symbol shapes. If you want to give it a try, I have made a free sheet of dabbed pen dots from different pens that you can download here. I especially like to use this effect on lettering, in combinations with a gradient (Figure 10).
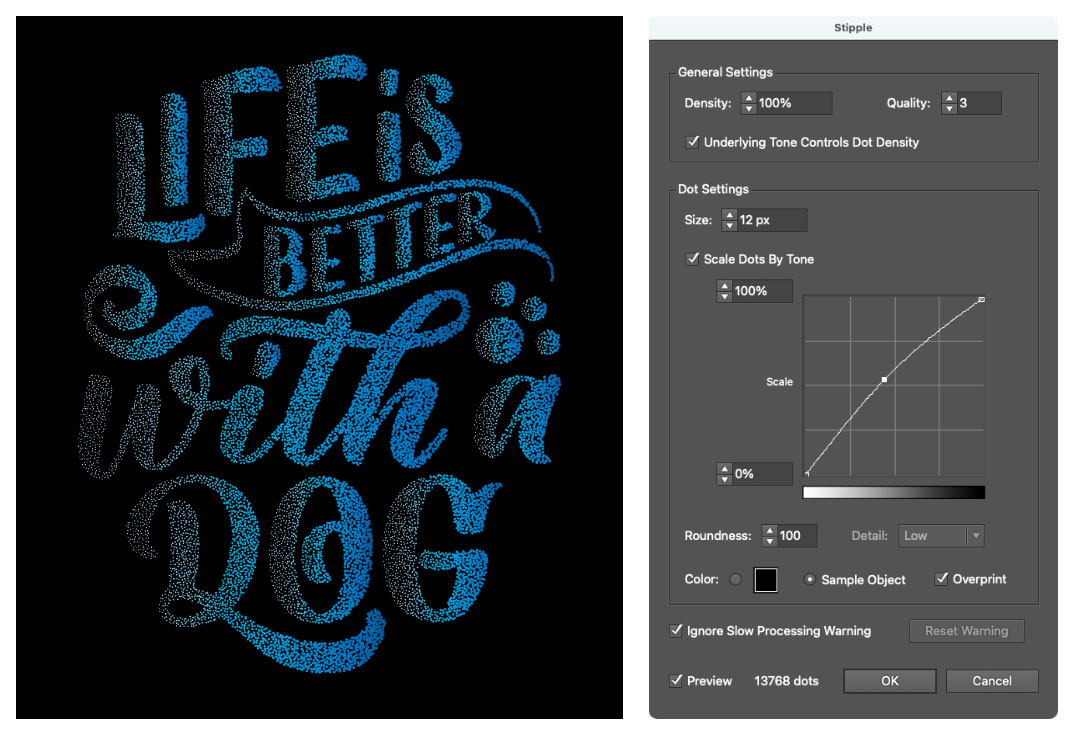
Figure 10. The size of stippling dots can be controlled by the tones in a gradient.
You could even create a fun stipple effect with, say, a skull shape by using the skull shape as the stipple style—again, all live to go back and edit via the Appearance panel (Figure 11).
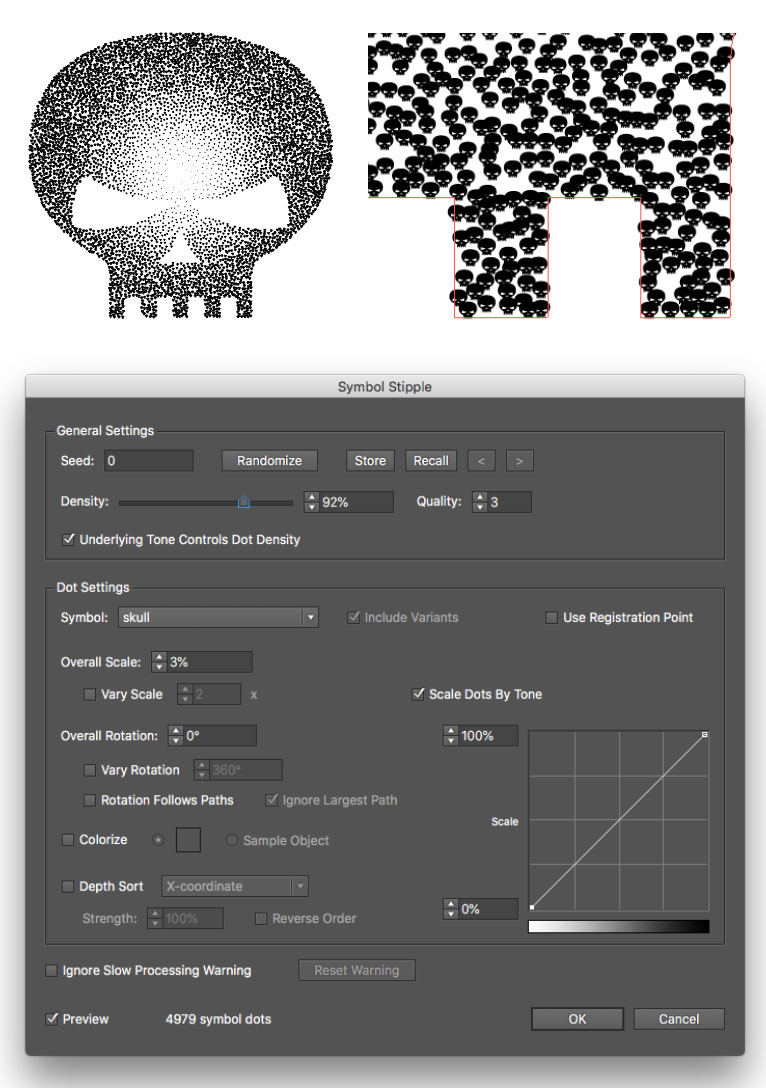
Figure 11. You can apply an infinite variety of stippling effects with Stipplism.
Stylism
Stylism comes with some awesome tool options but my favorite two are the powerful Offset tool and the Block Shadow tool. Once you realize how easy these tools make creating and editing offsets and shadows in your work, you’ll never want to use any other methods again (Figure 12).
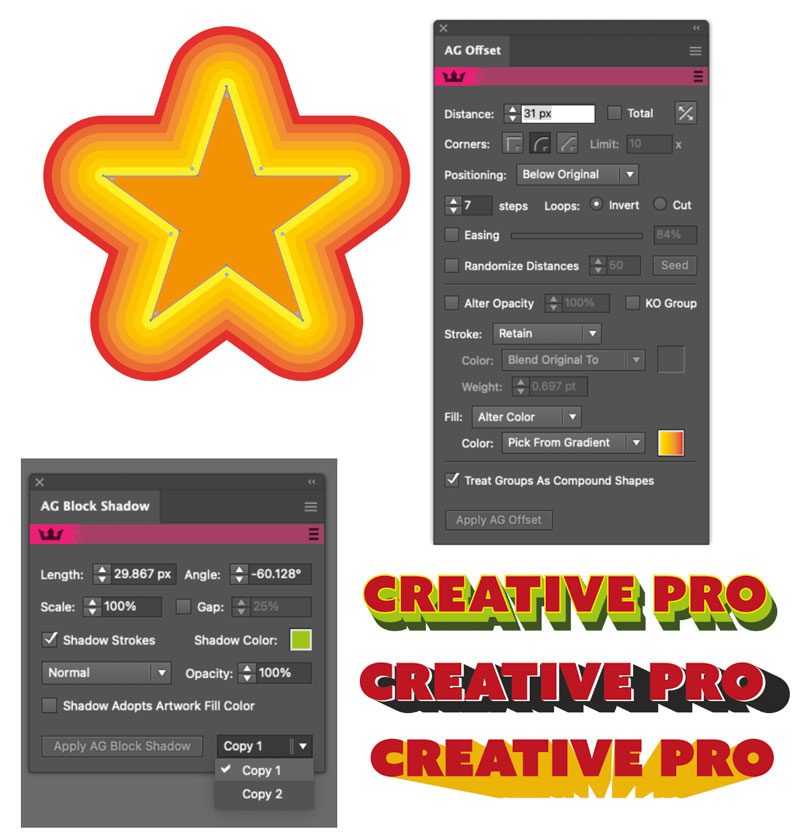
Figure 12. Create eye-catching offset and shadow effects with intuitive but powerful settings.
Texturino
Texturino is by far the best option for applying textures in Illustrator. Use the built-in Texture Manager to easily install all your texture files and label, tag, and categorize them. Searching, previewing, and applying textures is simple, and you can switch between textures easily to create different looks. I love using this effect for making realistic worn sticker effects (Figure 13).

Figure 13. Before and after applying textures to sticker graphics with Texturino
Tip: RetroSupply.co made a cool texture pack available to all Astute Graphics subscribers.
Texturino also includes the Opacity Brush, which you can use to paint more (or less) opacity in your artwork
VectorFirstAid
Okay, I know we’ve covered a lot of ground, but I hope you’re not exhausted because I saved the best for last. I cannot live without VectorFirstAid. This tool is an absolute lifesaver. For example, picture this scenario that every longtime Illustrator user has experienced: You need to edit some artwork, but the original working file isn’t available. So, the client sends you a PDF. You open it in Illustrator, and immediately feel the urge to scream. Why? Because all the text “paragraphs” are composed of many separate objects, some text has been converted to outlines, vector art is broken into pieces and riddled with unnecessary anchor points, there are unnecessary clipping masks everywhere, groups within groups within groups, on and on and on. Normally, it would take at least an hour to clean up all that mess. But what if I told you that you could fix all these problems in less than five minutes and under ten clicks? That’s what you can do with VectorFirstAid (Figure 14).
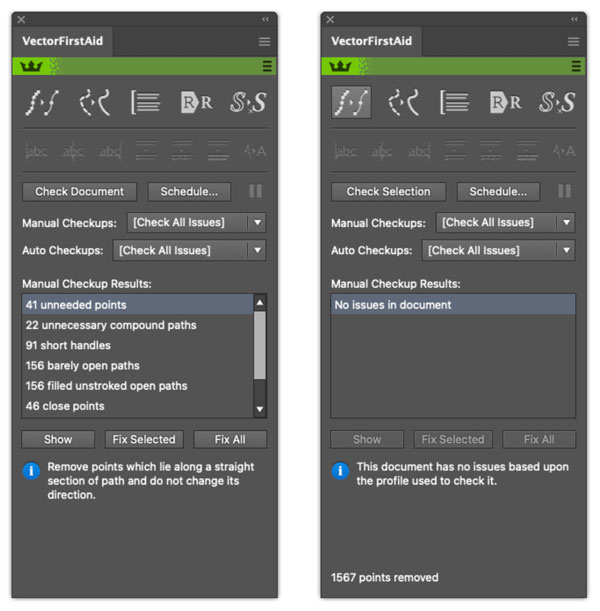
Figure 14. Before and after running all document fixes with VectorFirstAid
When it comes to converting outlined text back to live text, just be aware that this feature runs a check on your system and looks for a matching font to use based on the shapes of the outlines, so it only works if you have the font installed, it’s not true OCR. But the ability to reunite a horde of separate text objects into an editable paragraph works regardless of what fonts you have on hand, and it is nothing short of breathtaking (Figure 15).

Figure 15. Making uneditable text editable again is just one of the strengths of VectorFirstAid.
But Wait, There’s More
Now that I’ve shared my favorites, I’ll give a quick rundown of the rest of the suite.
AG Architect
With the AG Architect panel you can apply a graphic style that looks like a blueprint or technical drawing with sketch lines in a live effect. There are plenty of settings to define how and where the lines are created, including the ability to set the ends of the lines, such as tapered ends, for a more realistic result (Figure 16).

Figure 16. You can give any text or artwork a blueprint effect with AG Architect.
AG Splatter
AG Splatter enables you to apply a randomized, live splatter effect to any object or type. Like most of the Astute plug-ins, it also has a panel with very precise and adjustable settings.
DirectPrefs
DirectPrefs offers handy features for constraining angles, setting default keyboard increments, plus buttons to quickly access grids and guides, object lock status, and visibility. I use the Constrain Angle feature the most (Figure 17).
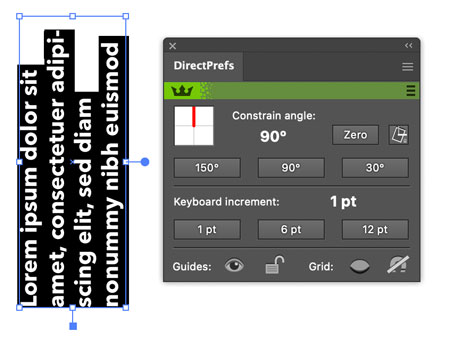
Figure 17. With DirectPrefs you can set constrain angles to draw and set type at any angle.
Vectorscribe
Vectorscribe is actually a set of four different tools.
Dynamic Shapes: This tool is so amazing, I never use Illustrator’s native shape tools. As the name implies, when you create a shape with this tool you can quickly change it to be something different, so a circle can change to a cloud, a star, a gear, and more with one click (Figure 18).
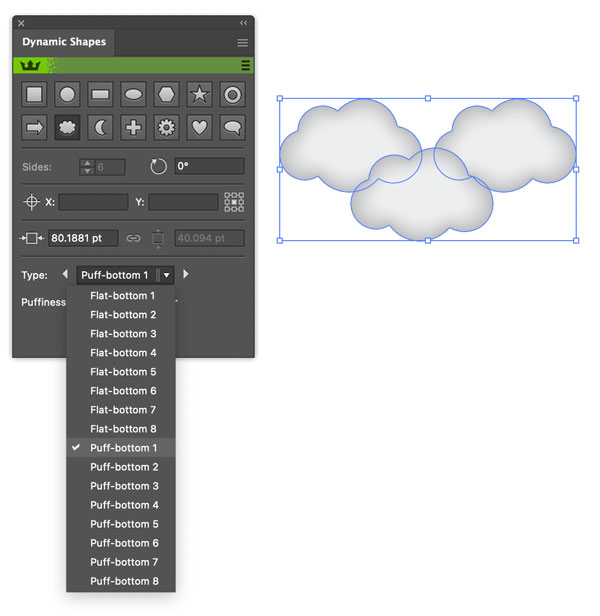
Figure 18. Dynamic Shapes lets you switch between a vast array of shapes with a single click.
Dynamic Measure: This is a handy measuring tool that you can actually embed in your artwork, showing any dimensions you set.
Dynamic Corners: This one came before Adobe added a similar feature to the program, and Astute Graphics’s version is still much more robust.
PathScribe: One of the most powerful tools in the entire Astute suite, Pathscribe gives you superpowers for manipulating paths precisely in ways that Illustrator alone simply can’t (Figure 19).

Figure 19. Most Illustrator users have never even dreamed of selecting and manipulating multiple path handles with mathematical precision, but you can do it with Pathscribe.
Dynamic Sketch
A much more intuitive drawing tool than the native options in Illustrator (especially when you use a graphics tablet), Dynamic Sketch includes flexible trim and join options and saveable presets. It also works wonderfully alongside InkFlow. Both include a string pull feature to make the job of drawing elegant curves easier for less steady-handed people!
FindReplace Art
Until you use FindReplace Art, you might not know how much you needed this tool. I think this is because it adds something you get so used to dealing with manually. But imagine you could find anything in your artwork based on combinations of attributes such as color, size, shape, text type, image resolution, grouping, and so on, and then modify them all at once or replace them with any other sampled artwork while matching the rotation, scale, and position of the original items (Figure 20). It’s also great for quickly searching artwork for items that may need to be corrected before printing, such as items that may not be at 100% opacity. You can also save these fixes for future use. It’s a very complex tool, but immensely powerful!
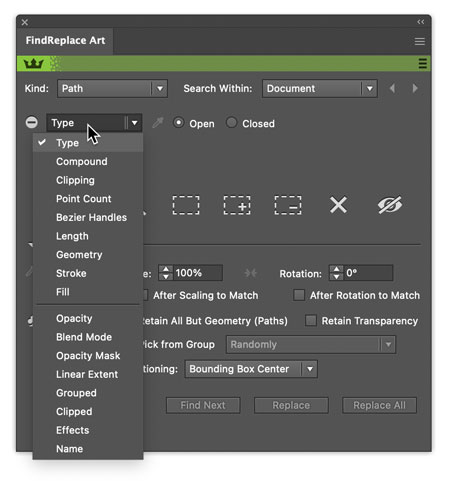
Figure 20. Just a tiny sample of the search parameters offered by FindReplace Art
InkQuest
InkQuest is a powerful color separation tool, used mostly by print service providers. It allows you to examine and output separations, view a temperature map of ink coverage in each channel, and even swap channels.
InkScribe
I call InkScribe “The Better Pen tool.” It comes with a small annotation panel and a ton of preferences that you can tweak (Figure 21). Trust me, once you start using InkScribe it will become your default pen tool.

Figure 21. Just the sheer number of InkScribe’s preferences gives you an idea of how much more flexible and powerful it is than Illustrator’s built-in Pen tool. With InkScribe, you can draw a path the way you want to.
MirrorMe
MirrorMe is the best vector mirroring tool in existence, hands down. You can work with a simple single plane to create perfectly symmetrical art or add planes for a more complex mandala style. You can apply mirroring to the current layer or to selected artwork. It’s also totally free, so you can try it at no risk and get a glimpse of the power of the Astute suite.
Perturb
Perturb was released with Reform (see below), it’s similar to the native Roughen effect in Illustrator but much more powerful, and a lot of fun to experiment with.
Randomino
Randomino is one of the newer tools in the Astute suite and offers some very creative options. It gives you the ability to quickly randomize art by attributes such as color, position, opacity, rotation, stacking, scaling, stroke weight, and more. It’s the perfect tool to use when you want to get away from a uniform style to a more natural look.
Rasterino
Rasterino is one of the older and lesser used tools, but it’s still good for image cropping and resolution control, as well as some handy image linking/embedding features.
Reform + Reprofile
One of the newest additions, Reform is a great Pen tool replacement for those who want to modify vector shapes without dealing with Bezier handles. Just intuitively click and drag the paths with a preview before applying your changes. If you hate the Pen tool, you’ll love Reform. Also added to this tool recently is Reprofile, which enables you to create and apply your own profiles to paths (Figure 22).

Figure 22. Reshape paths in all kinds of creative ways by applying profiles.
Stylism
Stylism is a standalone tool as well as the parent of Astute Graphics Block Shadow, Splatter, Offset, and Architect. The Stylism panel enables you to apply eight live effects, such as drop shadows, blurs, feathering, and glows, and modify them with precise control.
SubScribe
The SubScribe tools are found in the Toolbar, and I could write a whole article about how useful they are for creating arcs, perpendicular lines, affecting the orientation of items, and getting precise tangency between shapes (Figure 23). Another tool loved by so many great Illustrator users. Try it, and you’ll fall in love with it!

Figure 23. SubScribe’s Tangent Line tool makes creating perfect tangent lines a snap (literally).
WidthScribe
WidthScribe adds three panels: Width Gradient, Width Selector, and Width Stamp to give you total control over the widths of strokes to create cool line effects in your artwork (Figure 24).

Figure 24. The Width Gradient tool and panel allow you to quickly create complex stroke width effects that would be tedious or impossible to achieve with Illustrator’s native Width Brush.
Final Thoughts
I hope by now it’s clear that the Astute Graphics plug-ins offer a lot of power, value, and fun for the cost of a subscription. You certainly get your money’s worth, but they can be overwhelming at first, even if you’re an experienced Illustrator user. There’s just a lot to take in and get used to. Even with the Astute Buddy panel on hand to help, it takes a while to learn the tools and integrate them into your workflow. The seven-day trial isn’t really enough time to do that, but you can test drive the handful of plug-ins you think you’ll use the most. And remember, you get to keep four of them for free even if you decide not to subscribe. So, the next time you’re frustrated by Illustrator’s limitations, remember that you can get an incredible boost in capability and creativity with Astute Graphics plug-ins.
Commenting is easier and faster when you're logged in!

Recommended for you

QuarkXPress Server 9 Enables Hosted Services
Press Release Quark announced QuarkXPress Server 9, the new version of Quark’s h...

Force Text Reflow When InDesign Forgets to Flow the Text
What to do when InDesign stops flowing text automatically from one frame to anot...
Working with Grids in InDesign
Greater confidence in your design, a more efficient workflow—really, why wouldn'...