


This InDesign tip was sent to Tip of the Week email subscribers on October 4, 2018.

Sign up now and every week you’ll get a new tip, keyboard shortcut, and roundups of new articles, plus exclusive deals sent right to your Inbox!
Just scroll down to the bottom of this page, enter your email address, and click Go! We’ll take care of the rest. Now, on with the tip!
You can make some very interesting effects by putting type on a curved path. But it can be pretty hard to get that type perfectly centered on the curve if you try the usual method of dragging the brackets at the center or ends of the type. Instead, try this method:
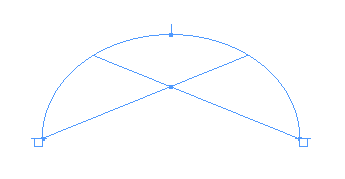
1. Draw an ellipse that has the curve you want the type to sit on.

2. Click anywhere on the ellipse with the Type on a Path tool.
3. Use the Direct Selection tool to select just the bottom anchor point of the ellipse.

4. Press Delete to remove that anchor point. Now you have an open, curved path instead of an ellipse.
5. Use the Paragraph controls in the Control panel to center align the text on the curve.
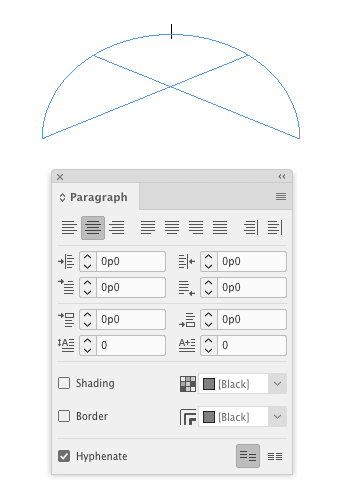
6. Then and add the text.
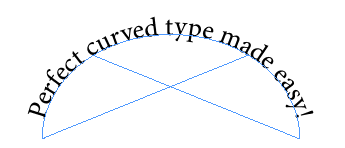
Also, be sure to adjust the kerning as needed to get the best-looking type.
This article was last modified on July 25, 2019
This article was first published on October 9, 2018
Commenting is easier and faster when you're logged in!

Recommended for you

Tip of the Week: Spring-Loaded Shortcuts
This little trick lets you switch tools in InDesign without missing a beat.
Tip of the Week: Make the Pasteboard Taller
Sign up for the InDesign tip of the week to get a new tip, roundups of new artic...

CreativePro Tip of the Week: Creating Dotted Lines in Photoshop
This CreativePro Tip of the Week on creating dotted lines in Photoshop was sent...