This article appears in
Issue 30 of InDesign Magazine.
Tables of Contents (TOCs) appear in many different types of print documents: books, manuals, technical documentation, magazines, catalogs, you name it. But formatting this common navigational element correctly can be challenging. In this article, I’ll explain how to format many common types of TOC layouts. Even if you don’t routinely create TOCs, stick with me. You’ll learn some handy techniques for working with tabs, indents, special characters and more. Most of these techniques apply to all versions of InDesign, except where noted.
Creating a TOC
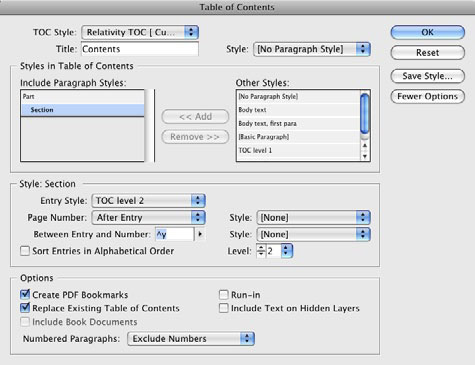
This article is concerned chiefly with how to format a TOC. But let’s first look briefly at the three ways to create a TOC. The easiest way to create a TOC for a long, structured document is to use InDesign’s automatic Table of Contents feature. Basically, you create your document and assign unique paragraph styles to the paragraphs that you want to include in the TOC. Next, you choose Layout > Table of Contents to tell InDesign which Paragraph Styles to include in the TOC (Figure 1). When you click the OK button, InDesign combs through your document, locating each paragraph that’s assigned the paragraph style(s) you’ve chosen to include in the TOC. Then, it puts the text of each of those paragraphs, along with the corresponding page numbers, into a loaded text cursor. Then you place this text on an empty page or text frame and format it as you wish. A TOC built in this manner will not auto-update when your text or page numbers change. But you can choose Layout > Update Table of Contents any time to accomplish this. For
much more detail on InDesign’s auto-TOC, see page 28 of the December 2006/January 2007 issue (#15). InDesign has an alternative way to create a semi-automatic TOC using cross-references. In a nutshell, you create your document and assign a paragraph style to the paragraphs that you want to include in the TOC. Next, create a new text frame for your TOC, and click inside the frame with the Type Tool. Then display InDesign’s Cross-References panel (Window > Type & Tables > Cross-References) and use this panel to add a cross-reference for each paragraph you want to include in your TOC (Figure 2).
Figure 2: To create a semi-automatic TOC, use the Cross References panel.
Once you’ve built your TOC in this way, you can update it at any time by choosing Update Cross Reference from the Cross-References panel menu. This method of building a TOC requires more work to create than the first method, but there are three benefits: First, cross-references provide more flexibility for which entries appear in the TOC and which are left out. Second, you can include only partial paragraph text in the TOC, or even different text in the TOC than appears on the page. And third, it lets you update just selected TOC entries when the document changes, instead of having to update the entire TOC at once, as the automatic TOC feature requires. For simple projects or those where the TOC entries are very different than the text they reference, you may want to create a TOC by simply typing in text and page numbers. No matter which method you use to create your TOC, this article will be your guide to how to format that TOC’s text.
Formatting a Simple TOC
Each line of a “classic” TOC contains the entry text, followed by a tab character, followed by the page number, followed by a return. A TOC may have multiple levels (Figure 3).
Figure 3: The anatomy of a simple TOC entry.
By default, the Table of Contents command separates the paragraph text from the page number with a tab. If you stay with the tab, position the tab stop where you want the tab character to line up by selecting the TOC text and choosing Type > Tabs. Click on the Right-Justified tab stop (the third arrow from the left), and then click in the white area above the ruler where you want the tab stop to be placed. This is where the right edge of your page numbers will line up. If you don’t place it exactly where you want it the first time, just drag the arrow you placed to the left or right until it is positioned correctly (Figure 4).
Figure 4: A right-justified tab stop
Dot leaders often guide the reader’s eye from the TOC entry to the corresponding page number. To create a dot leader, select the tab stop you just created in the Tabs ruler, and then enter a period (or any characters you wish) in the Leader field in the Tabs panel. If using a single period makes the dots too close together, try a period followed by a space (Figure 5).
Figure 5: Enter a period or a period-space to create a “dot leader”.
Once you have at least one line of your table of contents formatted to your satisfaction, either create a new Paragraph Style to make it easy to reapply this formatting to other TOC entries, or update the formatting of any paragraph styles that InDesign may have automatically applied to your TOC entries. To create a new paragraph style, position your text cursor inside one of your fully formatted TOC entries and choose New Paragraph Style from the Paragraph Styles panel menu. Give the style a name, such as TOC Level 1, and click the OK button. To update the formatting of an existing paragraph style that’s applied to a TOC entry, position your text cursor in one of your formatted TOC entries and choose Redefine Style from the Paragraph Styles panel menu.
Using the Right Indent Tab
Instead of using a normal tab character, consider a right indent tab. It’s the only tab character that doesn’t require a corresponding tab stop on the Tabs ruler. Instead, a right indent tab right-aligns the text following the character with the right edge of the frame or column the text is in. That means it automatically moves if you change the text frame width (Figure 6).
Figure 6: When you change the width of the frame that holds the TOC text, the right indent tab before the numerals causes the numerals to move with the frame.
If you have hidden characters displayed (Type > Show Hidden Characters), the right indent tab will look like a regular tab character with a vertical line through it (Figure 7).
Figure 7: On the left, a regular tab character. On the right, a right indent tab character, as displayed with Hidden Characters shown.
You can enter a right indent tab by pressing ShiftTab. To tell the automatic TOC feature to insert a right indent tab between the entry and the page number, type “^y” in the Table of Contents dialog box as shown in Figure 8.
Figure 8: How to insert a right indent tab character before each page number in an automatically created TOC. You may need to click the More Options button in the Table of Contents dialog box to see this information.
If you use a right indent tab and also want to have dot leaders, you have to get sneaky. A right indent tab character has no corresponding tab stop that it lines up with, so there is no tab stop to assign a dot leader to. Fortunately, InDesign will read the dot leader characters from the right-most tab stop on the Tabs ruler and use this for the right indent tab characters. (Curiously, if you use a dot leader with a right indent tab character, the tab character no longer appears when hidden characters are visible.)
Getting Fancy
There are several other tricks that make formatting a TOC easier, and many of them aren’t just for TOCs! Customizing leader character formatting. Leader characters may be more attractive if you set them smaller, farther apart, or in a different color or type style than the surrounding text. The slowest, most painful method to format leaders differently is to select the tab characters manually and change any of these attributes. It’s smarter to make a character style to apply these changes, then apply that style to the tabs. Or, if you’re using the automatic TOC feature to build your TOC, select your character style in the Style pop-up menu next to the Between Entry and Number field in the Table of Contents dialog box. (Click More Options in that dialog box if you don’t see these features.) Alternatively, use nested styles to apply a character style to the character after your TOC has been built: Apply a style of [None] “up to” the tab character, and then your chosen Character Style “through” the tab character (Figure 9).
Figure 9: Use Nested Styles to automatically format leader characters. The ^y^t entered into the Nested Styles field means “right indent tab or regular tab character”.
Indents. If you have a multi-line TOC, you’ll probably want to indent each sub-level further from the left than its parent level. The best way to do this is by assigning a left indent to each of these paragraphs. Normally, you’d want to use multiples of the same number for each indent. So the second level might be indented 2p, the next level 4p, the next 6p, etc. To make this easy and consistent, use a separate Paragraph Style for each level of the TOC, naming your paragraph styles something obvious, like TOC Level 1, TOC Level 2, etc. (Figure 10).
Figure 10: Use the Left Indent field to move the paragraph in from the left side of the page.
Last line right indent. For a TOC that has long, multiline entries, it’s a good idea to create vertical white space around the page numbers so the numbers are easier to scan quickly. Instead of typing soft returns to break the lines, use the Last Line Right Indent command. Simply give the text a right indent to push all the text away from the right edge of the frame, and then use the same amount, but negative, for the Last Line Right Indent command. Make this part of your Paragraph Style, and all of your multi-line TOC entries will be kept neatly away from the page numbers (Figure 11).
Figure 11: Use the Last Line Right Indent field to leave clear space to the left of the page numbers.
Fixed width numerals. Some fonts (such as Adobe’s Pro series of OpenType fonts) can format numbers as either tabular (fixed) or proportional width. Page numbers in a TOC often look better when they’re fixedwidth fonts so that the numerals line up vertically with each other (Figure 12).
Figure 12: On the left, proportional width numerals are used, on the right tabular width numerals are used. This setting is found in the Control panel menu > OpenType.
Keep with next for different levels. You rarely want to allow a page or column break to appear within a single long TOC entry. To prevent this from happening, select the entire TOC and choose Keep Options from the Control Panel menu. Complete the dialog box as shown in Figure 13. You can also specify this option in your Paragraph Styles.
Figure 13: Use Keep Options to prevent a TOC entry from breaking between two columns or pages.
Using auto-numbering to add chapter or section numbers. If you have a long TOC and want to add a chapter or section number before each entry, use InDesign’s automatic Numbered List feature (in CS3 and later). For example, this would let you automatically apply the text string “Chapter 1:” before the name of the first chapter; “Chapter 2:” before the second chapter name; and so on. To do this, select your Table of contents entries and choose Bullets and Numbering in the Control panel menu. Fill in the dialog box as shown in Figure 14.
Figure 14: Use the Bullets and Numbering feature to automatically add a chapter or section number before each TOC entry.
Alphabetic TOC. In certain cases-perhaps for a TOC that’s more like an index to your content— you may want to alphabetize TOC entries. If you’re using the automatic TOC feature, simply check the “Sort entries in Alphabetical Order” option in the Table of Contents dialog box. If you created a TOC manually, use the SortParagraphs script located in the Samples folder in your Scripts panel (Window > Automation > Scripts). Graphics in TOC entries. Perhaps you want to include a small graphic before each TOC entry, or you’d like to have a colored “thumb tab” on the right edge of the page next to each TOC entry. To be sure the graphics or tabs move with the entry should the text reflow, make them anchored objects. Begin by creating and sizing the graphic somewhere to the side of the page. Then, with the Selection tool active, cut the graphic (Edit > Cut). Next, choose the Type tool, click at the beginning of the paragraph, and choose Edit > Paste. Finally, select the graphic, and choose Object > Anchored Object > Options and fill in the dialog box similar to Figure 15.
Figure 15: Use the Anchored Graphic feature to “anchor” a graphic to a location within a paragraph, so that when the text moves, the graphic moves with the text.
But what if you have 150 paragraphs? This manual technique would be terrible. Here’s a trick: First apply an object style to the object. After cutting the object to the clipboard, open the find/change dialog box and choose the GREP tab. Dial in the formatting with the Find Format field (for example, specify the TOC1 para style). Type ^(.) in the Find what field, and type ~C$1 in the Change to field. Click Change All and ID inserts the clipboard contents (the anchored object) at the beginning of each paragraph. It’s easy to adjust the position of all the objects by changing the object style definition.
We’re happy to announce that InDesign Magazine Issue 65 (September, 2014) i...
×By signing in, you agree to our Terms of Use and acknowledge our Privacy Notice.
Manage your privacy
This site uses cookies, but not the kind you eat. We use cookies to remember log in details, provide secure log in, improve site functionality, and deliver personalized content. By continuing to browse the site, you accept cookies.
Functional
Always active
The technical storage or access is strictly necessary for the legitimate purpose of enabling the use of a specific service explicitly requested by the subscriber or user, or for the sole purpose of carrying out the transmission of a communication over an electronic communications network.
Preferences
The technical storage or access is necessary for the legitimate purpose of storing preferences that are not requested by the subscriber or user.
Statistics
The technical storage or access that is used exclusively for statistical purposes.The technical storage or access that is used exclusively for anonymous statistical purposes. Without a subpoena, voluntary compliance on the part of your Internet Service Provider, or additional records from a third party, information stored or retrieved for this purpose alone cannot usually be used to identify you.
Marketing
The technical storage or access is required to create user profiles to send advertising, or to track the user on a website or across several websites for similar marketing purposes.
We use technologies like cookies to store and/or access device information. We do this to improve browsing experience and to show (non-) personalized ads. Consenting to these technologies will allow us to process data such as browsing behavior or unique IDs on this site. Not consenting or withdrawing consent, may adversely affect certain features and functions.
Functional
Always active
The technical storage or access is strictly necessary for the legitimate purpose of enabling the use of a specific service explicitly requested by the subscriber or user, or for the sole purpose of carrying out the transmission of a communication over an electronic communications network.
Preferences
The technical storage or access is necessary for the legitimate purpose of storing preferences that are not requested by the subscriber or user.
Statistics
The technical storage or access that is used exclusively for statistical purposes.The technical storage or access that is used exclusively for anonymous statistical purposes. Without a subpoena, voluntary compliance on the part of your Internet Service Provider, or additional records from a third party, information stored or retrieved for this purpose alone cannot usually be used to identify you.
Marketing
The technical storage or access is required to create user profiles to send advertising, or to track the user on a website or across several websites for similar marketing purposes.


 When you click the OK button, InDesign combs through your document, locating each paragraph that’s assigned the paragraph style(s) you’ve chosen to include in the TOC. Then, it puts the text of each of those paragraphs, along with the corresponding page numbers, into a loaded text cursor. Then you place this text on an empty page or text frame and format it as you wish. A TOC built in this manner will not auto-update when your text or page numbers change. But you can choose Layout > Update Table of Contents any time to accomplish this. For