
Digital Photography How-To: Making Web Galleries with iPhoto
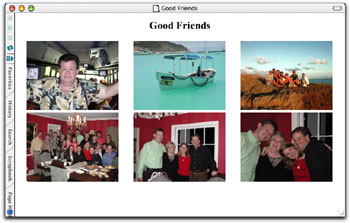
Though iPhoto is a truly groundbreaking application on the surface, it lacks some sophisticated features that more avid digital photographers are looking for. There’s no better example of this than the creation of a Web album using the program’s Export command. Granted, the application makes it easy to create a generic Web photo gallery, as shown in the example on the top in figure 1, but when was the last time you wanted to settle for something that’s generic?
Fortunately, there’s a simple solution for the boring HTML export feature integrated into iPhoto. Just export your images into a program called Image Rodeo and build professional photo galleries like the one shown on the bottom in figure 1. In this article, we’ll show you how you can go from basic to advanced photo galleries with just a few extra clicks of the mouse — all with a single shareware application.

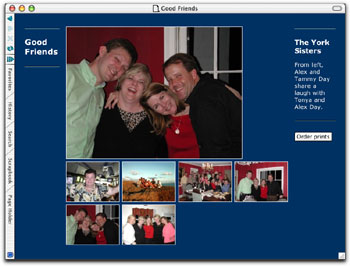 Figure 1: Though the photos are the same, the gallery made with Image Rodeo (bottom) is far more sophisticated than the one produced with iPhoto alone (top).
Improving your Look
Since you’re posting your photos to the Web, you certainly want to put your best foot forward. To do so, you’ll first need to download the Image Rodeo utility. Once you get the application in place, you’ll open iPhoto, round up a selection of photos, and drag them into the Image Rodeo. We’ll then review the settings available within the application and explain how to create the very best Web gallery possible. We’ll also highlight how easy it is to set up photo galleries so viewers can instantly order photos from the Shutterfly photo service.
Going from Ho-Hum to Wow!
To begin creating sophisticated-looking Web photo galleries, you’ll first need to download Image Rodeo from www.imagerodeo.com. The program is shareware, so you can test it out as long as you like to make sure the program will suit your needs. (Then, be sure to send in the $30 shareware fee to help support future versions.) Once you’ve downloaded the program, unStuffIt and drag it into your Applications folder. Then launch both Image Rodeo and iPhoto.
The interface of Image Rodeo is quite simple — just a place to display the photos in a particular album, a preview area for the images, and a field each for you to enter a title and caption for the photo. Don’t let its seemingly simplistic interface fool you. The utility can do some very cool things to regular photos. And since Image Rodeo was designed exclusively for Macintosh OS X, it supports unlimited undo, spell checking in every edit box, and AppleScript to make your work even easier.
To get a feel for the hidden power in Image Rodeo, select an iPhoto album and then select all the photos in the main preview area and drag them into the image list section of Image Rodeo. One cool thing about the program is that it doesn’t copy the photos when you do this — it only copies the paths for the images. Thumbnails of the images along with the filenames will then appear in the list section. Clicking any of these thumbnail listings will display that image in the main preview window. At that point, you can then change the titles for each of the images as well as add a caption to them, as shown in figure 2. You can also change the name of the album by simply selecting it and renaming it in the Title field.
Note: Unfortunately, titles and comments you’ve added in iPhoto don’t import into Image Rodeo.)

Figure 2: A descriptive title is much better than the filename assigned to the picture by the camera.
Once you’ve added all the titles and captions to your collection of photos (assuming you’ve decided to have the titles and captions displayed in the galleries) you’re ready to begin creating the Web album. To do so, first choose Web Site > Template Settings to display the sheet from which you can choose the template to use, as well as the attributes for the thumbnails and photos, as shown in figure 3. You’ll also notice an option labeled Prints that contains a pop-up menu and a Max Size field; we’ll explain that option in a moment.

Figure 3: You can quickly configure the template of your choice to accommodate photos of varied sizes.
Getting Everything Just Right
As you select the various templates available within Image Rodeo, a preview will appear in the window in the upper-right corner of the sheet. That way you get a feel for how each gallery will look when it’s complete. The size and number of columns for your thumbnails will largely depend on the template you choose. And when setting the photo size, remember that larger photos will take up more room on the Web server. In our example in figure 3, you’ll notice that the Show Titles option is deactivated in both the Thumbnails and Photos section. That’s because the template currently selected doesn’t work well with titles. If you’re unsure of the sizes and number of columns you need, just leave them alone or click the Defaults button to reset the values.
The Prints section is another feature of Image Rodeo that makes it especially cool. This option allows you to include a button on the individual image pages that allows the viewer to order the print from the Shutterfly photo service. As you can see from figure 4, Image Rodeo lets you set the maximum format the viewer can order. For instance, if you choose the Maximum 8×10 option, Image Rodeo will include a file in the Web gallery folder large enough to print an 8 x 10 image with Shutterfly. That is, of course, if the resolution of the original image is large enough. If it isn’t, Shutterfly will calculate the optimal size of the print and inform the viewer when they’re ordering it. So, with this feature you can not only share your photo gallery with a viewer, but also allow them to get high-quality copies of the images with ease. That means people won’t have to bug you to make them copies of the prints they like! The only drawback is that you’ll have to include the larger print files on your Web server as well as the display and thumbnail images for your Web pages.
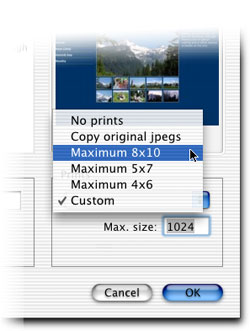
Figure 4: Image Rodeo lets you determine the size of print that the viewer will be able to order through Shutterfly.
Once you’re satisfied with the Template Settings sheet, click the OK button and then choose Web Site > Build Settings to display the sheet shown in figure 5. Here you tell Image Rodeo where you’d like to move the HTML and image files as well as how to handle the naming of the files. And you’ll also notice the warning after the Delete Extra Files option — heed it. Otherwise you may accidentally delete photos that you wanted to keep. After setting the default location for the photo gallery files, click the OK button to return to the main window.

Figure 5: You can define where Image Rodeo saves the files so they’re readily accessible.
After you’ve selected the template to use and configured the pages as well as their destination, you’re ready to create your photo album. To do so, simply choose Web Site > Build Web Site or press [command]B. Image Rodeo will update the photos, create the HTML pages, and then begin building the thumbnail, display, and print images for each photo. The whole process is surprisingly fast if you consider how much work is actually being done to create the album.
When the utility has completed building the page, you can then launch your Internet browser and load the first index page to see how the photo gallery came out. Or you can stay in Image Rodeo and choose Web Site > View Web Site (or press [command]J). The program will then open the files in your default browser. If all went well, your album will be perfect. However, you may want to try redoing the album using a different template if you don’t like how it appears.
If you included a print option when setting up the template, you’ll see an Order Prints button on each of the picture pages. When you click this button, the browser takes you to a Shutterfly order page, complete with details on which size print will work the best, as shown in figure 6. If you want to print other photos, you can click the Add More Pictures link to return to the previous picture page on your site. Pretty nifty!

Figure 6: If you upload high-resolution files, Shutterfly can print photos sized up to 8 x 10.
Making It Your Own
But what happens if you experiment with the available templates and you just can’t find one that works well with the look and feel of your Web site? Then design your own. Image Rodeo lets you use HTML, XML, and its built-in scripting language, IRScript, to design complex and sophisticated Web galleries with ease. Full source code for all of the built-in templates is provided to help you quickly understand the process, and full documentation is provided online.
Picture-Perfect
Although iPhoto is a revolutionary product for digital photographers, it does lack a few features you might want to use. Sure, you’d be hard-pressed to find a program that so elegantly allows you to create a hardbound book or allows you to go from a digital camera to a CD in such a short time, but iPhoto simply lacks the sophistication to create attractive, customized photo galleries. Fortunately, there are always programs like Image Rodeo to help you out. With it added to your arsenal of photo tools, you can create and manipulate galleries however you like.
This story is taken from “The Mac Authority” (Element K Journals).

Creativepro.com readers can subscribe to Element K Journals at a discount. Click here to learn more.
This article was last modified on January 3, 2023
This article was first published on January 3, 2003
Commenting is easier and faster when you're logged in!

Recommended for you

Thoughts on the Sony A6000 Mirrorless Camera
Mirrorless cameras have been both a hot topic and a subject of some debate. Duri...

Panasonic Introduces Three New FX Series LUMIX Digital Still Cameras
Panasonic today introduced the new LUMIX 7.2-megapixel DMC-FX50 and DMC-FX07 dig...

An Intimate Look at Adobe’s Branding
When I was down at Adobe a few weeks back, I wrote about the graphics used in th...