
Deneba Canvas 8: Master of Some
Cool Tools
Canvas has all the tools you expect to find in a vector-graphics application and a few you don’t. In most cases the range of tools, effects, and functions go beyond your expectations. New to the Selection tool flyout menu, but which will be familiar to Illustrator users, are: two lasso tools, Direct and Direct Edit, for selecting only a designated area or points along a curve; a Direct Edit selection for editing curves; and a Direct Group Selection tool for selecting individual objects within a group. A new Add Points filter adds a user defined number of intermediate control points, between existing control points along a curve.
In addition to parallel vector extrusion effects, the Extrude tool can be used to do simple 3D modeling and rendering. A one half pattern can be “swept” around a user-defined axis to create a lathed effect (see figure 4). The lighting controls and extrusion options are not as robust as what you might find in a dedicated 3D modeling application, but they are good enough to produce credible results. Extruded objects can be free rotated in any direction. Just drag the object and it rotates as if contained within a sphere. You can also adjust the extruded object’s height, width, and depth interactively. While you can only extrude solid-colored objects, you can apply transparency to a grayscale extrusion placed over a pattern-filled object to obtain a quasi-bump-map effect.
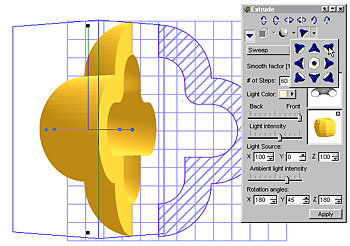
Figure 4: Canvas offers three extrusion types, Round, Parallel, and Sweep (shown here), which sweeps a shape in a user-defined number of degrees around a user-defined axis. The lighting panel offers 9 preset light sources, any of which can be fine- tuned. Extrusions can be free-rotated by dragging the object, which rotates as if suspended inside a 3D sphere.
There are loads of useful utility tools contained in the Object tools flyout (see figure 5). The interactive Concentric Circle tool creates a user-defined number of evenly spaced circles or ellipses, useful for creating nested ellipses. The Dimensioning tool measures and places arrowheads and dimensions on your drawing. Dimensions can be configured in a variety of styles and directions. The interactive Cube tool creates a 3D cube or 3D rectangle that you can drag in any direction to produce an object of any size and depth. The Easy Shape tool draws adjustable lightning bolts, thought balloons, borders, and a host of common flow-charting symbols, similar to what’s also found in CorelDRAW. The Web Button tool automatically creates JavaScript rollover buttons from images you drag-and-drop into the dialog.
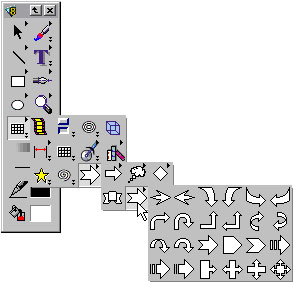
Figure 5: The Object tools flyout contains a host of useful utilities. Many nested tools have their own flyouts such as the flow-charting symbols seen here. Also contained in this menu are a JavaScript rollover Button tool, a Concentric Circles tool, a 3D Cube tool, a Horizontal Dimensioning tool, and more.
The Paintbrush tool contains a flyout menu of bitmap-editing tools including a set of mask-creation tools and a magic-wand tool. The ability to select and mask pixels is unique to Canvas and is not found in any other vector drawing application. It not only permits some image editing, but allows for mask and pixel selections to which Photoshop compatible plug-in filters can be applied. While just about every vector application today can apply some Photoshop plug-in filters to selected bitmaps, only Canvas can take advantage of those filters that require a mask or pixel selection to be made. Also included are: a Rubber Stamp tool, an Eraser tool, a Dodge and Burn tool, and a complete set of image editing tools.
Canvas has a Smart Line tool that snaps the line end to any snapping point on the target object. For example, draw a line to a square, and the Smart Line tool attempts to snap to the outside corners, the center of each side, or the center of the square. The Pen tool works as you’d expect creating straight-line segments and Bezier curves. The Freehand tool draws smooth lines with user-definable smoothness settings. The Auto Curve tool automatically curves the last segment you draw in the direction you move your mouse or stylus. The Reshape tool edits an existing path by replacing existing segments with new segments. Finally the Push tool lets you reshape a path by dragging it like a rubber band. This rubber band-like editing function is now common in most vector drawing applications. Canvas’s implementation lets you define an editing distance and the Push tool will only edit that defined portion of the path.
Any object, bitmap, vector, or text, can be made transparent using the Opacity Slider on the main tool bar. The Transparency palette lets you select from nine types of transparency, with which Photoshop users will be familiar. Going far beyond the flat transparency capabilities of Illustrator and FreeHand, Canvas offers four types of gradient transparency, which it refers to as Masks: Directional, Radial, Rectangular, and Elliptical. Each of these masks can be edited on screen with the results applied in real time.
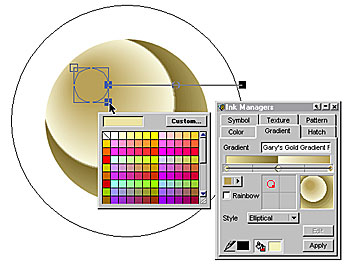
Canvas begins with a rectangle surrounding the object that defines the edit area. Depending upon the type of mask, interactive controls let you define the transparency area, direction of transparency, and the amount of transparency (see figure 6). You can add additional control nodes to create intermediate stages of transparency; so for example, a Directional (linear) transparency can go from opaque to 50 percent to opaque to 25 percent, and so on. CorelDRAW is the only other vector application that can do this. These interactive gradient transparency capabilities are similar to CorelDRAW, but go a step beyond in terms of user control. Control- or right-clicking on any of the transparency nodes, pops up a transparency slider permitting you to adjust the transparency amount at any of these points.

Figure 6: As with gradient fills, Canvas’s transparency effects can be applied interactively. The large ellipse represents the outside of the editing area while the small ellipse in the center represents the inside of the editing area. The inside ellipse can be resized to modify the edit area. Control-clicking (Mac), or right-clicking (Windows) any of the control squares, pops up a transparency slider giving full control over individual areas of transparency at the point of the cursor.
This article was last modified on March 13, 2022
This article was first published on January 22, 2002
Commenting is easier and faster when you're logged in!

Recommended for you

Scanning Around With Gene: Stuff I Miss About Photography
Return to page 1. I miss buying film in bulk and rolling my own to save money, a...

The 7 Skills Every Design Professional Needs Today
Today more designers are finding themselves having to be well rounded with diver...

The Photographer’s Guide to Copyright
PhotoShelter offers several free, informative guides for photographers on a wide...