
In my previous posting on the Live Preflight feature in InDesign CS4, I talked about some reasons why Live Preflight was an advance over the Preflight feature in previous versions of InDesign. The main reason is that it improves your productivity. The Pfeiffer Consulting study found that ?locating and fixing document errors with Live Preflight was twice as fast in our tests as compared to the preflight functionality in previous releases.?
But the key to making Live Preflight useful for your production workflow is to create your own preflight profile. The default [Basic] profile only checks for a few simple things?missing or modified graphics, missing fonts, or overset text.
To create a custom preflight profile, open the Preflight dialog (Window > Output > Preflight), and choose Define Profiles from the flyout menu.

In the Preflight Profiles dialog, you first want to add a profile. You can’t edit the [Basic] profile. Click on the + button. Give it a name (I named mine “Production”), and click Save.

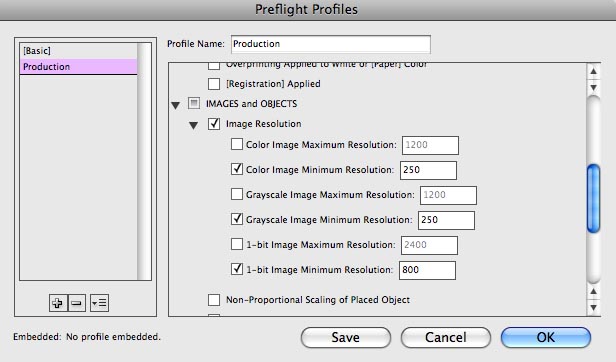
Next, you want to choose the attributes you want to check for in the profile. It will require some experience and experimentation to decide what criteria to include. For most environments, you probably want to define different profiles for the different kinds of output you do regularly. It might be tempting to make a profile with every possible option checked, but that will end up being more trouble than it’s worth. In the example below, I’ve added the ability to look for low resolution images by checking the options under Image Resolution.
After making your choices, click OK. Now, for the customized preflight profile to be active, you must select it from the list of profiles. When you do, InDesign will immediately analyze the InDesign file using the new profile.

After you create a new profile, make up some test files, and add some mistakes to them. Test these with your new profile. Then open up some of the kinds of files you normally work with, and test again. Return to your profile and refine it, adding things you forget or deleting those that aren’t necessary.
There’s one more important step in making a custom profile: You must back it up! Custom profiles are stored in InDesign’s preferences. Unless you’ve backed up your custom profile, it will be lost when you restore InDesign preferences!
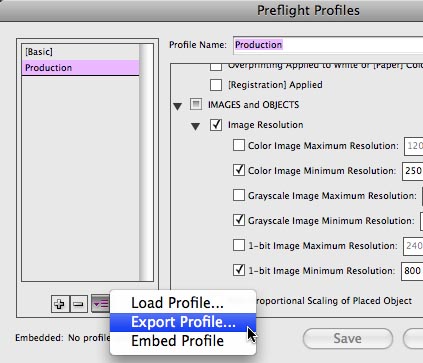
To export a profile, choose Define Profiles in the Preflight panel flyout menu. In the Preflight Profile dialog, click the menu to the right of the + and – buttons (see figure below), and choose Export Profile. The profile will be saved with an .idpp (InDesign Preflight Profile) extension.
In the third and final posting, we’ll cover some more profile tricks, including covering the very best way to get a preflight profile for your print workflow.
This article was last modified on December 19, 2021
This article was first published on April 3, 2009
Commenting is easier and faster when you're logged in!

Recommended for you
How to Export a Selection to a Precise Size
Export a PNG or JPEG of your artwork to an exact pixel dimension, and let InDesi...

Insert a Special Character with GREP Styles
David's back with yet another fun and adventurous grep styles trick.
Designing Forms with InDesign? Acrobat’s Replace Pages Feature is at Your Service.
Revising a PDF form doesn't have to mean a lot of work.