
Adjust Color and Composition
To change the color cast or value of your image, choose an Adjustment Layer from the Layers palette and make any changes you want. I chose a Levels Adjustment layer to make the colors warmer and a bit lighter. If you want to include something in your image that you don’t have in your collection of snapshots, try to fake it first to see if you really need it. To simplify my image, I wanted to eliminate some of furniture and try a rug in the foreground instead. Because I didn’t have a snapshot of a rug handy I just used patching techniques to assemble a fake rug out of different elements (see Figure 6).
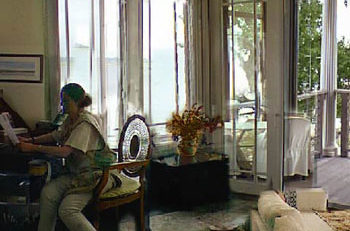
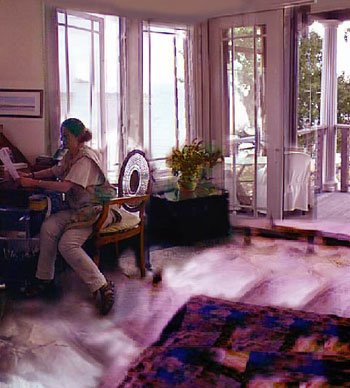 Figure 6: After applying a Levels Adjustment layer to change the color cast of the image and patching together a fake rug.
If you decide you like the composition as a stand-alone piece of art, you can experiment with ways to transform your collection of snapshots into something more cohesive. I used Save As to save a flat copy of the image in TIFF format and then applied various filters and Blending modes to the flat version to make the image appear painterly (see Figure 7).
 Figure 7: Transforming snapshots into a more painterly look.
You might find that your composition moves in directions that necessitate your taking more photos. If you do need to keep working and have to incorporate new elements, ensure you return to the multi-layered file (without the effect applied). At this point in my process, the client had chosen a different direction for her screen, but I liked the composition myself and decided to show my mom. She really loved it but had some requests.
The main change she wanted was (if we were to create a composition that she would actually hang in her home) to dress her up a bit. In addition she wanted me to substitute one of her own rugs for the fake one, and she even had some specific flower arrangements she wanted me to use. Because I had to photograph her rug and flowers anyway, I asked her to dress up in her outfit of choice. The flower arrangement wasn’t on the table she liked, so back in the multi-layered file, I composited the new elements together using Layer Masks (see Figure 8).
 Figure 8: Incorporating new photographs into the image.
Setting Up Layers
If you have a number of elements that you always move together, you should probably create a Layer Set for them. I created a Layer Set for the table and vase with flowers so I could easily move them around as a unit.
With the layers linked, choose New Set from Linked from the Layers palette pop-up menu. You can then attach a Layer Mask to the Layer Set so that the grouping can be integrated as a unit to the image below. If you need to apply a color correction to the images within a Layer Set, make sure to change the Blending mode for the Layer Set to Normal (from Pass Through). To work on some of the layers within a set, expand the Layer Set and unlink elements that you want to exclude, but remember to link them later if you need them to be a unit again (see Figure 9).
I needed to scale the table but didn’t want to stretch the vase, so I unlinked the vase while I used the Edit> Free Transform command. Then after I applied the transformation, I relinked the vase and collapsed the view of the Layer Set. My mom wasn’t happy with the pose that I’d chosen, so I went back to my collection of shots and found one similar to the original pose. I then had to go back and photograph one last time to capture details such as her floorboards, how the wall met the floor, and the side of the desk.
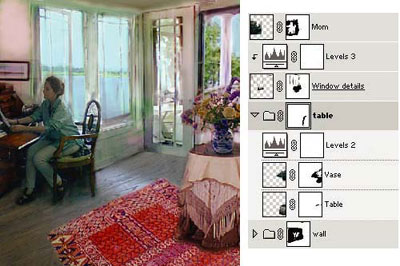 Figure 9: Using Layer Sets to move related layers as a unit and a section of the Layers palette at this stage.
If at any point you want to again transform the look of your image, save a flat copy of your image and apply the filters and such to the flat copy. I used Save As to save a flat copy as a TIFF image and then experimented with new ways to transform this image.
 Figure 10: The book Creative Thinking in Photoshop by Sharon Steuer covers how to create the final painterly effect, as well as how to apply the same effects to another updated file.
From “Creative Thinking in Photoshop: A New Approach to Digital Art,” copyright © 2002 by Sharon Steuer, published by New Riders Publishing. Used with permission of Pearson Education and New Riders Publishing.
This article was last modified on January 3, 2023
This article was first published on February 19, 2003
Commenting is easier and faster when you're logged in!

Recommended for you

3D Printing With Photoshop CC
Adobe has been building increasingly sophisticated 3D modeling tools into Photos...

Advanced Layer Blending in Photoshop
Photoshop’s Layer Modes provide several ways of enabling you to see throug...

Photoshop New Features Guide Updated
Earlier this year, I wrote about a great resource for Photoshop users, the Photo...