
Creating PDF Forms in InDesign
Save time and gain control by building and exporting PDF forms directly from InDesign


This article appears in Issue 133 of InDesign Magazine.
In a perfect world with uninterrupted internet access available everywhere, it’s not hard to imagine web-based forms completely replacing PDF forms. But we don’t live in a perfect world, and as much as I want my internet connection to always be “on,” the reality is that it’s not. So PDF forms will probably continue to be an important tool for gathering information.
There are other advantages of PDF forms, too, of course: For example, they can be saved locally and accessed like any file on your computer. Web-based forms don’t give you that ability. And where creating web-based forms can require specialized technical skills and custom code, PDF forms provide what I call “forms for the masses,” giving regular folks like you and me the ability to create and distribute forms in an easy and intuitive way.
The traditional approach to building PDF forms is first to create a PDF that provides the visual appearance of the form using an application of your choice, and then add the form fields using Adobe Acrobat. This approach accomplishes the task, but it becomes very inefficient as soon as changes need to be made—and of course you know they will! Almost any kind of edits will force you to output another PDF and rebuild all the form fields, which gets old very quickly. Also, because Acrobat is not a page layout application, it can be frustrating to create and position form fields exactly as you want them.
InDesign is the tool that most designers would use to create the visual appearance of a form, so it just makes sense to create the form fields there too. The ability to add form fields in InDesign dates way back to CS6, and over the years a few improvements have been made to make
the feature even better. Still, it’s important to remember that InDesign can’t do everything you might want related to form fields, and it’s more than likely that at least a small amount of tweaking will be required in Acrobat before your form is ready to distribute.
Here’s my workflow for building PDF forms, using InDesign and Acrobat.
Form Design Strategy
When designing a form in InDesign, you need to begin by considering how to structure your file. Most users design the look of the form, and then simply place the form fields on top of the design. This approach is effective, but if you need to make changes to the form design you’ll need to make changes to the form fields as well. You can make the file a little bit easier to work with by placing the design elements and form fields on different layers.
Or, you can be even more efficient by anchoring the form fields to specific locations in the text. This allows the form fields to move with the text as it’s edited, so you won’t need to do as much manual adjustment. Furthermore, when you apply object styles to your anchored form field frames, you can exercise global control over their attributes, including size and position.
Video: Creating Lines in Forms
Watch David Blatner show you a great way for creating write-on lines in forms in this video.
Adding Form Fields
With the visual design of your form created in InDesign, the next step will be to add the form fields. Start by drawing a frame using the tool of your choice to create the shape of the field. It can be a text, graphic, or unassigned frame, and you can make it any shape or size. Keep in mind, however, that when you export to the PDF format, the form fields will become rectangles no matter what shape you use in InDesign. The one exception to this is radio buttons, which are in fact round in the PDF, so I usually draw them with the Ellipse Frame tool. My preference is to use an unassigned frame with a fill color during the design and layout process to make the fields easier to see (Figure 1).

FIGURE 1. Drawing a frame for the form field in InDesign
Form Field Types
Available in InDesign and Acrobat:
Button: Used to trigger an action, such as showing or hiding a field or printing/submitting a form.
Check Box: Used to provide options that a user can choose from. Usually checkboxes offer the ability to select more than one of the options, such as “Which activities do you enjoy.”
Combo Box: Provides a list of potential choices in a single menu allowing the user to provide just one possible answer, such as “Home state” or “Hair color.”
List Box: Provides a list of potential choices in a single menu allowing the user to choose more than one possible answer, such as “Select all states where you’ve lived.”
Radio Button: Provides a user with several possible choices, only one of which can be selected at a time, such as “Select your age range.”
Signature Field: Provides a field for the user to sign a document using a digital signature.
Available only in Acrobat:
Image Field: Provides the user with an option to upload an image.
Date Field: Provides the user with a field to enter a date. Acrobat gives the user a pop-up calendar to make entering the date easier.
Barcode Field: Can be used to capture information from a form printed out on paper. This type of field typically requires JavaScript coding to generate the barcode.
With the frame created, it’s now time to define that frame as a form field. You can do that in the Buttons and Forms panel (Window > Interactive > Buttons and Forms). With the frame selected, choose the type of form field you’d like to create from the Type menu (Figure 2). For simple fields like one where you want someone to enter their first name, choose Text Field as the type. (See the sidebar “Form Field Types” for a list of all the types of form fields you can choose.)
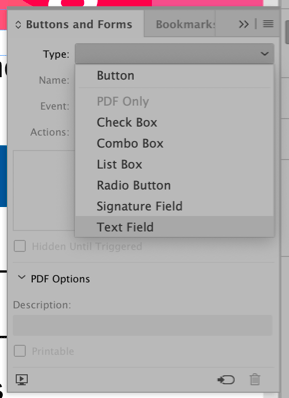
FIGURE 2. Converting a frame to a form field
Once the form field is created, you’ll notice it has a thick dashed border and an icon appears in the lower-right corner indicating what type of form field it is (Figure 3). The color of the dashed border, just like frame edges, is controlled by the color of the layer that the form field resides on.

FIGURE 3. The appearance of the field once it’s converted to a form field
Once you’ve created the form field, you should give it a name in the Buttons and Forms panel. It’s essential that each form field has a unique name, because fields with the same name are automatically populated with the same information when someone fills out the form. (This is actually a cool feature you can use to your advantage if, for example, you want someone to enter data once but have it appear multiple times in the form.)
Fortunately, InDesign automatically gives each field a unique name (something that Acrobat doesn’t do). InDesign’s default field names are generic, however, and thus not very helpful. It’s much better to take the time to give your form fields descriptive names. These will also come in handy when it comes time to set the tab order or if you need to add scripting to your forms in Acrobat.
You can also adjust other properties in the Buttons and Forms panel to control the appearance and behavior of the form field. For instance, you can choose the font and size of the text entered into the field, as well as such properties as whether the field is required and if it accepts multi-line input. Prior to CC 2019 you could not specify a font, only a font size. Note that if the person filling out the form does not have the specified font loaded on their computer, they will see a default font instead. So if you want to be 100% sure that everyone will see the fonts you specified, stick to common fonts that just about everyone has like Helvetica, Times, or Courier. Form field fonts can be changed in Adobe Acrobat by selecting the Rich Media toolset and double-clicking the field with the Select Object tool. This opens the Text Field Properties dialog box, where you can set such text properties as font, size, and color in the Appearance tab (Figure 4).
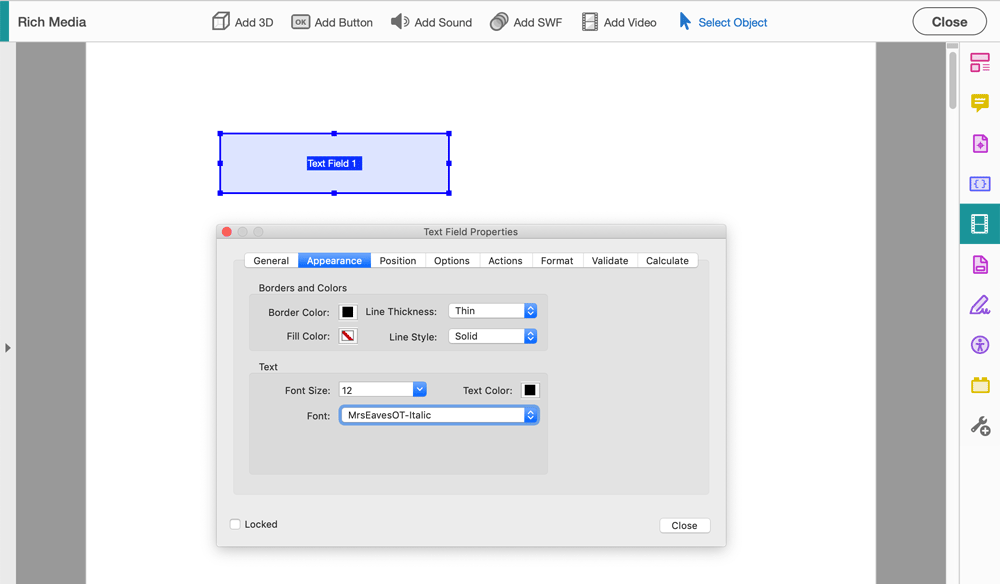
FIGURE 4. You can change the font for user input in the Text Field Properties dialog box in Adobe Acrobat.
It’s also important to fill in the Description field (Figure 5). Text entered into this field can help users fill out a form correctly by providing them with a tooltip that appears when they hover over the field. This field is also required if you intend to export your document to an accessible PDF file that can be announced by assistive software to impaired users. So don’t skip those descriptions!
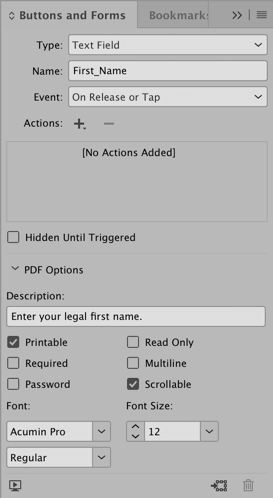
FIGURE 5. The form field properties available in the Buttons and Forms panel
Take Advantage of the Sample Buttons And Forms Library
InDesign ships with a library stuffed with pre-made buttons for checkboxes, combo boxes, and radio buttons that can speed up the production of your forms. The appearance of some of these elements is a bit dated, but they’re all easily editable. Even better, you can upgrade this library with an expanded and searchable version, as Kelly Vaughn explains in this post.
Anchoring Form Fields
As I stated earlier, at this point you could simply position the form fields as needed, possibly on a separate layer. This method works just fine, however I’d like to walk you through my method of anchoring the fields, as I think it’s worth the extra effort if there’s even a slight chance the form will ever be edited.
With a form field selected, drag the blue square in the upper-right corner of the frame to the point in the text where you would like to anchor the frame and release. An anchor icon appears where the blue square was, indicating that the frame is now anchored. I like to anchor the form fields to a consistent location in the text, ideally after the name or caption for the form field (Figure 6).

FIGURE 6. The form field anchored to the text
While holding the Alt/Option key, click the anchor icon to display the Anchored Object Options dialog box. Here you can adjust the reference point used to position the anchored object as well as the position of the object relative to different elements on the page. In Figure 7, you can see the settings that I used for positioning the form field when anchored.

FIGURE 7. Defining the options for the anchored object
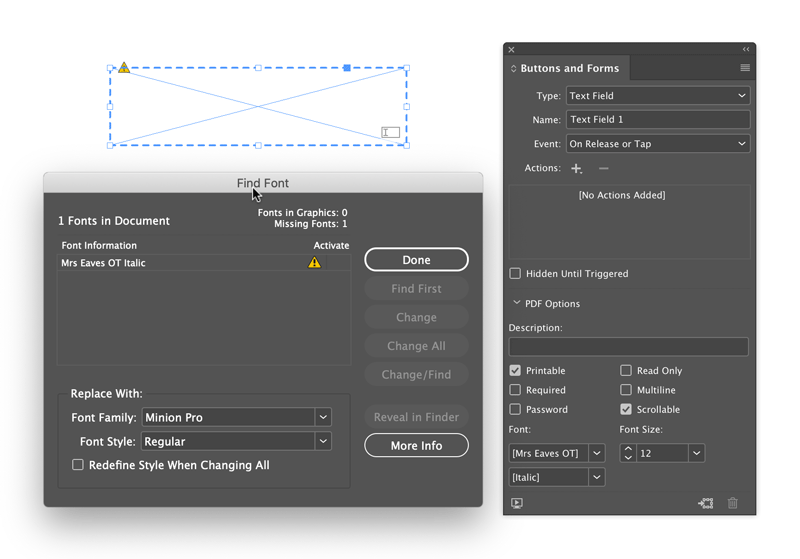
Form Tip: Choose Form Fonts Wisely
Form formatting can be a source of missing fonts in InDesign. If you specify a font for your form fields, be sure that everyone who will work on the layout file has access to it.
Object Styles for Form Fields
Regardless of which layout method you choose, you’d be hard pressed to argue against using an object style to control the appearance of those form fields. In the case of anchored form fields, object styles are most valuable as you can adjust the position and size of the fields with just a few clicks.
Open the Object Styles panel by choosing Window > Styles > Object Styles. With the form field selected, hold down the Alt/Option key while clicking the Create New Style button at the bottom of the panel. This brings up the dialog box where you can adjust your new style’s properties. Give the style an appropriate name, then adjust any other settings that you’d like to control. For form fields, I usually turn on the Size and Position Options and define the Height setting for the object. This ensures that the height of each form field will be consistent, while allowing me to adjust the width as needed. Lastly, don’t forget to turn on Apply Style to Selection, then click OK.
Now it’s time to use your object style. You can draw a frame, convert it to a form field, anchor it, then apply the object style. The order of steps is important because if you apply the object style prior to converting the frame to a form field, the object style will be removed from the object. Another limitation is that form field properties are not recorded in the object style. So you can’t apply font, font size, and so on via an object style. For this reason, I tend to apply the object style to a frame, set the form field properties, then copy and paste the field for each instance I need (Figure 8). This allows me to retain the properties for each form field. Note that you will need to clear any style overrides for pasted form objects.

FIGURE 8. The completed form in InDesign
Controlling Tab Order
Experienced users are accustomed to using the Tab key to jump to the next field when filling out both online and PDF forms. This allows them to keep their hands on the keyboard, making the process of filling out the form much smoother and faster. So as form authors, it’s our job to ensure that the tab order is defined correctly. There’s nothing more frustrating than tabbing through fields that seem to jump randomly all over the form. Fortunately, InDesign makes it easy to set that tab order prior to exporting the file.
Choose Object > Interactive > Set Tab Order to display the Tab Order dialog box. The order in which the fields appear in the Tab Order dialog box from top to bottom indicates the tab order of the fields in the form (Figure 9). Unfortunately, InDesign doesn’t give you the ability to drag these to change their order. Instead, you have to select a field, then use the Move Up or Move Down buttons to change the order. It’s a simple, albeit somewhat tedious, process that gives you control of the tab order of the fields in the exported document.
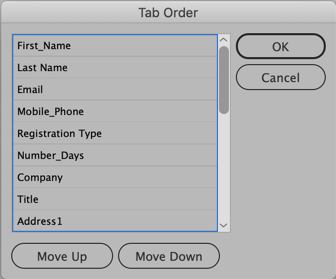
FIGURE 9. Setting the form field tab order in InDesign
Exporting to PDF
Before exporting your file, you should (of course) edit your form field object style and remove any fill and stroke color so it doesn’t carry over to the exported PDF. But the most important thing to remember when exporting your form file to PDF, is that you need to use the PDF (Interactive) option in the Export dialog box. Exporting to the PDF (Print) option will not yield a fillable PDF form.
Also, in the Export to Interactive PDF dialog box, confirm that Include All is chosen for Forms and Media. This ensures that all of your fields will be fillable in the exported PDF file. Adjust any other properties to your liking, then click Export and open the exported PDF (Figure 10). Your end result should be a completely functional, fillable PDF form.

FIGURE 10. The exported PDF file viewed in Adobe Acrobat
How to De-Form a Form
If you ever need to remove the live form objects from a PDF, you can do that with Adobe Acrobat. First, select the Rich Media toolset and choose the Select Object tool. Press Command+A/Ctrl+A to select all live form objects. Then, press Delete. Alternatively, you can right-click one of the form objects, choose Select All, and then choose Delete.

Depending on how your form was built, however, this could change its appearance. So use this technique only when the form objects were added on top of the visible page elements.
To remove form objects in InDesign, select them and click the Convert to Object button at the bottom of the Buttons and Forms panel.
Limitations and Benefits
Building your PDF form in InDesign doesn’t come without its limitations. As stated earlier, some form field types and properties are not available in InDesign. These are things like formatting for phone numbers and zip codes, text alignment, and calculations. For this reason, depending on the content of your form, you still may have some work to do in Acrobat after exporting the PDF file. Currently, this is simply the reality of the process. For information on a helpful third-party add-on, see the sidebar “Extending Forms in InDesign.”
On the upside, changes that can be time-consuming in an Acrobat-only workflow become fairly minor when you build your form in InDesign. Another big advantage for anyone producing files that need to be made accessible is that form fields in PDFs exported from InDesign are automatically tagged, while form fields created in Adobe Acrobat are not. This is a huge timesaver in the remediation process. For much more on the topic of accessible PDFs, check out my article in Issue 130.
Note that if you do have to make edits to your form objects (e.g., adding calculation fields) and then have to update the InDesign file, your work in Acrobat isn’t necessarily lost. This article explains how Acrobat’s Replace Page feature can give you the best of both worlds.
Extending Forms in InDesign
Ariel Walden from id-extras.com created a product called FormMaker that overcomes many of the limitations you’ll encounter when working with forms in InDesign. FormMaker is composed of a set of scripts that appear in InDesign’s Scripts panel as well as in Acrobat’s Edit menu. FormMaker adds the following features for creating fillable PDF forms in InDesign:
- Text formatting, including font, style, color, and alignment
- Rich text formatting, including superscript, subscript, underline, and strikethrough
- Default text in form fields
- Comb fields (these distribute the text evenly across the width of the field)
- Text field formatting to define date, phone, social security numbers, zip codes, currency values for numbers, percentages, and times
- Define validation values for fields
- Set fields to calculate values of other fields (sum, product, average, minimum, and maximum)
FormMaker is composed of two scripts. The first script, called FormMaker Assistant, provides controls similar to what you find in Acrobat for defining form properties. After defining the properties, you click the Insert Script button to add the information to the form field. The second script is simply called FormMaker and has to be executed only one time prior to exporting to the PDF format.

In Acrobat, you simply choose Edit > FormMaker to add the scripts to the PDF file, and all of the formatting defined in InDesign is applied in the PDF form.
If you like the idea of adding functionality to your forms in InDesign but you don’t need the ability to do calculations, id-extras offers another product called FormMagic that has all of the same features minus the calculation capability.
Good Form
Given the power and flexibility of InDesign, the more I can do there, the better. This rule definitely applies when creating fillable PDF forms. With the design flexibility and precision that InDesign offers, forms become easier and more intuitive to work with, even if some additional effort is required in Acrobat later on. InDesign adds some advantages to the process not found in Acrobat as well. If you haven’t leveraged InDesign’s ability to export fillable PDF forms, I highly encourage you to give it a try on your next project.
Commenting is easier and faster when you're logged in!

Recommended for you

Building a Photo Book with Object Styles
David Blatner shows how object styles can make designing layouts incredibly fast...
Data Merging Individual Records to Separate PDFs Part 2: via Scripting
In my last post, I outlined how to create individually named PDFs from a Data Me...

InDesign Magazine Issue 148: Designing for Social Media
Issue 148 has articles on designing for social media, dielines for creative fold...