
Creating an Interactive Portfolio
Sandee Cohen shows how to collect and display your best work in an interactive portfolio using InDesign and Publish Online.
This article appears in Issue 108 of InDesign Magazine.
Back in the Jurassic Age of dinosaurs, photographers or designers (aka creative pros) carried large (some over 2 feet tall) portfolios that they lugged from one client or prospective employer to another. Some of these portfolios were hard-case boxes that held the creative pro’s work on mounting boards. Others used polypropylene sheet protectors inside a binder portfolio.
Many companies required the creative pro to leave their portfolio for a week or so for the head honcho to look through. This meant that you had to have two or more portfolios so you could keep your portfolios moving around town.
Fortunately, today’s creative pros aren’t stuck back in Jurassic Park, and there are many ways to present a portfolio of work online. Some folks use services such as Adobe’s Behance. But I want to share a different method—one that not only lets you create a compelling interactive portfolio, but one you can build yourself with Adobe InDesign, and then publish using Adobe’s Publish Online service. (And it’s not hard at all!)
Types of Portfolios
There are several types of portfolios you can create with InDesign. The first is what I call a “linear” portfolio, in which each image is on its own page. This is the simplest type of document to create and display in Publish Online. You can easily create one using the ImageCatalog script that comes with InDesign. You don’t even really need to add your own navigation controls, because once it’s published, the reader uses the controls built into Publish Online to move from one display page to the next. Here’s an example of this type of portfolio.
I call the next type of portfolio “auto-run” because the reader doesn’t have to click any buttons to
navigate through the portfolio. Instead, once the reader goes to the Publish Online page, all the items automatically appear, like a self-running slideshow. You can see an example of this type of portfolio here.
The final type of portfolio is a “catalog” portfolio that combines both images and descriptions or labels for the images. It can be a single or multi-page document that displays images with custom labels. The images appear automatically on the page, and the reader navigates to other pages using the Publish Online controls. In addition, there is a “call to action” hyperlink added to the last page. You can see an example of this type of portfolio here. In this article, you’ll learn how to create all three of these.
Creating an Online Portfolio Document Preset
In our first portfolio, we’ll be using the free ImageCatalog script that comes with InDesign, which automatically places multiple images on many pages. The script uses a document preset to set the size, orientation, and margins of the page it creates. So you need to define a document preset before you run the script. And by the way, even if you’re not using this script, it’s a great idea to create document presets; they make creating new documents a breeze later.
To make a preset, choose File > Document Presets > Define (Figure 1).
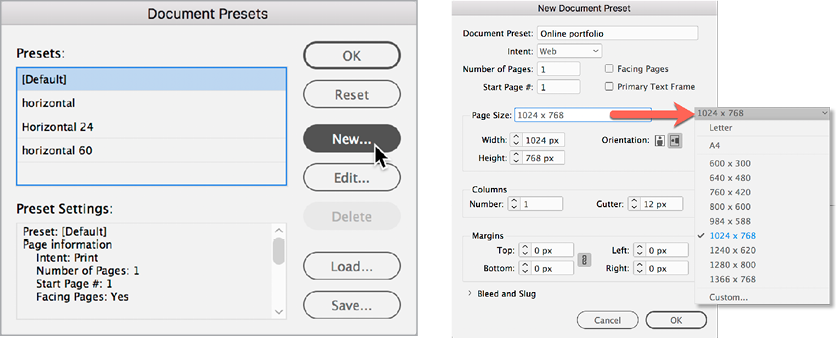
Figure 1. Use the New Document Preset dialog box to set up the portfolio document.
Click New in the Document Presets dialog box. Then fill out the settings for the New Document Preset:
- Name the preset (I chose “Online portfolio”)
- Intent: Web
- Page Size: 1024 × 768
- Orientation: Landscape
- Margins: 0 px
Click OK. The preset will appear in the Document Presets list. Choosing the preset creates a new document. You can close the document or leave it open. The script always uses the last-chosen document preset.
Creating a Linear Portfolio
Let’s start by creating a linear portfolio. Choose File > Document Presets, and then select the portfolio preset you created.
Choosing your images
Find the images you want to use, and put them in a single folder without any images you don’t want. These images will be imported and placed on the pages in alphabetical order. If you need them in a different order, you can either change the names or (later) rearrange the images in the InDesign file.
Running the script
You’re now ready to run the script. Open the Scripts panel (Window > Utilities > Scripts, Figure 2). The panel contains folders with scripts that ship with InDesign. The script you need is located in the following path: Application > Samples > JavaScript > ImageCatalog.jsx.
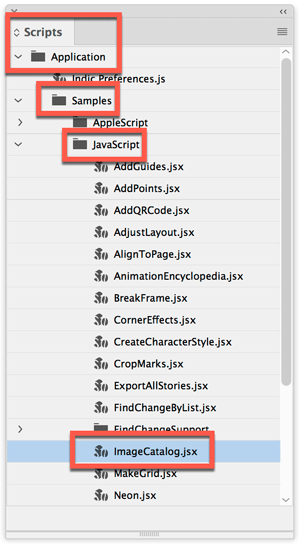
Figure 2. The JavaScript version of the ImageCatalog script in the Scripts panel.
Double-click the script. You’ll get a prompt to choose the folder that contains the images you want to display. Once you’ve chosen the folder, the Image Catalog dialog box opens (Figure 3).

Figure 3. The steps to choose a folder for the ImageCatalog script and then set the options.
Set the options as follows:
- Set the number of rows and columns to 1.
- Since you also want the images to hug the edges of the pages, set the horizontal and vertical offsets to 0 pt.
- Select Fitting > Proportional to make the images fit inside the frames without being distorted.
- Select Center Content so that the images are in the middle of the frames. However, deselect the Fitting option for Frame to Content. This will ensure that the frame stays the same size as the page and doesn’t shrink to fit the image.
- It doesn’t matter if you select the option to remove empty frames, as there won’t be any with these settings.
- Finally, deselect the option for Labels. There’s a much better way to add labels (captions) to the images. We’ll cover that later in this article.
- Click OK. The dialog box closes, and the script creates a new InDesign document and places each image on its own page.
Filling frames
As you scroll through the pages, you may see whitespace at the top and bottom or sides of the images (Figure 4). This is because the script centers each image inside its frame but doesn’t crop it. This scales the images so they fit exactly inside the frame. In my example, the images fill the frames horizontally but there’s whitespace at the top and bottom of the image.
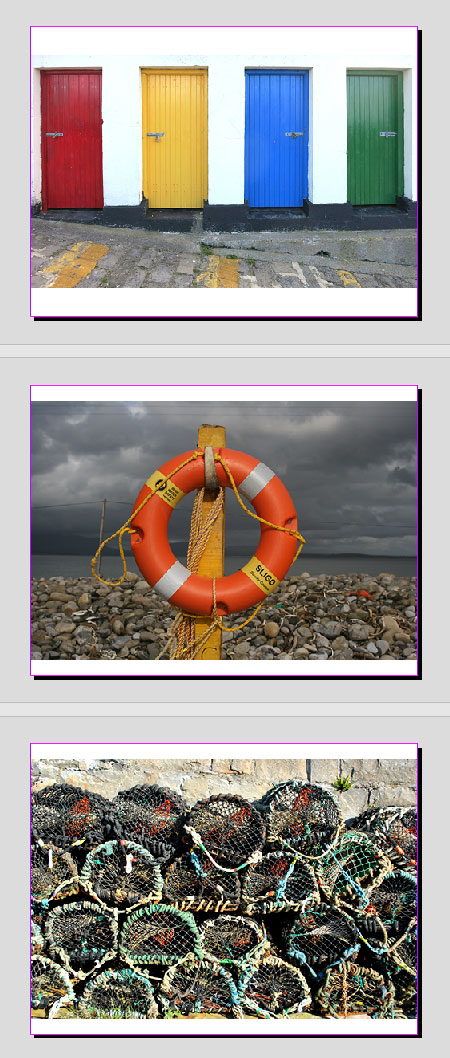
Figure 4. Images placed on pages may not fill the page, leaving white space vertically or horizontally.
If you want to always see the entire image and don’t mind the whitespace, you don’t have to make any adjustments. However, I like my images to appear with no whitespace. Fortunately, InDesign has a command (Object > Fitting > Fill Frame Proportionally) that expands the image to display the way I like it.
If you have only a few pages in the document, you can simply scroll through the document and apply the command to pages one at a time. If you’ve got more than a few pages, you’ll want to do it automatically, using object styles. Here’s a simple trick that can quickly fix the entire document. Open the Object Styles panel (Window > Styles > Object Styles, Figure 5).
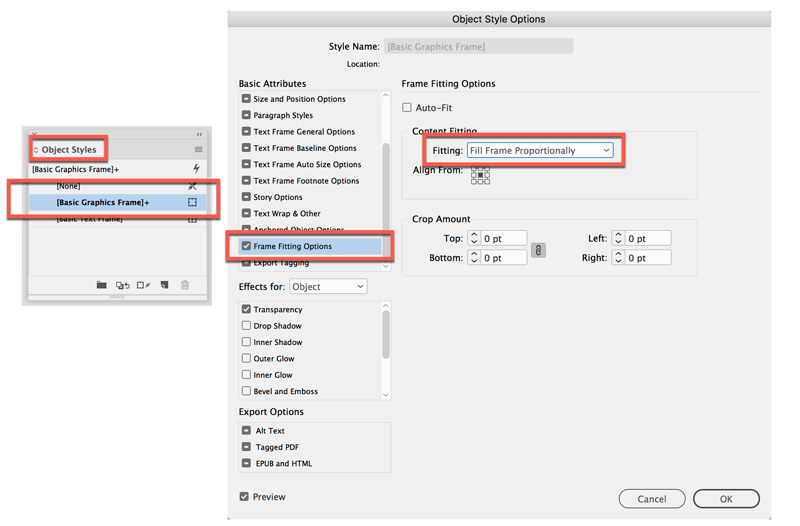
Figure 5. Set up an object style with Frame Fitting Options to automatically resize all the images to fit the page.
We need to redefine the settings for the Basic Graphics Frame. (Note that, ordinarily, placed images are not tagged with the Basic Graphics Frame object style, but we’re in luck, because the script applies this object style for us!) Double-click on that style to edit it. On the left of the Object Style Options dialog box, you’ll see all the options that the style can control. Click Frame Fitting Options to see all the controls for how images fit inside a frame.
There’s only one item you need to choose. In the Frame Fitting Options area, choose Fill Frame Proportionally from the Content Fitting menu. Click OK. The images will be cropped on the sides, but will fit completely inside the frames.
Once you’ve got the images on the pages, you’re ready to upload the file to Publish Online. We’ll cover that in the last section of this article.
Creating an Auto-Run Portfolio
The previous “linear” portfolio requires the viewer to click on the navigation arrows in Publish Online (or press the arrow keys on their keyboard) to move from page to page. However, it’s fun to display items in a portfolio without the viewer having to do a thing. And controlling which images are seen also ensures that the viewer sees all the elements and doesn’t skip anything.
This next type of portfolio uses InDesign’s “gridify” feature, which places images in an orderly grid together on a page. These images are then animated so they appear on the page one at a time.
Setting the page size
Instead of running a script, use the New Document dialog box (File > New > Document) to define the page size, orientation, and so on.
Placing the images in a grid
You now need to place images on the page in a grid. The technique to do this automatically is informally called “gridify.” With your document open, choose File > Place, and navigate to the folder that contains the images you want in the grid. Use the Command (Mac) or Ctrl (Windows) keys to select the images you want to display. Click OK to load the cursor. You can also drag images from the macOS Finder or Windows Explorer onto the InDesign page to load the place cursor.
Move the loaded place cursor over the page. You’ll see a preview of the first image in the stack as well as a number that tells you how many images you have (Figure 6).

Figure 6. A loaded place cursor shows a preview of the first image as well as the number of images.
Position the cursor over the corner where you want the grid to begin. Start to drag, but don’t release the mouse button until the end of the process. At this point you will be placing only the first image in the stack. With your other hand, tap the up or right arrow keys on the keyboard. Don’t release the mouse button! A dotted line appears inside the bounding box. This line indicates that two images will be placed. If you tapped the up arrow, you created two rows. Tap the up arrow again to add additional rows. Don’t release that mouse button!
If you want columns, tap the right arrow. This increases the number of columns inside the bounding box. If you want fewer rows, tap the down arrow. For fewer columns, tap the left arrow.
In this example, I’m creating nine frames in the grid for the nine images in my folder (Figure 7).

Figure 7. As you drag using the gridify modifier keys, you see the size and arrangement of the grid.
Once you have the correct number of blocks in the grid, drag the bounding box to the corner where you want the grid to end. Finally, yes, you can now release the mouse button. The images are automatically placed on the page in a grid (Figure 8).

Figure 8. Releasing the mouse button after dragging places images inside the grid.
If you have more images than can fit in the grid, your cursor remains loaded with a new preview. Add a new page to the document, and then repeat the dragging process, using the gridify controls.
It’s very possible that you have images already on the page that you would like to arrange in a grid. But gridify only works when images are being placed into InDesign. Fortunately, David Blatner recently discovered a terrific technique that uses the Content Collector tool to arrange already-existing objects in a grid. You can read about it in Issue #107 or here.
Animate the items to fade in
Now we want the objects to appear to fade in, one at a time, when the page loads. First, switch to the Selection tool, and use the Shift key to select each object until all are selected (Figure 9).
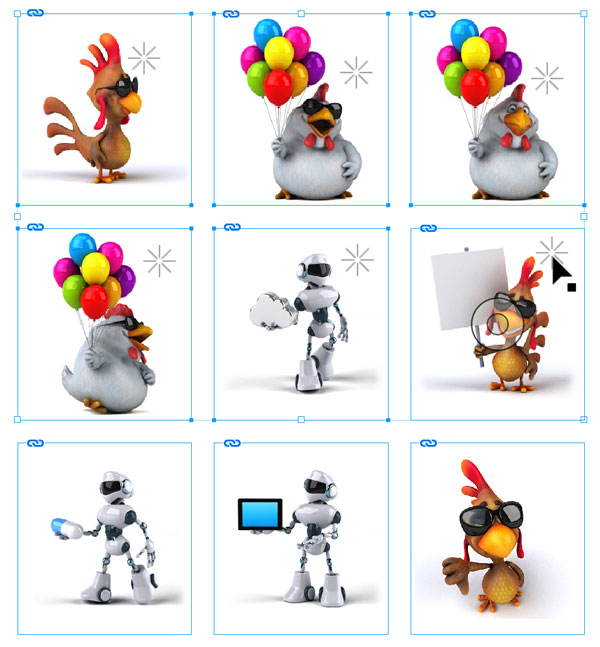
Figure 9. Click to select the images in the order that you want them to appear when animated.
Tip: The order that you select the objects is the order that they will appear.
Next, open the Animation panel (Window > Interactive > Animation). Choose Fade In from the Preset menu to apply the animation to all the items. Once you have applied the preset, the animation controls appear in the panel. I feel that the default Duration value of 1 second is too short, so I recommend changing it to 2 seconds.
To preview how the page appears, click the Preview EPUB button in the bottom left corner of the Animation panel (Figure 10). This opens the EPUB Interactivity Preview panel, and you’ll see the images fade in. (You may want to expand the panel’s size to increase the size of the preview.)
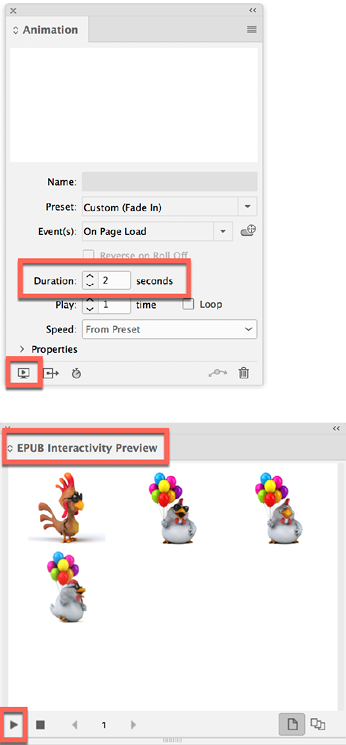
Figure 10. Click the preview button in the Animation panel to see the page in the EPUB Interactivity Preview panel.
Setting a delay to the items
Currently, each image appears immediately after the previous item. I think it would be more elegant to add a little pause, so that the viewer can appreciate an image before the next one appears. To do this, open the Timing panel (Window > Interactive > Timing). You can see a list of all the animated objects in the panel, in the order they appear. You can drag each one up and down to reorder them. Use the Shift key to select all the items except the first (Figure 11). Then set the Delay field to 1 second. This allows the viewer to enjoy one item before the next one appears.
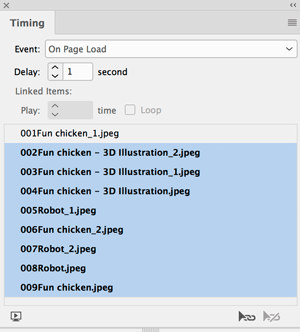
Figure 11. Select the images in the Timing panel to apply a delay before they appear.
Use the EPUB Interactivity Preview panel to view the result. If the panel is already open, you can press the panel’s Play button to view it with the new settings. Or, to replay with the old settings, hold down the Option/Alt key when you click Play.
If you’re wondering why you don’t apply a delay to the first item, it’s because that would simply delay the first item appearing on the page. You want that first item to grab your viewer’s attention as soon as the page appears.
Creating a Catalog Portfolio
My final type of portfolio combines features from the first two examples. It uses the catalog script to lay out images on multiple pages, but unlike the first portfolio, it lays out multiple images in a grid. This is similar to the gridify technique, and you can easily specify the exact size of the gutter (the space between the rows and columns).
It then uses InDesign’s captions feature to extract the metadata that contains information about the file and insert it under the image. Finally, it contains a hyperlink that allows the reader to send an email asking for more information.
Adding the Description to the Images
Every graphic contains not only a picture (like the pixels in a Photoshop image), but also metadata. The metadata for photographs can include the camera brand, settings, resolution, and so on. This is also where you can store a description of the image, such as a caption or copyright information.
You can insert a description via Photoshop, but it’s much easier and faster to do it in Adobe Bridge (Figure 12). If you don’t have Adobe Bridge in your Applications folder, open the Creative Cloud application. Select Bridge, and click install. Once you have it installed, choose Open. The Bridge dialog box appears.
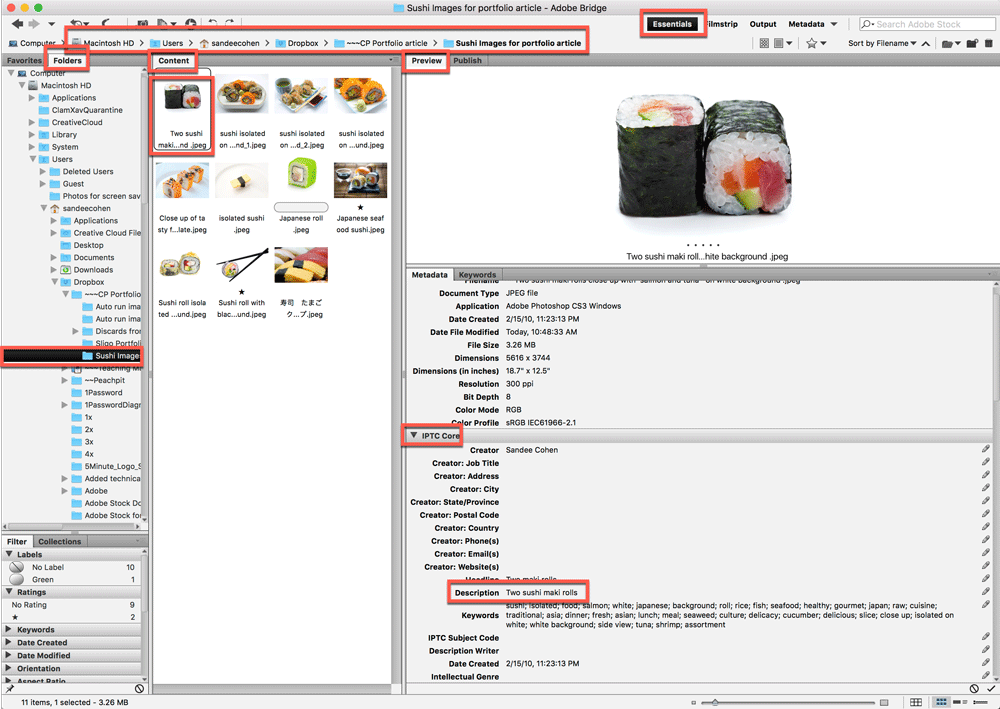
Figure 12. Use Adobe Bridge to add descriptions to the metadata of images.
Bridge’s many controls can be a little daunting. But don’t worry; to create the metadata for your images, you need only take the following steps:
- Make sure the Essentials workspace (at the top of the document window) has been chosen.
- Use the Folders panel to locate the images you want to add metadata to. This path will appear at the top of the document window.
- Use the Content panel to select each image. The Preview panel displays a larger preview of the image.
- In the Metadata panel, open the IPTC Core section. This is where you can add information for things like the creator (probably you), headline, description, keywords, and so on. These are the types of metadata that are usually inserted as captions.
- When you have all the metadata added to the images, you can close Bridge. The metadata has automatically been saved with the file.
Setting the catalog script for multi-image pages
As in the first portfolio, for the catalog portfolio you also choose a document preset for the size, orientation, and margins of the page. In this case, you may want to create a preset where the margins are set to 24 pixels, so the whitespace areas are uniform.
In the Scripts panel, double-click the ImageCatalog.jsx script. This time, set the options as follows:
- Set the number of rows and columns to how many images you want to fill the page. I set mine to 3 rows and 3 columns. But my portfolio will have only 8 images. The last block in the grid will have the hyperlink with the call to action.
- Set the Horizontal and Vertical offsets to 24 points. This will be the space between the columns and rows.
- Set the Fitting to Proportional and Center Content. Leave Frame to Content unselected.
- Deselect Remove Empty Frames. This will create a frame perfectly centered in the last cell of the grid. This is where the email hyperlink will be inserted.
- Leave the Labels section deselected. We actually do want labels under the images, but there’s a command built into InDesign that does a better job than this script.
- Run the script. If you have more images than will fit on one page, the script makes as many pages as you need.
Setting up the captions
Before you add the captions to the images in InDesign, you need to set what information you want those captions to display. Choose Object > Captions > Captions Setup. The Caption Setup dialog box opens (Figure 13).
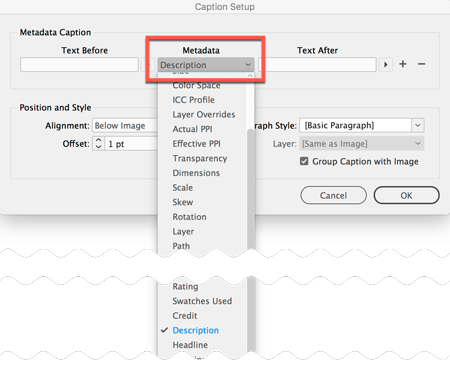
Figure 13. Use the Caption Setup to choose the metadata information that will be inserted as part of the caption.
Choose Description from the Metadata menu. The metadata you added in Bridge will be inserted into the captions. Under Position And Style, do the following:
- Set the Alignment to where you want the caption to appear. I almost always choose Below Image.
- Set the Offset to how much space you want between the image and the top of the caption text. An offset ensures the text doesn’t get lost next to the image.
- If you have a paragraph style for the captions, you can apply it here.
- Select Group Caption with Image. This is essential for setting the animations. When the image and caption are grouped, the animation will be applied to both together.
- Finally, if all your items are on a single page, select them all, and choose Object > Captions > Generate Static Caption. The captions appear as part of the image area.
If your items are on multiple pages, here’s a trick for applying captions across the whole document quickly: open the Links panel and select all the images listed (click the first, and then Shift-click the last). Then open the Links panel menu and choose Captions > Generate Static Captions.
Adding the hyperlink
If you remember, the last block of the grid didn’t have an image. But because you had deselected Remove Empty Frames, the script left a frame in that position that can hold the hyperlink. Switch to the Type tool, and click inside that frame. Choose the Center alignment in the Control panel (Figure 14) to center the text from left to right.

Figure 14. Use the text Align Center icon to center the hyperlink in the frame.
Open the Text Frame Options dialog box (Object > Text Frame Options). Choose Center from the Vertical Justification Align menu to put the text in the center of the frame from top to bottom (Figure 15).

Figure 15. Use the Vertical Justification Align menu to position the text in the vertical center of the frame.
You can then insert a hyperlink so that viewers can send you an email.
Type the address for the email, and then select the text. Click the New Hyperlink button in the Hyperlinks panel (Window > Interactive > Hyperlinks). This opens the New Hyperlink dialog box (Figure 16).

Figure 16. Click the New Hyperlink button to set the options for an Email hyperlink.
Choose Email from the Link To menu. The email you entered on the page has been added to the Destination Address field. In addition, you can insert a personalized subject line, which will help identify where the emails are coming from. Click OK. The text on the page will have the hyperlink paragraph style of underlined blue text applied (Figure 17).

Figure 17. The blue text and underline indicates that the text has a hyperlink applied.
Applying the animations
Finally, just as we did in the last portfolio, you can add the Fade In animation by selecting the items in the order you want them to appear on the page. Use the same steps as in the previous portfolio exercise to apply the animations and set the timing. (If you have more than one page, you’ll have to repeat this for each spread.)
Publishing the Portfolios using Publish Online
Once you’ve finished laying out the portfolio, you can use InDesign’s Publish Online service to create a website where your portfolio can be viewed. (I’ll cover just the basics of Publish Online here. For more information, see Diane Burns’ article in Issue #81.)
Start by clicking the Publish Online button in the Control panel (or choose File > Publish Online). This opens the Publish Your Document Online dialog box (Figure 18).
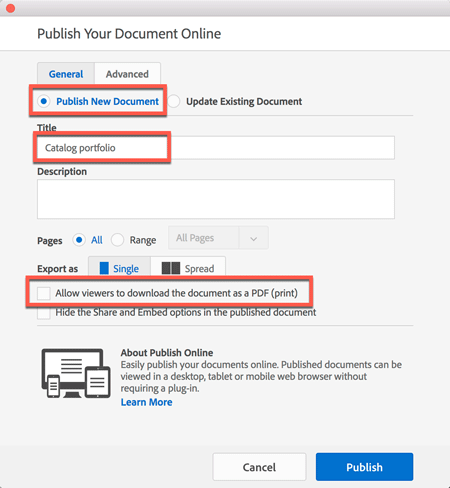
Figure 18. Click the General tab to set the General options for Publish Online.
In the General tab, select Publish New Document, and give it a title. You can also write a description. Choose which pages you want to include, and set the document for single pages or spreads.
Set the option if you want to allow viewers to download the document as a PDF. This will be a static file with no animations and very limited interactivity, but can be an important “leave behind” document.
Use the Advanced tab to add a cover page for social media. You can also set the format for imported images (Figure 19).
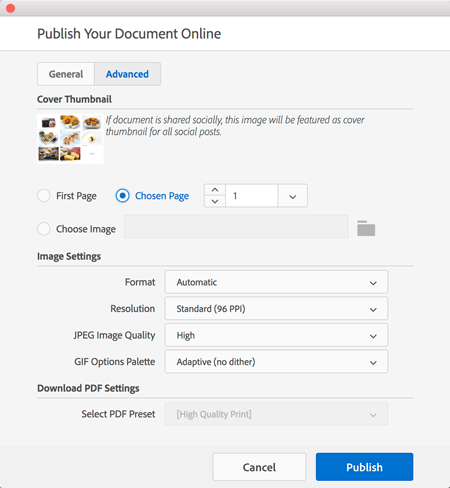
Figure 19. The Advanced options for Publish Online control the cover and image settings.
Once you have finished the settings, click Publish, and you can watch the progress of the upload (Figure 20).

Figure 20. Monitoring the upload progress.
Once the upload is complete, click the View Document button to open a browser and view the document (Figure 21).
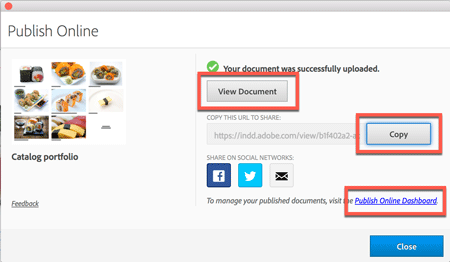
Figure 21. Use the Publish Online controls to view the published document and send it to others.
Click the Copy button to copy the link for the page that hosts your portfolio. You can insert this link into other sites. The Publish Online team has made it very easy to share your portfolio on social media by including links to Facebook and Twitter. In addition, you can click the email icon to create a new email with the portfolio link already inserted.
For Further Work
As you become more comfortable using InDesign to create custom portfolios, you can add more advanced animation presets, include interactive buttons, and even add video files to the portfolio pages.
I think you’ll agree with me that InDesign with Publish Online lets you create dramatic portfolio presentations, and that the benefits of online portfolios are one more reason we can be grateful that we’re not dinosaurs.
Commenting is easier and faster when you're logged in!

Recommended for you

InDesigner: RAND Review
Kelly McCathran looks at the design and production of the RAND Review, a publica...


InStep: Using Table Styles and Cell Styles
Grace Fussell shows how table and cell styles can help you make quick work of co...