Creating Custom Printer Marks in InDesign
M. asked: Can I customize the crop marks and registration marks that InDesign creates? I never thought you could until Olav Martin Kvern, my co-author on Real World InDesign discovered...

M. asked:
Can I customize the crop marks and registration marks that InDesign creates?
I never thought you could until Olav Martin Kvern, my co-author on Real World InDesign discovered a secret method using PMD (also known as .mrk) files. It’s obscure, it’s not necessarily for the faint of heart, but it’s not that hard and it’s very powerful.
For example, you could make an .mrk file that places the page information on the page instead of outside the trim area. This might be helpful if you were printing a Letter sized page on Letter sized paper and didn’t have room for the crop marks and page info.
Ole and I wrote up the MRK file definition in Real World InDesign, but we’ve decided to post that section here as a PDF file for everyone to enjoy.
The PDF file includes several examples, including some source code that you can download from here. For example, there’s a mrk file that makes InDesign’s printer marks look very similar to those found in QuarkXPress.
The description includes a list of customization codes and explanations for how to type them in an MRK file, including detailed illustrations such as this one:
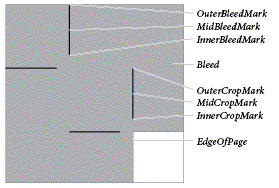
Obviously, if you like this kind of InDepth information, we hope you’ll go ahead and buy the whole book itself.
This article was last modified on December 18, 2021
This article was first published on June 28, 2007
How can I get rid of the “registration marks” from the “crop marks” script?
I don’t know how to edit the script to disable that, so I just turn off the Registration Marks checkbox when I run the script. That does it.
Are there any updates available to this thread for InDesign 2020?
I’m not finding .mrk files or the various other folders indicated.
I’m hoping Adobe has moved or rename them, but I’m willing to take the public humiliation (be nice! :-) ) if I’m just not looking in the right spot.
Mac OS Catalina
InDesign 2020
Brett, unfortunately Adobe hasn’t done much to keep this alive. But I did just update the links above… so you should be able to click the “from here” link to get the .mrk files.
By using MRK file, Is there any possibility to fix Times font instead of Helvetica in page information? Please help me.
I am Using Indesign CS6 on a windows10-machine. I can´t find the printspt-folder. Can anyone help me?
I found it under Program Files (x86)-Common files – Adobe
Hi Sam, I never did find a solution to the problem. When I tried the tag line did move to the left-hand-side of the page, and centred on the page, but the tag line ran horizontally across the job, not vertically as I’d hoped.
Is it possible to make a vertical tag line along the left-hand-side of the page?
Hi Dale,
I just read your post about having a vertical tag line along the left-hand side of the page. Did you find a solution for this as I’m trying to do the same.
Is there a way that I can change the font using this code? I was able to get it to work in InDesign, but I can’t seem to figure out a way to do anything that would change the font.
When the crop mark and page info overprint a background image, there is a thin white background around the type. Is there a way to make this white background larger? (So I can read it without my glasses!)
is there a fix for the “PAGEMARKS DEFINITION FILE ERROR”-problem under windows 7? We need the custom printer marks.
Did you find a fix for this?
After 2 hours looking for that printSpt ..
I;m using CS5 and Windows 7
It is here
C:\Program Files\Common Files\Adobe\PrintSpt
Good luck
Amit
@ Jon, mine was in “/Library/Application Support/Adobe/PrintSpt”
@ Carina, I am on CS5 as well, where did you find the .mrk file, I cannot locate on my mac, thanks
@ Paul or anyone else: How did you get the spot color names to show on a composite pdf?
So I’m running Mac OS 10.6.8 and CS5, and I am trying to manually tile a page and have the page info show up, even when I crop very close up. Is there a way to do this? I tried the .mrk file and got it to show in my Marks and Bleed settings, but I can’t get it to do anything when I tile. Any suggestions?
Still noone around who has located the printspt folder in windows7/cs5 ?
Would be very helpful!
Thanks – Frank.
where to find or put the PrintSpt folder in VISTA.
@Christian: Unfortunately, I haven’t found anyone who has found this folder in Windows 7. It has either gone away or is very well hidden. Sorry!
I am Using CS5 on a windows7-machine. I can´t find the printspt-folder. Can anyone help me?
Regards Chris
We have successfully altered our .mrk file to what we want except for spot plates across multiple pages. If we have, for example, FOIL and GLITTER as spot colours on page 1, it does put those names onto the PDF. It also puts the two spot colour names on page 2 despite there only being 4 colour process on page 2. Is there a way to only have the plate names appearing that occur on a particular page in a multi-page pdf? We are using CS3.
Many thanks
Brenda, what OS are you using?
In my OS X Leopard (with CS4), the PrintSpt folder
is still at the same location as before (HD/Library/Application Support/Adobe/PrintSpt).
We just upgraded from CS2 to CS4. We had a custom crop setup for Japanese crops in CS2. We work in InDesign, and could select these Japanese crops through the drop down menu during the export dialog sequence. Now that we’re on CS4, we need to customize the crops options again. These custom crops are .mrk files; I believe they originally went into the PrintSPT folder. I can’t find that folder on CS4.
Can you point us in the right direction? Thanks.
Brenda
Is there a way to get spot plate info to print when exporting a composite PDF?
I’ve modded the MRK file to include the plate information (how this has been overlooked in every version of InDesign to date is beyond me… grrrr!) but it will only show the spot plates when outputting separations. The spot colors are in the PDF, just not in the printed slug.
:o(
I’m trying to do the same thing as Brian. I’m using InDesign CC (2014.2 Release, 10.2.0.69) on a Mac running OS X 10.7.5.
I can get the names of the CMYK plates to output correctly, but the only text I can get to appear on spot plates is the following cryptic text, which is invisible but selectable in the outputted PDF:
(BYCMleyaalglconeKw)n))ta)
Searching for this string online seems to bring up a random sampling of websites on every conceivable topic. I would speculate that this string is the accidental byproduct of some kind of type error — a binary number being interpreted as a string, or something like that.
Ben: That is really weird! Unfortunately, I think this MRK code is really old and it’s unlikely that there is a good solution for this.
So you’re trying to export a composite PDF but include the plate information? The name of the plate? Where would it go?
Hi David. Thanks for the quick response.
Context: I do prepress and graphic design at a small printing company. Perhaps 80% of our offset print jobs use only spot colors. (For the most part, customers who come to us for CMYK jobs prefer digital printing due to cost.)
The pressmen and equipment I work with have needs that make InDesign’s default color bars and page information unsatisfactory. To reduce the risk of color mixups, our pressmen prefer for every plate I expose to include the Pantone number (or other identification) of the ink it is meant for. To verify that the ink is distributing evenly over the width of the rollers, they also require color bars that span the full width of the paper. Neither InDesign nor our RIP software are designed to create color bars of flexible width which omit unused CMYK plates. The best I have been able to get so far is a color bar of the pattern [C][M][Y][K][1][2], which results in spot color cells spaced so far apart on the page that they aren’t helpful for diagnosing ink distribution problems.
Therefore, my current workflow for adding color bars and page information to the slug is to copy and paste a premade text frame into each document just prior to plating. My custom text frame contains Text Variables to generate page information for whatever document it is placed in, followed by a large number of square frame objects assigned to various tints of a dummy color swatch (or alternating dummy color swatches, for 2+ spot jobs). I scale the width of the text frame to the width of the document, and excess color squares are omitted as overflow text. I then use Ink Manager to alias the dummy swatch(es) to the actual Pantone swatches in the document. However, I must still manually type the name of each spot plate into the text frame. That isn’t a big deal, but I would like to minimize the number of things a human being has to remember to do during our prepress process. Redoing a bad plate – or worse, a bad press run – is time-consuming and expensive.
I am aware that writing spot color names to a text frame can be accomplished with scripts, but my hope was to create a custom MRK file that would add the names of spot plates automatically as a part of the Export process.
I am also aware that InDesign is not imposition software. But given how easy it is to export PDFs with spot color names from Quark XPress, I read Adobe’s priorities as indifferent-bordering-on-hostile to the offset print side of the industry.
@Lauren: Not automatically… you’d have to create our own. The Cropmarks.jsx script (free, in the Scripts panel) can do that for you. Put them on a master page, and on their own layer so you can turn them on/off.
Is there a way to export an .indd to a PDF and include marks which indicate your live area? (I use margin guides to indicate my live area.) Essentially, the PDF will have crop, bleed and “live” marks?
Thanks!! David Blatner
@S. Venkatesan: I’m sorry, but I do not know if this is possible. The MRK file is not well documented, and many customization that people want is not supported. You may have to build your own trim and reg marks.
I like to set as custom crop mark should be white or other color. Kindly send exact code for this.
I have problem in Setting custom printer Marks. I am editing the mrk file and put in to Printspt folder, but this is enabled in Printer dialog box, but there is no any output. Kindly advise.
Regards,
Venkat
I am satisfied with the default crop marks and I only want to change the size of the page information, but can’t seem to do this without adding a variable for Crop or Bleed Marks too. I used the 11-13 example and removed the two lines associated with the crop marks, but I get a pagemarks definition error when I do this. any help?
Print your file with no printer marks. Take it over to Adobe Acrobat Pro and add the tombo marks there.
You have the option of selecting the type of marks you want.
I’ve just tried the marks file on vista with CS4 and I’m also getting the pagemarks definition error.
The lines appear in the top left corner of the page but then I get the error.
@Jim: I don’t think the crop marks are in a spot color; what makes you think that? They’re in “registration” color (all color plates). But no, I don’t think there’s any way to change the color itself.
Is there a way to change the color of the crop and bleed marks using the .mrk file?
I’m using CS3. I’m outputting an all black job and I don’t want the crop and bleed marks to be in spot color named “all” (the printing people object to it for some reason!).
@Tom and @David: I’m sorry, but I don’t have a copy of Vista to try this on right now. (I’ve secretly made the executive decision that Vista never really happened, and that all Windows users will skip from XP to Win7.) ;) I have never seen that error, so I’m not sure what could be going on. Weird.
I get this message (printed where the page info should be) when using the mrk files posted here. I am using IDCS3 in Vista.
PAGEMARKS DEFINITION FILE ERROR
Ideas?
I have a problem finding the PrintSpt folder for IDCS3 in windows Vista. Can any one help me with this? Thanks a lot….
@Robert: Check out my answer to Bartleby above.
Hi David
I like this a lot! :o)
But I have one final wish. In my company, we would like to be able to see, from which user the document was printed.
Is there any way to include initials for the user currently logged in to the system in the mrk fil. As far as I can see I can’t use InfoValues for this one, and I’m wondering how to do it then.
In the oooold days of Quark we we’re actually able to do exactly that, and I’m a bit amazed if IDCS2 can’t do it. Please help. :o)
We’re in CS2 at the moment btw.
I’ve tried it on a few different machines, and it’s always screwed up. I’m wondering if there’s something screwy in the .mrk file that is throwing the Panther a curveball, or if I don’t have the most recent drivers installed on my Panther.
Well, I got the custom marks, but now I can’t get anything to come out of the Panther even remotely correct. I have all of the page size info set the same as Quark, but my pages are coming out with just portions, and always turned 90 degrees.
That seems do have done the trick. Thanks for the quick help.
@Scott: You still need to choose your mrk file in the Type pop-up menu, in the Marks & Bleed pane. (It’s usually set to Default.) Does that help?
I use OSX, CS3. Did everything I was told to get the .mrk file into the right folder so InDesign would print registration marks like Quark to make my pressroom happy — but the film looked exactly the same. Any ideas what happened?
I tried the Quark-esque sample in IDCS3 (we recently switched and our plateroom doesn’t like the change) and got a strange echo with gibberish characters behind the plate information (Process Black) when outputting as composite gray.
When I copy-paste the string out of a resulting PDF, the text turns out to read thus:
(Process CMYBCMYBelelyaalglclconekekw))n)ta)
Which looks like it’s jumbling the plate information for all the parts of the composite.
Now, this is clearly an issue with the way Indesign’s designing the string for plate information, and the proper plate information is readable, but does anyone have any ideas on how I could clean this up?
@Bartleby: You can add the file path (and other file info) using text variables. I talk about how in this post.
Hi,
Anyone know if the is a way of putting the file path on the page information?
(Sorry if this posts twice.) In XP, the folder is in %commonprogramfiles%\Adobe, and the tip works very well. Thanks to you both.
Like Eric, I’m bursting to try this out in CS3, but I cannot for the life of me find out where to find or put the PrintSpt folder in XP.
Tim, I’m glad you like the site, but unfortunately, I don’t have a good answer for you for this edit. There’s no good documentation on this, so a lot of it comes down to trial and error.
The PrintSpt folder can be found here on a Mac – HD/Library/Application Support/Adobe.
I am editing the Quark style code to get rid of the “Platecolor” from the page information. However if I delete the format string and the info value none of the information prints. Can you help?
This is a fantastic site.
Many thanks for the .pdf excerpt and outstanding tip. I’m in CS3 and cannot find a “PrintSpt” folder. Any suggestions?
All I want to do is change the font for the page information from Times New Roman to Helvetica. Can I do that?
I’m sorry, but I don’t have any good suggestions for you. It sounds like a limitation of ID. Perhaps they’ll remove that in a future version. In the meantime, you might want to use variables and slug area to handle that data.
The name cuts off after 32 characters, with ?1 1? How to define the “PubName” length? is there any options… Kindly need your help. Thanks in advance.
David, thanks for replying. Perhaps I wasn’t clear in explaining my problem, but just in case I attempted several different bleed settings, to no effect. The name still cuts off after 32 characters, with “1 1” added at the end, presumably to indicate section and page numbers. The name never so much as crosses the center of the document, much less gets close to the right side bleed. Thanks for your help.
I managed to get the plate colors to not print on top of each other, however the pantone names do not show up, only cmyk. They do show up if I print separations, but I need to export composite pdf’s. Any help with this is appreciated.
Thank you soooo much. All I wanted to do was to control the length of the crop marks. This simple solution has alluded me for a long time.
Alan, the “cut off” is based on the bleed amount. Perhaps you just need to increase the bleed value on the right side?
Does anything allow you to alter where InDesign decides to cut off the page information on the right side? Our files have long names due to job numbers, descriptors, size info, version numbers, etc., and the name is always cut off. This makes it difficult for our AEs to keep different printouts separate from each other. With Quark we never had that problem. Thanks for your help!
MHong, yes this appears to work in CS3, too.
Is there a PrintSpt folder for CS3? We’re migrating and would like to keep our *.mrk files from CS2 to use for InDesign CS3.
Very cool, thanks. Has anyone found a way to get the CMYKTextColor parameter to work for the slug text? I tried entering ” CMYKTextColor [0 1 0 0]” for magenta, along with other variations, but no love.
Karoldev, I believe it normally does use Courier, no? There is a sample in that PDF (or at least in Real World InDesign CS2) that shows how to make a QuarkXPress style of printer marks.
Hi, This is great. I wish i’d known about this before a previous project of ours. We met a lot of issues regrading printers marks that dont match the source file. Our team got in trouble because of that simple thing. Anyhow, Is there a way to change the font of the page information? Say I want it to display courier, exactly how quark displays it?
This is very useful! Thanks so much for sharing.
I am creating a PMD according to the directions, but I wonder if there is a way to NOT define an element (color bar, for example) and have the default show. I find when printing all marks using a PMD with an undefined element, it does not print that element even if all printer’s marks are checked in the print dialog. (also, I figured I could copy from the default PMD and paste into my own, but I cannot find any default .mrk files. ) I guess my question is: how can I get a copy of the default.mrk? Thanks so much!!
Newcombe: Did you download and read the PDF? You can make your own custom mark, including changing the size and position of the page info slug. To make this the default, you need to change the default printer preset.
Hi guys
Is there a way to customize the way ID’s page information slug is formatted (6 pt, lower left corner) by default?
Thanks as always-
Skip Baker
Jumping jackrabbits, Batman, this should have been the “Obscure Feature of the Year… ear… ear…” in Episode 52. Thanks for posting the PDF. I had no idea you could do this.
:)
David (and Ole) thanks so much for making that PDF available!
But it took me for-EV-er to find the button that would let me downoad it. Could you make it a little bigger?