

I love the way InDesign lets you make cross-references, but it’s not always obvious how to use this feature to get what you want. For example, you can easily make a cross reference to a specific page, but how would you make one that goes to a range of pages? Like “see pages 3 to 5”? The solution is to make two cross-references that look like one. For example, say I want a cross-reference that points to a whole section of the book. So, first I’ll manually type “(see pages )”  Now in this example I happen to know that the section starts at the beginning of chapter 12, so I’ll open the Cross-References panel (Window > Type & Tables > Cross-References). Then I’ll click the New Cross-Reference button to make my x-ref. I can choose a paragraph style that I used to format the text I want in my x-ref from the list on the left. I’ll choose Chapter Title, and then I’ll choose the one about weeping trees, since that’s where the section begins.
  Now I need to choose a cross-reference format, and in fact none of the defaults will work for me, because all I want is the page number—no text, just the number. So I’ll click the little pencil icon to make my own format. I’ll click on the Page Number format, and duplicate it by clicking the plus button. Then I’ll give it a different name—like “just the number”—and I’ll strip out the existing text, so I just have the code
 <pageNum />.  Before I click OK, I’ll make sure my new format is selected in the popup menu. And you can
see that the page number shows up! So I’ll click OK to close the dialog box.  Now to create the rest of the page range. I’ll type an en dash (Alt/Option-dash). Then I’m going to make another cross-reference that points to the end of the section. To do that, I need to add a text anchor on the last page of the chapter. There’s usually no special “end of chapter” paragraph style here that signals the end of the section, but that’s okay — instead we can use a text anchor. To do that, I simply place my text cursor where I want it, then open the Hyperlinks panel (Window > Interactive > Hyperlinks). And from the Hyperlinks panel menu, I’ll choose New Hyperlink Destination.
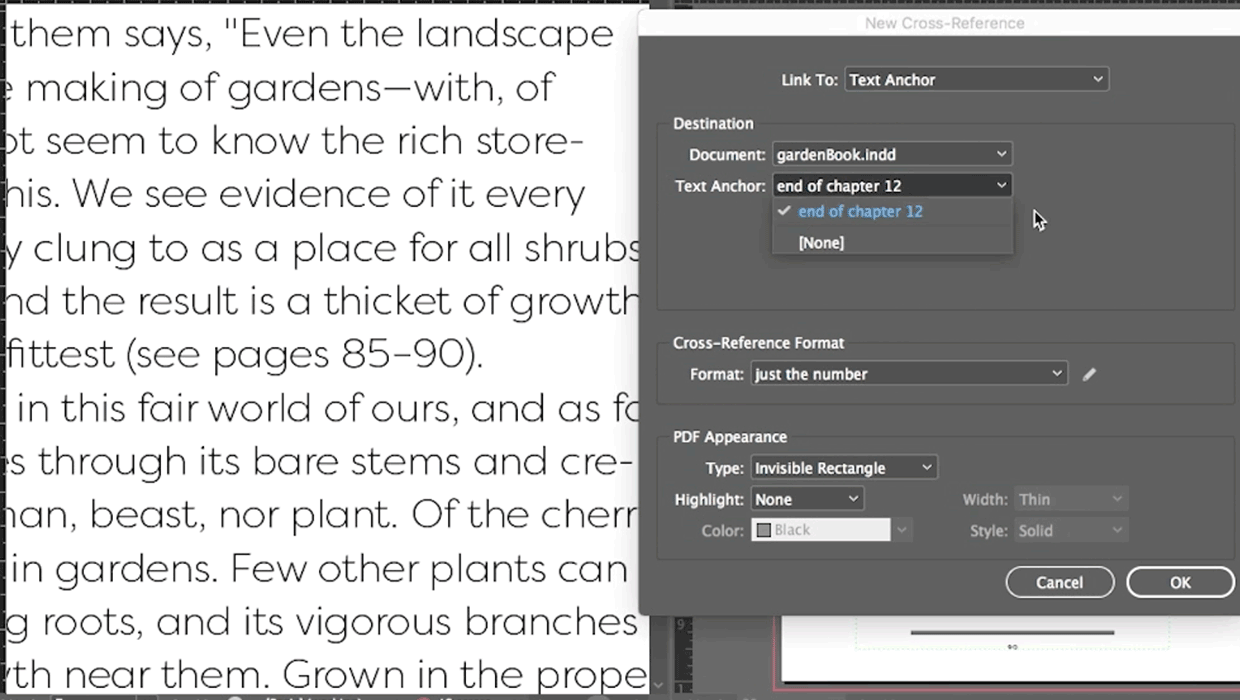
  This is going to be a text anchor, and I’ll call it “end of chapter 12.”
  When I click OK, it doesn’t look like anything changed, but there is an invisible marker there. Now I can navigate back to the page with the cross-reference, and put my cursor after the en dash I typed. Then I’ll make a new cross-reference. But this time in the dialog box, I’ll go to the Link To popup menu and choose Text Anchor, and then the anchor I just created. Once again, I check to confirm the Format menu is still set to just the page number, and I’ll click OK. And voila! There’s our two cross references that look like one: the first for the beginning of the section and the other for the end.
  It took at bit of work to set up, but remember, the benefit is that now the cross-reference will update if my page numbering ever changes, saving me a lot of time and worry. This article is for CreativePro members only. To continue reading, please log in above, or sign up for a membership today! Thanks for supporting CreativePro!
Commenting is easier and faster when you're logged in!

Recommended for you

How to Type “The Last Page Number in a Book”
You already know that InDesign has a “the last page number” text variable, right...

Creating Cross References with Text Anchors
InDesign’s Cross-References panel lets you create x-refs such as “see Oranges an...
What’s That Alert or Question Mark Icon in InDesign?
Sometimes InDesign's alert icons are mysterious to the unintiated. Here's an exp...