
A Copy/Paste Deep Dive
Sandee Cohen takes a deep dive into two of the most fundamental commands in InDesign and comes up with some gems

This article appears in Issue 114 of InDesign Magazine.
When I first suggested an article on the Copy and Paste commands in InDesign, my colleagues at InDesign Magazine asked if I thought there really was enough information for a true “deep dive.” After brief consideration I replied, “Yes! There’s plenty of stuff for a full article, including tips that might surprise even seasoned InDesign users.”
This article is structured to start with very basic stuff and work toward the more complex and sophisticated topics. So if you’re an InDesign novice, start at the beginning and proceed straight ahead. If you’re an experienced user, skim along till you get to the topics that are new for you. Then follow along till the end. Regardless of your level of experience, I think you’ll find enough here to make your investment of time worthwhile.
The Edit Menu
After the basic New, Open, and Quit InDesign, the Copy and Paste commands are the most important of InDesign’s menu items—but InDesign gives you more than just a regular Copy and Paste. You’ll find all these options under the Edit menu (Figure 1).
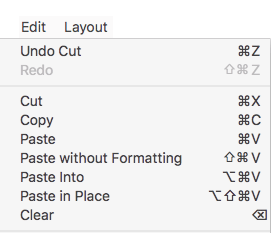
Figure 1. The Copy and Paste commands under the Edit menu
The Contents of the Clipboard
Ordinarily you don’t see what’s on the clipboard. For years I have had to keep a running commentary in my head as to what was the last thing I cut or copied from the page.
Now, though, for those using macOS, you can switch to the Finder and choose Edit > Show Clipboard (Figure 2), which opens a window with the contents of the clipboard. The command is great for
selected text. But it doesn’t show any InDesign objects such as text or image frames.
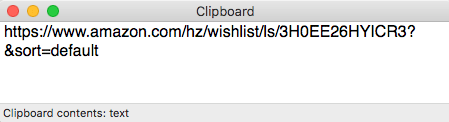
Figure 2. The Macintosh Finder command, Edit > Show Clipboard, lets you view the contents of the clipboard.
However, if seeing the contents of the clipboard is important to you, check out Paste 2 in the Mac App Store. It’s pricey for an app ($15), but very powerful, offering the ability to access an unlimited number of items you’ve copied/cut to the clipboard, across all your devices. You can even organize the items in your clipboard history in sets called Pinboards. And Paste 2 isn’t the only game in town. There are plenty of other applications—some free, some not—that enhance the capabilities of the clipboard on a Mac; check out this article for details.
Windows once had a clipboard viewer application, but it was retired after Windows XP and is no longer supported. There are various groups and companies that have made alternate clipboard utilities for Windows users. One of the applications that appeals to me is Ditto (Figure 3). It’s free and was developed specifically for Windows 10. It also stores a history of multiple clipboards and can even sync clipboards from networked computers. You can download Ditto here.
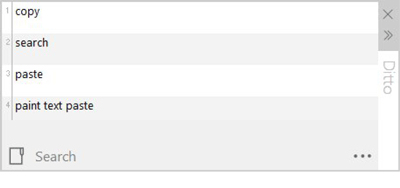
Figure 3. The Windows 10 extension Ditto lets you view and insert multiple clipboard items.
Cut and Copy
We’ll start off our list of luminary copy/paste commands (Figure 1) with Cut and Copy, which are pretty straightforward. Both features copy selected objects or text from the document and then store it in an area of the computer’s memory called the clipboard. As everyone knows, the Cut command removes the item from the document and stores it in the clipboard. The Copy command adds the item into the clipboard while keeping the original text or object where it originally was on the page.
Paste
Once you’ve copied information into the clipboard, you will want to paste it to a new position. There are several commands for pasting from the clipboard, including Paste, Paste in Place, and Paste Into.
The simple Paste command is, not surprisingly, the most basic. When this command is invoked, anything on the clipboard is deposited back onto the file. There are several ways objects appear after you choose Paste, depending on whether you copied (or cut) objects or text and whether your text cursor is inside a text frame when you paste (Table 1).

Table 1. How the basic Paste command is applied when various objects are selected
When the Paste command places an object or group on the page (rather than inside a text frame), that object is placed in the visual center of the page—which may not be the actual center of the page! The visual center is the center of the window displaying the document. So here’s a tip: Always choose View > Fit Page in Window (Command+0/Ctrl+0) before pasting to guarantee the pasted object ends up in the center of the current page. Or you can use the controls in the Align panel (Window > Object & Layout > Align) to align objects to a page or a spread.
Paste in Place
Where Paste always places the object or new text frame in the middle of the window (unless your text cursor is in a text frame when you paste), the Paste in Place feature is more clever: it puts the object in the same X and Y coordinates it had before it was pasted. But those coordinates don’t have to be on the same page! In fact, they don’t even have to be in the same document!
For example, think about trying to place an image in the same spot on each of the chapters of a book. You can simply position the graphic in the correct spot once, and then copy it. Then, switch to a new page or new file and use the Paste in Place command. InDesign remembers all the coordinates. (Of course, if this is something you do very often, you should consider putting that object just once on a master page instead of repeatedly on your document pages, but that’s a topic for another day.)
In some ways, this feature is far more useful than the ordinary Paste feature. In fact, I’ve got a good friend who uses Edit > Keyboard Shortcuts to swap the keystroke for Paste In Place (Command+Shift+Option+V/Ctrl+Shift+Alt+V) with the one for Paste (Command+V/Ctrl+V). The only downside is that he could possibly paste an object somewhere on the page where he can’t see it. That’s because the X and Y coordinates are always based on the spread, not the individual page (even if you’ve set the ruler origin to be Page or Spine in Preferences). So if your document is set to Facing Pages, and you cut an object from a left-hand page, and then try to use Paste in Place to put it at the same location on a right-hand page, it won’t work. That’s also why, if you ever use Paste in Place and you can’t see the object anymore, you should check to see if it’s sitting over on the pasteboard!
Paste Into
Programs like Illustrator have a Make Mask command that lets you use the shape of one object to mask, or hide portions of other objects. Designers who are familiar with Make Mask from elsewhere will often look under InDesign’s Path commands for such a command… but there isn’t one. Instead, InDesign has a feature called Paste Into.
Making masks with Paste Into is simple. First, you arrange the objects so the masking path is in the correct position. Next, select the object that you want masked. Note: If you need to mask multiple objects, you need to group them first, so they behave as one object. Then cut the object, so you have it on the clipboard. Select the object that you want to act as the mask. Choose Edit > Paste Into. The objects from the clipboard appear inside the mask (Figure 4).

Figure 4. You must group multiple objects before you can paste them into a masking shape.
Once an object has been pasted into a mask, it behaves much like an image placed into a frame. Use the Content Grabber to reposition the masked object or group into the frame. You can double-click inside the mask object to select the object (or group) inside it. Or use the Direct Selection tool to select the individual points or paths of the masked object.
Unfortunately, you can’t use live text as a mask for images or other objects with the Paste Into command. There are ways to fill live text with image, as you can read about in this article. But the simplest method is to first convert the text into outlines. Once you do that, you’ve got a compound path that can easily have objects pasted into it (Figure 5).

Figure 5. A group of multiple objects can be pasted into text converted to outlines.
You don’t, however, have to convert text into outlines if you want to paste it into a mask. Once the text frames are on your clipboard, just choose Paste Into (Figure 6). And remember: if you’ve got multiple text frames, you need to group them first.

Figure 6. Text frames can be pasted into a shape and still remain live text.
If you’re ever confused by the results you get when using Paste Into, check out How Paste Into Positions Objects and How Frame Fitting Options Affect Paste Into at InDesignSecrets.
Paste Without Formatting
When you copy and paste text, InDesign gives you a choice whether or not you want the text pasted with its formatting. However, that control is actually handled in two different places, depending on where the text is coming from. If you copied the text from an InDesign document, then the normal Paste feature retains any text formatting applied to the text. If you’d rather strip out the formatting, you can choose Edit > Paste Without Formatting.
Paste Without Formatting can be extremely useful when you need to paste some text and have it take on the formatting of the text around it. For example, let’s say you select and copy a registered trademark symbol (®) in one part of your document. Now you can paste that symbol into another paragraph, and have it match the same formatting as its new home.
However, if the text on the clipboard is from an application other than InDesign, then Paste Without Formatting will be grayed out in the Edit menu, and the control for pasting with or without formatting is controlled in a completely different place. To find this, you need to open the Preferences dialog box (which you can find on the InDesign menu on the Mac or the Edit menu in Windows). Then choose Clipboard Handling inside Preferences. You’ll find two options in the section labeled When Pasting Text from Other Applications: “All Information” and “Text Only.”
Text Only strips out all the formatting. All Information keeps all the formatting extras. Unfortunately, there’s no option to pick and choose which formatting characteristics to keep.
Again, it’s important to remember that the preference controls pasting from other applications—it has no affect on text pasted from one InDesign document to another.
Pasting from Illustrator
There are two other, somewhat mysterious, features inside the Clipboard Handling section of the Preferences dialog box: Prefer PDF When Pasting and Copy PDF to Clipboard. You can read more about how these work in this article at InDesignSecrets.
Copying on the Move
There are several other ways to make a duplicate of an object in InDesign. They have nothing to do with copy and paste, but they’re often faster or more powerful, and so I want to mention them here. The trick to almost all of these is to hold down the Option/Alt key.
For example, you can make a copy of the object as you move it if you hold down the Option/Alt key (Figure 7). There’s an advantage to using the Option/Alt key to make a copy of an object. Not only is it usually faster, but the new copy doesn’t affect the contents of the clipboard! So anything you had previously copied to the clipboard stays there.
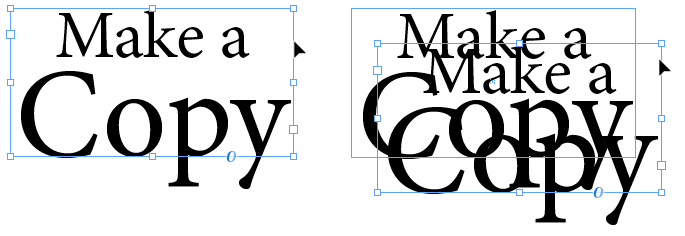
Figure 7. Hold the Option/Alt key as you move an object to make a copy of that object.
Transform and copy
You can also position the Selection tool over a corner of a selected object (or group of objects) to rotate and copy an object. Start the rotation, and then press the Option/Alt key. This makes a copy of the object as it is rotated (Figure 8). Release the mouse button and you have a rotated copy.

Figure 8. Hold the Option/Alt key to make a copy as you rotate or transform an object.
This technique also works with the Rotate, Scale, and Shear tools. Add the Option/Alt key as you transform with those tools, and you’ll create a transformed copy of the object.
In addition, if you use the dialog boxes for Rotate, Scale, or Shear, you can click the Copy button. This works the same as pressing Option/Alt. It creates a copy of the original without changing the contents of the clipboard!
Re-Apply transformations
Try this: Start by using the Option/Alt key as you transform an object (or click the Copy button if you are working in one of the transformation tools dialog boxes). Next, select another object, and choose Object > Transform Again > Transform Again. The transformation values applied to the original object are applied to the second. This technique works across pages in a single document or even across multiple documents. The transformation values are stored separately from the computer’s clipboard. And you’re not limited to storing just a single transformation; you can even store a sequence of transformations and then play them back.
Copying in panels
The Option/Alt key is also useful for duplicating objects (or other things) in InDesign’s panels. For example, you can Option/Alt drag a page in the Pages panel to duplicate it.
You probably know you can move objects from one layer to another by dragging the little proxy dot for the object in the Layers panel. But you can also duplicate an object by adding Option/Alt as you drag. You can even duplicate a whole layer (and everything on it) by Option/Alt dragging it.
You can also use the same Option/Alt-drag technique to make a copy of a paragraph, character, or object style.
Maintaining a Link to the Original
Did you know you can make a duplicate of any object in InDesign and maintain a link to the original, so that if the original changes, the duplicate can be updated, too? If that sounds interesting, check out these resources:
Copying Text Within Frames
InDesign is hiding another way to move or copy text from one location in a story to another, and it involves a preference that most designers have never touched. It’s inside the Type section of the Preferences dialog box: Drag and Drop Text Editing (Figure 9). The preference can be set for working in the Story Editor, or the Layout view, or for both. By default it’s on only for Story Editor, but I like turning it on for Layout view, too. (For more on Story Editor, see Steve Werner’s article in issue #54.)

Figure 9. Use the two Drag and Drop Text Editing options to copy text inside frames.
Drag and Drop Text Editing works as follows: highlight the text you want to move or copy. With the text still selected, move the cursor back over the highlighted area. The cursor turns into an arrow with a little T underneath. This indicates that you can drag the text to a new position.
Now press and hold the mouse button over the highlighted area. You’ll see the arrowhead cursor. If you drag the selected text, you move it—like cut-and-paste but without affecting the clipboard. Or you can press—yes, you guessed it—the Option/Alt key so that a copy of the text will be made (Figure 10).

Figure 10. Hold the Option/Alt key to make a copy as you drag and drop text inside frames.
Most of the time I drag the text to a new position within the same story. But you can drag and copy to a new story on the same page or a different page. You can even drag and copy the text to a new document, as long as you can see the other document’s page. And a bonus tip: If you add the Command/Ctrl key, you’ll move the text out of its current frame and put it in a new frame.
To Clip or Not to Clip? That Is the Question!
One of the major things to remember about duplicating objects in InDesign is when you will use the clipboard and when you’ll steer clear of it. Most of the time the only reason I copy content to the clipboard is to bring in text or an object from an outside program. This is usually for text like URLs or vector shapes from Illustrator. Other than that, I use the Option/Alt key to make copies as well as store transformation information.
However, there are certainly times to use Copy, Cut, Paste, Paste Into, and all the other great tools in the Edit menu. Understanding how all these features work will help you to use InDesign efficiently and productively.
Commenting is easier and faster when you're logged in!

Recommended for you

The Friendly Alien Easter Egg in InDesign
Back in the day, just about every major desktop publishing and design program ha...

InDesign Magazine Issue 136: Advertising
We’re happy to announce that InDesign Magazine Issue #136 (August 2020) is now a...

Tip of the Week: Toggling Find/Change Direction
This tip was sent to Tip of the Week email subscribers on February 19, 2015. Sig...