

Warning: This post gets a little tedious for a Monday morning (or whenever you’re reading this), but it contains some good stuff you need to know about the Links panel!
You probably know about the File > Package command that creates a copy of your InDesign file and all the linked images in a new folder. But sometimes this command is overkill. Perhaps you’re perfectly happy with where you’ve saved your InDesign file, but you just want to copy all your linked images to a new folder? Here’s how.
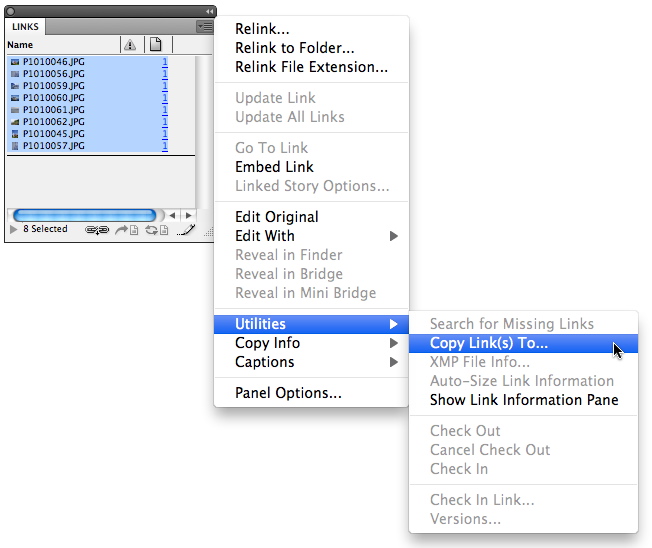
In the Links panel, select the linked images that you want to copy. Then, in the Links panel menu, choose “Copy Link(s) To” [CS3] or “Utilities > Copy Link(s) To” [CS4/5]. Choose a location for the linked files, and you’re done.
This is a really handy command, but here are some interesting caveats:
1. First of all, this command is very forgiving. Perhaps some of your placed images are already in a folder named “Links” alongside your InDesign file. But you’ve also placed a bunch of images in your layout from all over on your hard drive or network, and now you want to put a copy of those images in your Links folder also. You can go to your Links panel, and select ALL the linked images and choose the “Copy Link(s) To” command without any fear of images being duplicated or overwritten. Only the images that aren’t already in the specified folder will be copied there. The images that already reside in the target folder will be untouched.
2. When the images are all copied to the specified folder with this command, the path to the images is also updated to the new location. In other words, if the images were originally placed from a folder named “Stock images” but you copied them to a folder named “My Project”, InDesign updates the path to the images to specify the “My Project” folder. But BEWARE: At least in Mac CS4 and CS5, even though the path to the images will have changed in the InDesign file, InDesign doesn’t see that anything has been changed, so if you just hit Command-S to save or try to choose File > Save, you will see that the command is grayed out. So you will need to either do a Save As, or make at least one other change to your file before you can do a regular save.
3. Here is one other trick you can use: What if you want to make a copy of all your linked images, perhaps to send to a co-worker for a different project, without InDesign relinking to the newly copied images? Just follow the instructions above to “Copy Link(s) To”, and then when it’s finished, do a single File > Undo command. This will undo only the relinking, leaving the newly copied images in place, but leaving your InDesign file linking to the original images in their previous location.
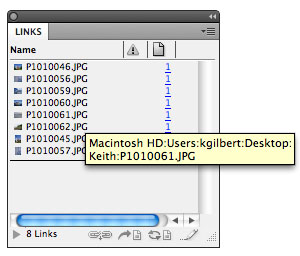
Remember, one quick way to view the full path to files in the Links panel is to hover over the filename in the Links panel. After a brief delay, you will see the full file path displayed.
This article was last modified on December 21, 2021
This article was first published on December 19, 2011
Commenting is easier and faster when you're logged in!

Recommended for you

InDesign Tip: Copying File Paths from the Links Panel
Ever need to record the location of placed files, either for your own records or...

Finding the Hidden Link Report Feature
No need to package your InDesign file just to get a list of its links. Use this...
Linking Images So They Change Together
Sometimes you want to have the same image in a number of different places in you...