Changing Colors by Percentages

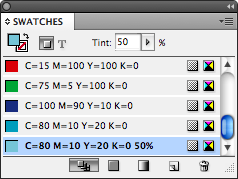
You have a process color, let’s say 80% cyan, 10% magenta, 20% yellow. Now you want to apply a shade of that color to an object on your page. You have several choices, some of which you may not have been aware of.
You can, of course, just select the color swatch, then change the value of the Tint field in the Swatches panel.
You can create a tint swatch by selecting the color in the Swatches panel and choosing New Tint Swatch from the panel menu. If you think you’ll be using this same tint more than a few times, going this route will greatly help in maintaining consistency throughout your document. Plus, if you need to change the tint later, it’s really easy (just change the tint swatch).

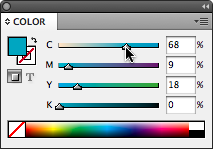
While a swatch is selected in the Swatches panel, the Color panel displays a Tint ramp. You can click anywhere on the tint ramp to change the tint.

Here’s one of my favorites: You can change the Color panel to CMYK mode (by choosing that from the panel flyout menu, or by Shift-clicking on the color ramp at the bottom of the panel a couple of times), then hold down the Shift key while you drag one of the sliders. As you Shift-drag, all the sliders move the same relative amount. (If a slider is set to 0%, then it just stays at zero.)

Here’s another fun Color panel trick: You can enter a value (or a mathematical expression) in one of the color value fields, then hold down Command/Ctrl as you press Return/Enter to apply the same percentage change to all of the color value fields. For example, in the color breakdown described earlier, changing cyan to 40% and pressing Command/Ctrl-Enter would change magenta to 5% (half its original value, because cyan was cut in half).
There are always more methods, of course. You could change the Opacity in the Effect panel, or change its Blend Mode. Or do like I did back in 1989: Just hack the postscript code to change all the values before it gets to the printer… oh, those were the days!
This article was last modified on December 19, 2021
This article was first published on January 5, 2009
Commenting is easier and faster when you're logged in!
Recommended for you

InDesign Eye Candy, part 5: Blending a la Mode
What's black and white or red all over? Your document in a blender (mode).

This Month in InDesign Articles, Number 139
I had an amazing time at The InDesign Conference last week… the attendees I met...

Format page numbers using grep styles
I was working on a project recently and decided to use old style figures in the...


