
Calculate Your Way to Better Images

![]()

Versions: 5, 5.5
Operating systems: Macintosh, Windows
Photoshop’s Calculations command hasn’t been a real attention-getter. Nonetheless, it still holds interesting possibilities for enhancing images both technically and creatively. On the more technical side, there are many different image problems related to correction for print. One that isn’t commonly addressed is color depth. At some point, you may receive an image that has good color but still appears a little flat and lacks depth or richness. Such is our sample image shown in Figure A. We have nice colors in the walls and table, but the image has poor contrast and detail. One way to enhance an image such as this is to create a new Black channel that contains more detail and contrast. You can do this easily by using the Calculations command to blend the existing Black channel with one of the other color channels that has more detail in it, thus creating a new channel with the desired attributes. Then, you can paste the new channel into the old Black channel. This may seem complicated, but we’ll take you through the steps we used in correcting the coffeehouse image, and you’ll see it’s a fairly easy correction to make. We’ll also show you how to use this command to creatively enhance your images, as we did with the butterfly images shown on the cover.
Figure A: Images without depth can be enhanced by adding more detail to the Black channel.

How it Works
The Calculations command works by manipulating pixel values with blending modes, just like the blending modes in the Layers palette. Each pixel in an image channel can have a brightness value from 0 to 255. By adjusting these values, a new and improved channel can be created. You can work with either CMYK or RGB images. In this article, we’ll focus on CMYK. Because the Calculations operation combines corresponding pixel values, you must use images that have the same pixel dimensions and resolution. The results of the combination can be saved out as a new channel, a new image, or a selection.
Analyzing the Image
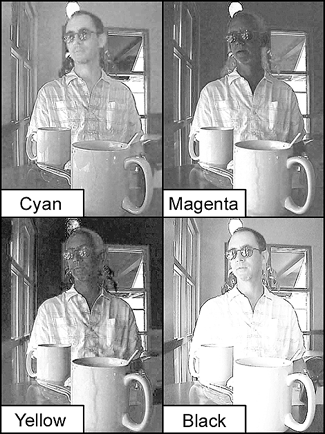
Open a CMYK image you want to work on and then click on the Channels palette. You can see our four color channels in Figure B. It’s quite apparent how low contrast the Black channel is. By looking at the other channels, we determined that the Cyan channel would be the best choice to combine with our Black channel. It has more detail as well as similar tonality to the Black channel. We could copy the channels into different layers and combine them with the blending modes, but we’ll make this combination far more easily with the Calculations command.
Figure B: Our Black channel has low contrast and lacks detail. We’ll boost its detail by combining it with the Cyan channel.
Using Calculations
Now that you know a little about how Calculations works and which channels you want to work with, choose Image > Calculations. In the resulting dialog box, as shown in Figure C, select the Preview check box so you can see the results of your combinations in the image window. Then, at the bottom of the dialog box, select New Channel from the Result pop-up menu to specify that you want the resulting blend to be placed in a new channel in the active image. Now, choose the Source 1 image and channel from the respective pop-up menus. You can choose from any open image (of the same size) and any layer or channel within that image. In this case, select the Cyan channel. Now, set the Source 2 image and channel. In this case, we chose the Black channel because that’s the one we want to enhance. In the next section down, you’ll see the Blending pop-up menu. You’re probably already familiar with most of its options since they also exist in the Layers palette. However, two of the settings are different–Add and Subtract. For more information about these settings, see the sidebar “To add or subtract.” Experiment with the different modes until you find one that creates the desired effect. For our example, we found the Hard Light setting does the trick. To fine-tune the effect, you can also adjust the Opacity setting. This lightens the opacity of the image specified as Source 1. Once you’re satisfied with your new channel, click OK. A new channel, Alpha 1, appears in the Channels palette. Click on the old Black channel to compare it with the new Alpha channel. You can see quite a difference in our channels in Figure D. Now, copy and paste the Alpha channel into the Black channel. You can see the difference our new channel makes to the image in Figure E.
Figure C: Choose your source and target channels in the Calculations dialog box.
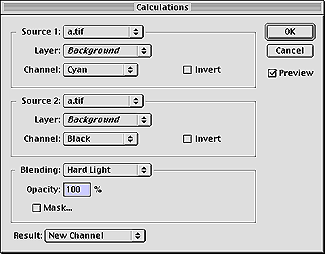
Figure D: Our new channel has significantly improved detail.

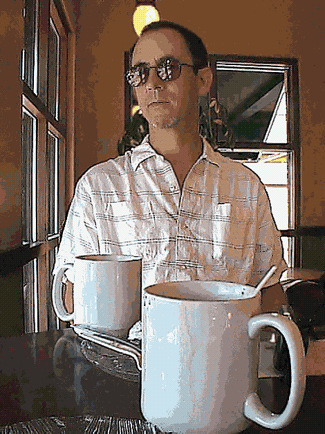
Figure E: Once we add the new channel, our image looks much better
To Add or Subtract
Under the Blending options, you’ll see two choices that aren’t there for typical Layer blending. So that you’ll understand what they do, here’s a little description of how they work.
Add
This mode adds the pixel values in the source channel to the corresponding pixels in the target channel. It’s most effective when combining non-overlapping images in the two channels (i.e., channels from different images). If you added channels from the same image, you’d pretty much just get a lighter image. Black areas in both channels would remain black, because 0 + 0 = 0. And any white would result in a white pixel in the composite channel, because 255 + any number = 255. The Add option divides the sum of the pixel values by the Scale amount and then adds the Offset value to the sum. The Scale amount may be any number between 1.000 and 2.000. The higher the number, the darker the image. The Offset value lets you lighten or darken the pixels in the destination channel by any brightness value between 255 and -255. Negative values darken the image; positive values lighten the image.
Subtract
Like the name says, this mode subtracts the pixel values in the source channel from the pixels in the target channel. As with the Add option, the result is then divided by the Scale factor and added to the Offset value.
Creative Calculations
The Calculations command isn’t just for correction purposes. You can also use it to make creative image combinations like the butterfly images shown on the cover. Since you can take channels from two different images, you can composite photographs into something more graphical. We’ll show you how we created Figure F from three custom calculated channels.
Figure F: By layering three different Alpha channels in a new document, you can create interesting graphical images.

Combination Street
To begin, open two images that are of the same size, resolution, and color mode, like our insect images shown in Figure G. Both images must be open for the Calculations command to access them. Whichever of the two images is selected appears as both the Source 1 and Source 2 image. Choose the second image from the Source 2 pop-up menu. From each Channel menu, select a different color channel. You’ll have to experiment until you get a combination that looks promising. If you want to work with a grayscale version of one of the images, you can do so by selecting the Gray option from the Channel pop-up menu. You can also work with either the positive or negative of the channel image. By selecting the Invert check box, you’ll switch to the negative version of the channel.
Figure G: You can combine any two images as long as they’re the same resolution and physical dimensions.

Masking Techniques
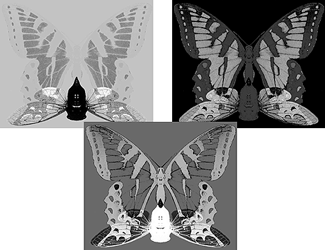
Once you’ve selected your channels, experiment with the Blending and Opacity settings until you get an interesting effect. To refine the effect even more, you can also apply the blending modes through a mask. To do so, select the Mask check box. This extends the dialog box and lets you choose the image and layer containing the mask. From the Channel pop-up menu, you can choose any of the color or Alpha channels in an image to use as the mask. You can also use a mask based on the active selection or the boundaries of the chosen layer because the areas of transparency will behave the same as a mask. As with the other channels, you can also invert the mask. Once you’ve created a good effect, make sure your Result setting is set to New Channel and then click OK. Repeat this process two more times until you have three different-looking channels similar to ours in Figure H.
Figure H: Here are the three Alpha channels we created.
Assembling a New Image
Now that you have three channels to work with, open a new CMYK document of the same size and resolution. Next, copy and paste the Alpha channels into the color channels of your choice. In the case of Figure F, we pasted the Alpha channels into the Cyan, Magenta, and Black channels of the new document. You’ll get different color effects depending on what channels you choose to paste into. You can of course do this same effect with four channels, but the colors tend to become somewhat neutralized.
Customizing Channels
You can see that the Calculations command is both a creative device and a color correction tool. By mixing and masking your channels you can come up with an almost infinite variety of effects.

Copyright ©© 2000, Element K Content LLC. All rights reserved. Reproduction in whole or in part in any form or medium without express written permission of Element K Content LLC is prohibited. Element K is a service mark of Element K LLC.
This article was last modified on January 3, 2023
This article was first published on August 18, 2000
Commenting is easier and faster when you're logged in!

Recommended for you
How to Perceive Brightness More Accurately
Learn how to control the key factors that can affect how you perceive brightness...
Free 3D Photoshop Objects from Pixelsquid
Online image libraries come and go, and the good ones get swallowed up by Getty....
Top Tips for Photoshop Book Now Available!
Twenty of our most popular Photoshop tutorials curated and collected in a conven...