
Building Illustrator Templates
How to design a great template to take your project from setup to save in record time


This article appears in Issue 37 of CreativePro Magazine.
Templates are powerful tools for streamlining your design process in Illustrator, especially when working with different clients or brand lines.
A template is a pre-made Illustrator file that you can use to jump-start a project. Because my main creative focus is designing packaging, my template includes essential elements like die-lines, colors, and graphic styles, allowing me to quickly start new projects with consistency and efficiency. Using a template not only ensures a cohesive look—it also simplifies your workflow.
In this article, I’ll show you how to create a basic Illustrator template that serves as a foundation for your unique design needs. You can then customize other versions for different types of projects, clients, or product lines.
Whether you’re new to Illustrator or looking to optimize your workflow, this guide will provide practical tips to help you design more efficiently and consistently.
If you want to explore my template file or use it to follow along as you read, you can download it here.
Create Your Basic Template
We’ll start by setting up the essential document, organizing layers, and preparing swatches and graphic styles. I’ll also demonstrate how to use an Assets layer, customize text appearances, and incorporate scripts to enhance your workflow. Finally, I’ll guide you through the process of saving the template for easy access and future modifications.
Set up your document
Start by creating a new file and setting your page size. I use A3 or Tabloid, landscape size with a CMYK color profile that matches my expected output conditions. This setup is well-suited for packaging and other print projects.
Organize your layers
Does this sound familiar? At the outset of a project, I always vow that this time
I’ll keep my layers organized. But let’s be honest—that promise often goes out the window when I’m in a rush. With a template, I—and you—can keep things in order from the beginning.
My template includes the layers I typically need for packaging design (Figure 1) in a structure that helps to keep all the elements organized and easily managed throughout the project.

Figure 1. Here’s how I organize layers, swatches, and graphic styles in my template.
The Pack layer is where I place my elements when starting a project, and it contains sublayers for Dimensions, Technical Info, Technical Lines, Varnish, Variables, Text, and Graphics. I distribute items into their respective sublayers based on their category.
Tip: You’ll probably want to use different layer and sublayer names in your template. What’s important is that the structure of your template makes sense for you, the documents you will be creating, and the nature of the information you need to organize.
Next, I use another layer, Info, for information that can vary from customer to customer or project to project (Figure 2). It typically includes a logo, printing information, and project details. If you have a standard form for your project information, you can place it in this layer.
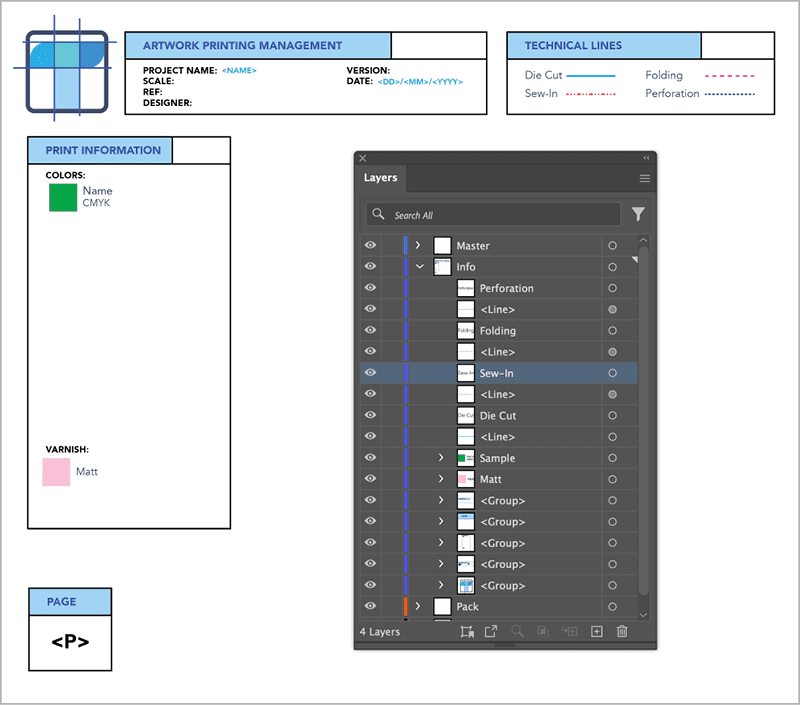
Figure 2. The Info layer holds technical information for the project.
As a script enthusiast, I can’t help but include this topic. In the template, I made some preparations to integrate scripts smoothly later. In the Info layer, you’ll see a group, Sample. This group is designed for my free ColorList script, which you can use to generate a color chart from the selection to make it easier to display the colors used.
You’ll also notice the Master layer. I included this layer because it’s required for my free FlexPageMaster script, which helps display page numbers and dates.
I use the Assets layer in my template as a library of default design elements, like icons, that I might need in a project (Figure 3). This is especially useful for elements that might be included in certain cases only—such as varnish options or the Sample group.
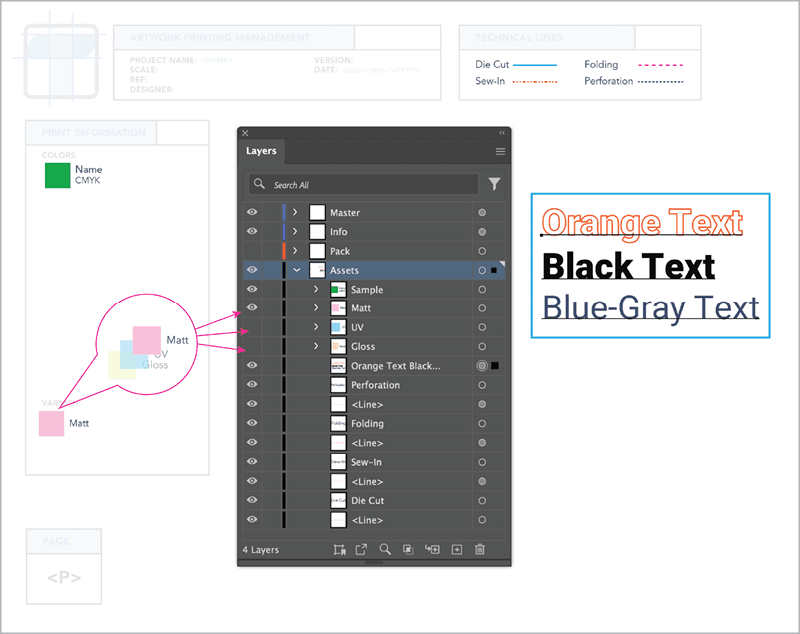
Figure 3. The Assets layer holds grouped technical lines and a color swatch for easy access during design.
I also include varnish samples stacked on each other in the Assets layer to maintain consistent placement without additional alignment work. Alternatively, you can create a group to indicate that no varnish is used in the design. In Figure 2, you can see the Matte group that I moved to the Info layer.
You can keep some samples in this layer and easily copy their appearance using the Eyedropper tool (I). This method works for items and text appearance as an alternative to creating paragraph or graphic styles. (See “Text formatting in templates” below.)
Tip: If you’re unable to duplicate the appearance with the Eyedropper tool, double-click the tool in the toolbar and ensure the Appearance option is selected (Figure 4).
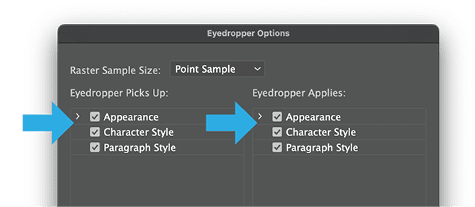
Figure 4. To copy styles accurately, open the Eyedropper Options panel and make sure you’ve selected the Appearance options.
Once the main design is complete, I delete the entire Assets layer. This keeps the document from becoming cluttered with unused graphic styles, symbols, or character and paragraph styles, ensuring the file remains clean, lightweight, and manageable.
Text formatting in templates
I must admit that I’m not a big fan of using paragraph and character styles in Illustrator, especially for designing packaging. In my experience, the time spent setting them up doesn’t always justify the output. Plus, I often need to adjust text to fit different packaging dimensions proportionally.
If I need to reuse a specific formatting or text appearance, I prefer placing a text sample in the Assets layer and using the Eyedropper tool (I) to apply that appearance to other text. You can quickly see all the specifications of your type—the stroke and fill of the text and text frame—by opening the Appearance panel. In Figure 5, you can see an example of a text appearance I created using the Appearance panel, which includes a blue frame around the text.

Figure 5. As seen in the Appearance panel, a blue frame is applied to the text area saved on the Assets layer. You can use the Eyedropper tool to pick up this formatting and reuse it across other elements.
You can use the Eyedropper tool to copy the appearance to Point Text and Area Type. By clicking different text formats, you can duplicate them into a new text frame. You might be tempted to use text areas to create graphic styles, but the text might not fully retain the applied appearance (Figure 6).
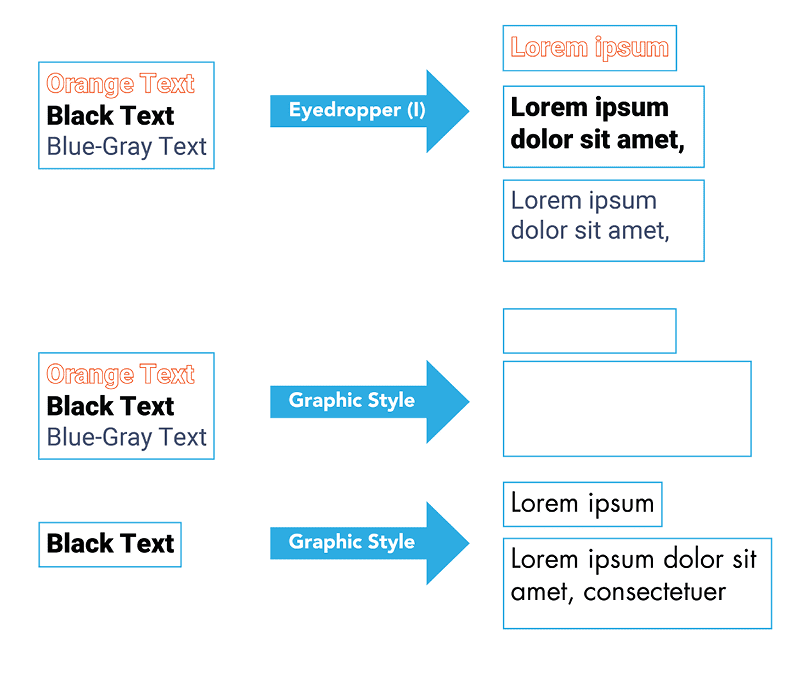
Figure 6. Illustrator’s Graphic Style feature applies text styles incompletely or inconsistently. You’re better off using the Eyedropper tool.
I do recommend changing your document’s font from Myriad Pro, if you usually use a different typeface.
- Open the Paragraph Styles panel (Window > Type > Paragraph Styles).
- Double-click [Normal Paragraph Style].
- Adjust the font settings.
- Click OK.
This change will be saved only in the current file and won’t carry over to other Illustrator documents.
Create swatches and organize swatch groups
To keep the workspace organized, I included only the necessary swatches and arranged them into groups for better clarity, e.g., Tech Lines and Varnish. After adding these essential swatches, I removed unused ones. The remaining swatches in the panel, all used in the template, focus on the project’s needs.
You can easily add new swatch groups specific to your design as your project progresses. This approach keeps your workspace clean and efficient while providing quick access to the colors you need.
Add graphic styles
Similarly, I removed the default graphic styles and replaced them with custom styles tailored for packaging design. These styles include settings for technical lines such as Die Cut, Sew-in Line, Folding Line, and Perforation, each customized with specific attributes like stroke weight, color, overprint, and dash patterns.
Symbols and brushes
I usually don’t use brushes in packaging design, so removing the default brushes helps me keep my workspace uncluttered. Similarly, you can delete unused default symbols.
When working with symbols, be sure to keep file size in mind: Be cautious about what you place in the Symbols panel and how many symbols you add, because they can significantly increase your file size. Remove any unused symbols from the file before sending it to print or sharing it with others.
Also, if your symbols contain text, ensure that your client or production team has access to the necessary fonts. Missing fonts can lead to issues where text is replaced with default fonts upon opening the file. To prevent this:
- Break the link. Before outlining, break the link to the symbol to separate it from the original.
- Outline text directly. Convert the text to outlines directly within the symbol.
- Include fonts. Always attach all required font files when sending the project to others. You can use the File > Package command to gather the fonts into a folder.
By following these practices, you can maintain a clean and efficient workspace while ensuring compatibility and ease of use across different systems and users.
Use Global Colors for Easy Updates
When creating swatches, consider using global colors, which allow you to make changes across your entire document by simply editing the swatch. This is particularly useful in packaging design, where brand colors need to be consistent across multiple elements.
To create a global color, turn on the Global option (Figure 7) when adding a new swatch.

Figure 7. Create a global color swatch for easy color updates across your document.
Save Your Template
When everything is in order, save your template in Illustrator’s template file format (AIT) with Save As on a shared drive or in a file synchronization service like Dropbox to make it easy for others to find.
Warning: Illustrator templates saved as AIT files can’t be saved as Adobe Cloud Documents or Creative Cloud Files. You can add them in either place, but they will be converted to regular Illustrator files.
You can save your template directly into the Illustrator Templates folder for quick personal access. To do so, select Save as Template from the File menu. This should automatically navigate you to the Illustrator Templates folder, where you can store your template for easy retrieval. Saving in the native template folder allows you to open the template quickly by going to File > New from Template (Command/Control+Shift+N).
Your Templates folder might be read-only, depending on your system’s settings (Figure 8). If you encounter a read-only issue when saving your template in the Illustrator Templates folder, the steps to resolve it depend on your operating system.
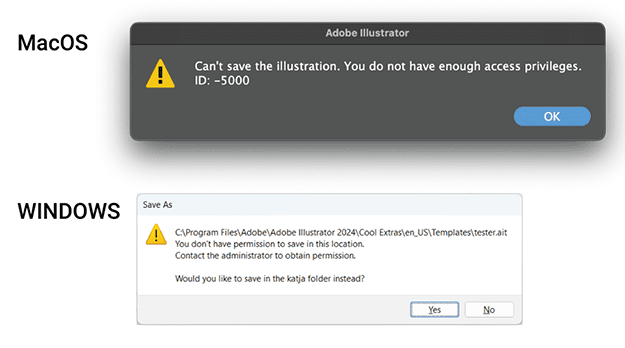
Figure 8. If your Templates folder is read-only, you might be prohibited from creating or modifying your template.
macOS
To change permissions on macOS:
- Open Finder, and navigate to the template file, usually located in the Cool Extras folder in the top level of the Adobe Illustrator folder you see in your Applications.
- Within the Cool Extras folder, find the Templates folder in your localization. (If you’re using the U.S. English version, you’ll find it in the en_US folder.)
- Right-click the Templates file and select Get Info.
- If your account doesn’t have the necessary permissions, click the lock icon at the bottom-right corner of the window. Once it’s unlocked, click the + at the bottom left of the window to open the Users & Groups dialog box. Select your account name to add it to the users.
- Set privileges for your user account: Click the Privilege setting and select Read & Write in the menu that opens (Figure 9). Click the lock icon to update the permissions accordingly.

Figure 9. Adjust permissions on macOS to ensure your template is not saved as read-only.
Windows
To change permissions on Windows:
- Find the Templates folder in File Explorer in your Adobe Illustrator version folder at \Program Files\Adobe.
- Look in the Cool Extras folder for your Templates folder with your localization (n_US\Templates, if you’re using the U.S. English version of Illustrator).
- Right-click the file and select Properties.
- In the General tab, under Attributes, make sure the Read-Only option is turned off.
- If the issue persists, go to the Security tab, select your user account, and ensure that you have Full Control under the permissions, as shown in Figure 10.

Figure 10. Follow these steps to adjust permissions on Windows to prevent your template from being saved as read-only.
By following these steps, you can avoid potential issues with template accessibility and ensure that you or your colleagues can modify the template as needed.
A Template for Success
Creating a well-organized and versatile Illustrator template can significantly streamline your workflow, especially when you’re working on complex projects like packaging. By setting up layers, swatches, graphic styles, and variables in advance, you’ll create a solid foundation for your work.
Remember that you can customize and expand this basic template to fit a wide range of design needs. Templates are not set in stone; they’re meant to evolve with your needs, so don’t hesitate to update and improve them as you go.
Whether you’re working alone or sharing your template with a team, a little extra preparation can save time and effort, allowing you to focus on the creative aspects of your work.
I hope these tips and techniques help you stay organized and efficient in your design process.
Commenting is easier and faster when you're logged in!

Recommended for you

Tip of the Week: Use RGB PDFs to Avoid Packaging Errors
This InDesign tip on using RGB PDFs to avoid packaging errors was sent to Tip of...

How to Ensure Perfect Barcodes on Packaging Proofs
PageProof's automatic barcode scanner saves users valuable time during the revie...
How to Display Measurements Using the Dimension Tool in Illustrator
Learn how to add measurements to your Illustrator artwork using the new Dimensio...