
Building a Varnish Plate in InDesign
Learn how to turn a clipping path into an editable frame that can be used as a varnish plate.


This article appears in Issue 1 of InDesign Magazine.
No one enjoys drawing clipping paths (or, if they do, they rarely admit it in public). InDesign’s transparency features spare you the headaches of drawing clipping paths because the program honors background transparency in Photoshop files. However, there are still times when a clipping path comes in handy, so don’t throw the Bezier out with the bathwater. What most people don’t realize about clipping paths in InDesign is that you can convert them to editable InDesign frames. This turns out to be extremely useful when you need an InDesign object the same shape as your image-for example, when you need to print a varnish over a silhouetted image, or emboss just the image. Here’s how to do it.
1. Duplicate Your Image
After importing your image and selecting it on the page, create a new layer (Option/Alt-click on the New Layer button in the Layers palette to name the layer while creating it). Now, select your image and duplicate it onto this new layer in exactly the same place. To do this, you could copy it and then use Paste in Place. However, I prefer a faster method: Just hold down Option/ Alt while dragging the little proxy square to the new layer.

Step 1: Dragging the Proxy Icon while holding down the Option/ Alt key duplicates the object on the new layer.
2. Turn on the Clipping Path
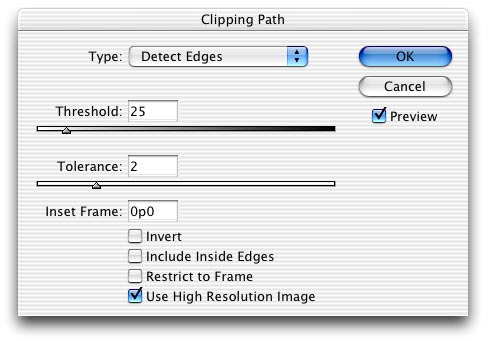
While the duplicate object is still selected, choose Object > Clipping Path. If you have already drawn one or more paths in Photoshop and saved them with the image, you can choose Photoshop Path from the Type popup menu in the
Clipping Path dialog box. If, however, you’ve sworn off drawing clipping paths-but the image is on a pretty clean white background-you can set the Type popup menu to Detect Edges. This is trickier, because you have to adjust the Threshold and Tolerance settings until you “knock out” the background without erasing too much of the image itself. I almost never use Detect Edges to build a real clipping path (it’s just too blunt an instrument), but it works well for this technique because a varnish or emboss plate rarely needs to be precise. Either way, turn on the Preview checkbox in the Clipping Path dialog box to make sure the clipping path looks right on screen before pressing OK.
Step 2
3. Convert the Path to a Frame
Now that you have your clipping path, you can swap it for a real InDesign frame. Right-click (or Control-click on the Mac) on the image and choose Convert Clipping Path to Frame from the context menu. The image shouldn’t appear any different, but if you switch to the Direct Select tool you’ll see the points and segments of an editable InDesign frame that looks suspiciously like your old clipping path.

Step 3
4. Delete the Image
While you’ve got the Direct Select tool, click on the image (not the edge of the frame) to select it. Now delete it. What remains is a frame that looks like a silhouette of the graphic. Here, I’ve hidden the lower layers to make it more obvious what’s on the varnish layer.

Step 4: Deleting the image from within the frame leaves the shape of the object (based on the clipping path’s shape).
5. Fill with a Spot
The only way to print a separate piece of film for the varnish or embossing plate is to fill your new frame with a spot color. If you don’t already have a spot color, take this opportunity to make one. I usually call it something clever like “Varnish Plate” and spec it at 15-percent yellow. (But remember to choose Spot from the Color Type popup menu in the Edit Color dialog box; you don’t want this to be a process color!)

Step 5
6. Make It Overprint
The problem is that this colored object now knocks out the image beneath it. You can get around that easily enough: Turn on Overprint Fill in the Attributes palette and then select View > Overprint Preview. Note that the spot color makes the underlying image appear slightly yellowed (of course, this is just a screen representation of the effect).
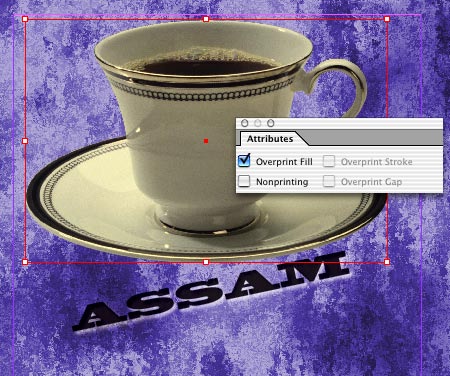
Step 6: Turning on Overprint Fill in the Attributes palette tells InDesign not to knock out the image underneath the varnish plate.
7. Print Separations
Because the tip relies on overprinting a color, if you print a proof to a non-PostScript inkjet printer you’ll need to turn on Simulate Overprint in the Print dialog box. However, when you print final separations, turn that feature off and you’ll get an extra plate-the spot varnish plate in just the shape you wanted.
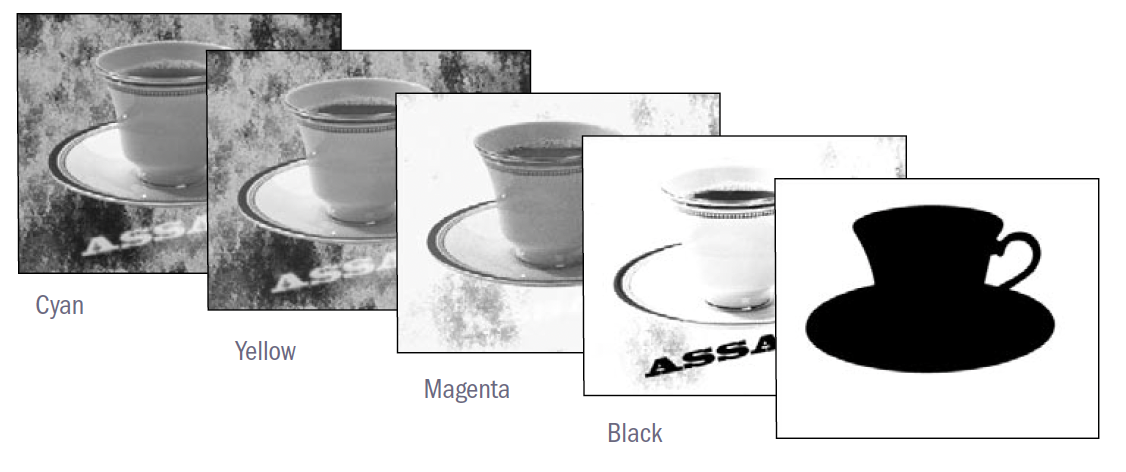
Step 7: The varnish shape was defined by a spot color so it prints on its own plate.
Commenting is easier and faster when you're logged in!

Recommended for you

Making a Die Cut Shape in InDesign
Need to cut a hole in (or apply a spot varnish to or emboss) your InDesign docum...
Choosing a Different Transparency Alpha Channel for an Image
InDesign can use any extra channel of an image as a transparency mask, if you kn...
Putting Screen Captures Over Colored Backgrounds
Dealing with non-rectangular screen grabs (such as a menu) can be a hassle, but...