

Within Photoshop, a shadow set to Multiply blend mode will darken what’s underneath it. The Multiply blend mode is sort of like what happens when you sandwich two slides together and hold them up to a light: The strengths of the colors in the slides are combined. (I confess I think of them as being added together, but, hey, they didn’t name it “Add,” so ‘Multiply’ it is.) As long as you’re playing in Photoshop, fine.
But when you place a Photoshop file into InDesign, the shadow knocks out what’s underneath, lightening the area rather than darkening it.
To see the effect, place a Photoshop image containing a shadow into InDesign, and then use the Separations preview (Window>Output>Separations Preview) to see what’s going on. Turn off the black separation, and you’ll see the gaping hole under the shadow (see image below). While this wouldn’t matter if the shadow fell on an empty area of the page, the anemia will be obvious when it falls over other page content.

What’s up with that?! While InDesign understands a lot about native, layered Photoshop files, it does not handle Photoshop blending modes correctly. It handles opacity correctly, but not blending modes.
What can you do? Well, if you just want a plain old down-and-to-the-right drop shadow, create it in InDesign rather than Photoshop. InDesign handles its own shadows correctly. However, if you want a cast shadow (as you see under the glasses), you need to create that in Photoshop. But with a little planning, you can still make the shadow behave correctly when the image is placed in InDesign.
NOTE: The ‘GlasseZ’ logo is an Illustrator AI file, and you might notice that its shadow does not knock out what’s underneath. Illustrator shadows do behave correctly in InDesign, because InDesign and Illustrator share the same imaging model. Photoshop?s internal imaging model is a bit different, which is why we have to cheat.
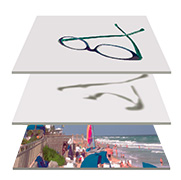
The secret to happiness here is to build the shadow on a separate layer in Photoshop, and then use Object Layer Options in InDesign to handle things. As you can see in the image below, the glasses and the shadow are on separate layers. (Hey, I don’t like my food to touch…)

- Place the image in InDesign, then copy its frame to the Clipboard. You’re going to build a Shadow Sandwich. Using Object Layer Options (Object>Object Layer Options), turn off the top layer, leaving only the shadow layer visible. Select the shadow frame, and set it to Multiply blend mode in the Transparency palette. You’ll see immediately that the shadow looks more natural, darkening underlying objects.
- Now it’s time to complete the shadow sandwich. Remember that you copied the original image frame to the Clipboard, now, Edit>Paste in Place to plop it on top. Use Object Layer Options again, this time to turn off the shadow layer and leave only the top layer. Check the results with Separations Preview: you’ll see that the shadow no longer knocks out. Whoopee!
Here’s an exploded view of the Shadow Sandwich:
Sure, it’s a bit of effort, but it’s the only way to use Photoshop shadows in InDesign and image them correctly. Keep in mind that the limitations (and solution) apply to anything in a Photoshop file that uses a blending mode (not just shadows). Within a Photoshop file, everything’s fine. It’s when you want those blending modes to interact with what’s underneath in InDesign that you have to cheat.
This article was last modified on December 18, 2021
This article was first published on December 17, 2006
Commenting is easier and faster when you're logged in!

Recommended for you

How to Create a Checkerboard Paragraph Rule
In a recent InDesign Secrets article, Keith Gilbert explored How to Add a Rule A...
Tip of the Week: Making Torn Paper Effects
This InDesign tip on making torn paper effects was sent to Tip of the Week email...

Updated Adobe Exchange Available
Mergers don’t always occur smoothly. One of the results of Adobe’s m...