
Book Excerpt: InDesign Course and Compendium
Steve Laskevitch shows how to work with long document features.


This article appears in Issue 136 of InDesign Magazine.
In the following excerpt from his book Adobe InDesign CC: A Complete Course and Compendium of Features*, Steve Laskevitch shows how to work with long document features like tables of contents, text variables (which you can use to control things like chapter numbers and running headers), and cross-references.
Tables of Contents (TOCs)
Manually building a table of contents for a large document is one of the punishments awaiting those who fail to use paragraph styles for headers and subheaders. InDesign’s ability to scour long documents (including Book documents composed of many individual files) to automatically create a table of contents is one of the great rewards for using paragraph styles.

Preparation
Consider this document: each chapter header has a paragraph style called Chapter title applied to it. Major topics (like the ones at the top of the page) have their own style, as do the headers under them (like “Preparation” just above). In some cases there are more granular headers used, too. In this book’s table of contents, I chose to include the first three heading levels as its entries.
I strongly recommend making a mock-up table of contents with its own paragraph styles to decorate the entries that will be generated from text using the styles you’ll target in the document. In my case, I made styles with names like TOC chap header, TOC topic header, and TOC header. I wanted names that clearly showed that these would be used only in my table of contents (TOC). When InDesign is configured to look for text that uses certain styles, you are offered the option of using the same styles to decorate the TOC entries. This is rarely what we
want. So it’s best to have other options at the ready.
You’ll also need a paragraph style for the TOC’s title (usually the word “Contents,” but that’s up to you). And you’ll be offered the chance to choose a character style for the page numbers that appear in the generated entries. In the case of this book, I made a character style that gives a consistent size and weight to the page numbers, no matter what the rest of the entry is like.
InDesign does offer to create styles for you. You’ll see them in the list of styles where you also find your own, and they’ll become real if you choose them. But they’re very generic and you’ll have to redefine them anyway.
Creating the TOC
Once you’re sure that styles have been applied to all the paragraphs with text that is to become TOC entries, and you have built styles for the TOC itself, you’ll need to go to the page(s) where the TOC will be. When you’ve configured and committed the Table of Contents dialog box, the cursor will become a loaded text gun. You can either create a text frame then or flow the TOC into an awaiting frame. Since I often have a master page with a primary text frame governing my tables of contents pages, I use the latter option.
There is a lot to configure in the Table of Contents dialog box (Figure 1), so I use my dummy TOC to guide me. To gain access to all of the available options, click the button labeled More Options, if you see it. On the other hand, if the button says Fewer Options, don’t click it. Near the bottom of the dialog, check Include Book Documents if you need to trawl for styles in all the documents of a Book document.

Figure 1
Now you can work from near the top of the dialog down. In the Title field, enter the text that should appear at the top of the TOC, and choose the Style for it just to the right. In the example here, I’m building the TOC for a magazine, so I chose “Articles” as my TOC’s title.
The two sections that follow are used in tandem. The Styles in Table of Contents section is where we choose the styles whose text is to become entries in the table of contents. Double-clicking on a style listed in the Other Styles box on the right adds it to the Include Paragraph Styles list on the left. Simple TOCs, like those for a novel in which we want only the chapter headers noted, may have only one style chosen. For this magazine, I’ll be choosing three: the titles of the articles, the bylines, and a brief synopsis. The first will be a Level 1 entry, which is assigned in the next section of the dialog, Style. The other two will be Level 2, since they’re both subordinate to the title, but not to each other.
In the Style section, you also choose how to style the entries generated from the style currently highlighted in the Include Paragraph Styles section above. For entries pulled from the style called Title (which decorates the article titles), I’m using a style called TOC Article Title. As in my mock-up, I chose to have the page number Before Entry with a tab (^t) Between Entry and Number. For the Level 2 entries, I chose No Page Number since they’re already next to the main entry (Figure 2).

Figure 2
There are times when we need a TOC entry to help a reader find a specific page, but we’d prefer to not have the text appear on that page. There are three common ways to do this:
- Put the text on a hidden layer, then check the box Include Text on Hidden Layers in the Options section of the Table of Contents dialog;
- Set the frame that holds the text to be Nonprinting using the Attributes panel; or
- Place the text frame on the Pasteboard mostly off the page, barely overlapping it.
I prefer method 2 because I can see the text when I zip through my pages in InDesign, but it disappears in Preview mode and won’t output. I may forget the text exists if it’s on a hidden layer or if I’m zoomed too close to see the text that is mostly offstage.
When I’m very on top of things, I may create an object style that gives the frame a garish fill or stroke and makes it nonprinting. This way, I can recognize them when I see them, but no one else will see the garishness.
Updating a Table of Contents
What if any of the text changes? Tables of Contents don’t update automatically. However, it’s easy to prompt them. Insert the Type tool cursor anywhere in the TOC. Then choose Layout > Update Table of Contents.
TOC Styles
You will likely generate a table of contents a few times before it’s right, especially if it has several levels of entries (Figure 3). Sometimes you’ll choose the wrong style to look for or to apply to the entry. When you finally dial it in, and you suspect you may need to use those settings again (the next issue of the magazine, for example), you can create a Table of Contents Style. I very much wish they called it a “preset” as the word “style” is used so much here.
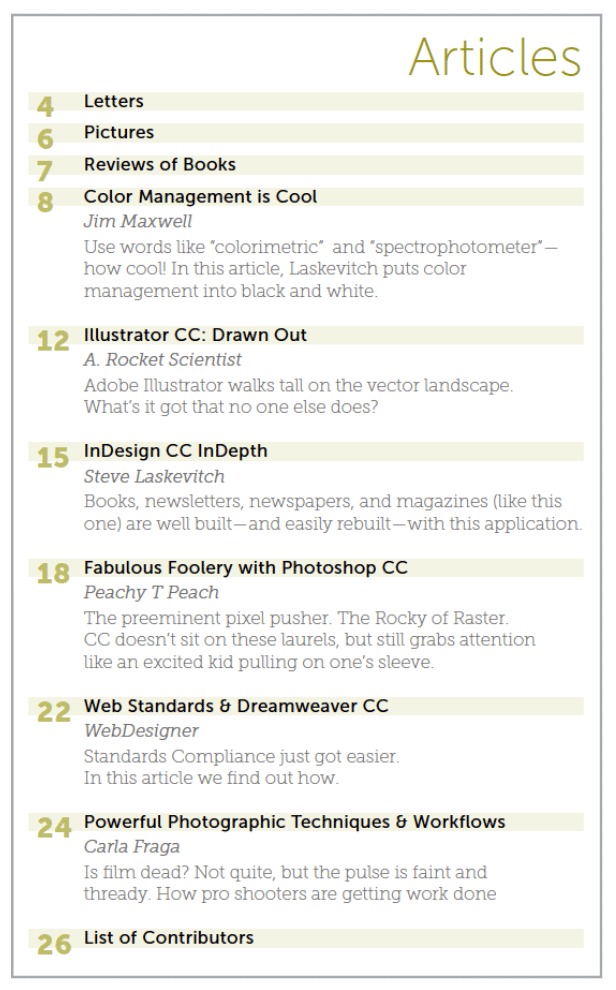
Figure 3
When you’re in the TOC dialog, and all the settings are correct, click the Save Style… button and give this preset a name. TOC Styles are among the things that get synchronized in a Book file.
They’re also used to generate the electronic TOC in an eBook (like those read on an iPad or Kindle). You may generate an attractive TOC from that TOC Style as well, but for those media it’s truly optional. However, the TOC Style is not; it’s the way we describe the hierarchy in an eBook’s code.
We will discuss eBooks in the “Output” chapter of this book—see “ePub and Tagged File Formats”—but you might consider creating a TOC Style that excludes page numbers just for that medium. In a reflowable ePub, a reader can change the font or font size of the text, which makes the whole concept of a page rather fluid. TOC entries become hyperlinks that will take the reader to the correct page, so knowing the number of a page becomes irrelevant.
To load TOC Styles from a different document (a previous project, perhaps), choose Layout > Table of Contents Styles… where you can click a Load button. You can also create new or edit existing TOC Styles, but it’s done a bit blindly, as this approach doesn’t generate a TOC afterward.
Text Variables
Tables of contents aren’t the only InDesign feature to extract content based on the styles applied to it. Text variables can be a convenient way to repeat or reference text that uses a paragraph or character style. Much of what you see along the tops of pages in the print edition of this book uses text variables to remind you of which chapter you’re reading (at the top of left-hand pages) and which topic (on right-hand pages).
Variables can also be a way to insert document data, like date and time of the most recent edit or output. And they can be used to extract and render metadata from placed images for captions. As in so much, there is good news and bad with this feature.
Chapter Numbers
When using the Book feature (discussed at the beginning of this chapter), you can inform each document which chapter it is or to begin automatic chapter numbering. To display the number, we insert a text variable: right-click and choose Insert Variable > Chapter Number. The chapter number will display in the same style as the text around it. Here is this chapter’s number: 7. Yes, that “7” is a variable. I used the Book feature to set the first chapter of the Compendium section as “1.” This is the seventh (Figure 4).

Figure 4
Another way to insert variables and, better, to define them, is by going to Type > Text Variables and choosing either Insert Variable or Define…. So I don’t redefine a variable I’m using, I’ll choose Define… and click New…. The settings above produce this:
If I put that in a narrow text frame, however, it will look like this:

Warning: Text variables don’t break across lines. I bet you wondered when I’d get to the bad news. If the space available is too narrow, the variable text will get crushed.
If we redefine the variable to be less verbose, it will change everywhere and may fit in narrower quarters. Or I can select the variable, right-click, and choose Convert Variable to Text, and the following will result: it will wrap, but it will no longer update if the chapter number changes.

Captions
Of course, we can create our own captions, but if our images have metadata, we can generate captions that utilize it. Although we go through a different procedure for these, they, too, are text variables (Figure 5).
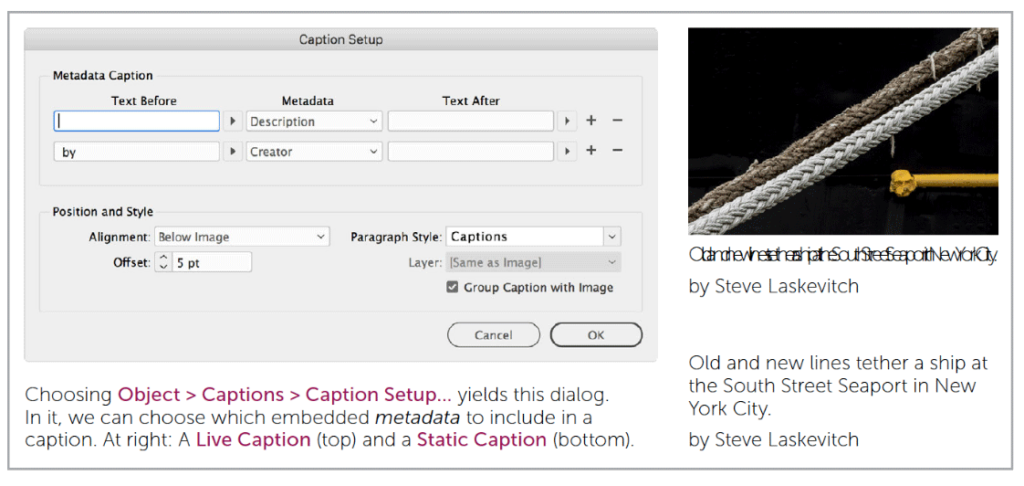
Figure 5
Metadata is added to images in one of several places. One can do so in Photoshop via the File Info dialog box. In Adobe Bridge or Lightroom, one can use a Metadata panel. For the image above, I added data to the Description and Creator fields. Object > Captions > Caption Setup… allows us to choose which metadata to include and what text should surround it in the caption we’ll later generate. To make the caption, I right-clicked a selected image and at first chose Captions > Generate Live Caption. The first problem was that InDesign didn’t read the Creator metadata. To force it to do so, I had to choose Author in the Caption Setup dialog—an obvious (and long-lived) bug.
Then I saw the result: the description was crushed on one line. If all my captions are very short, this may not be an issue. If a linked image’s metadata changes, the caption will automatically change as well. But few captions are short enough, and metadata like this doesn’t often change. So I used Undo, and this time right-clicked and chose Captions > Generate Static Caption. Static Captions are not variables, thus they are not linked to their source nor do they get crushed when the space is too narrow. Once these are generated, they’re just text.
Running Headers
These text variables are among the most useful. If you’re reading this in print, you’ll see a running header at the top of each page of this spread. One of them reads “Text Variables.” That one “sees” the last use of a particular paragraph style, which decorates the large header earlier in the text announcing this topic. Here’s its definition (Figure 6):

Figure 6
Using Type > Text Variables > Define…, I clicked the New button. I usually name a variable after the style to which it refers. I chose “topic title” and selected Running Header (Paragraph Style) as the Type. I have almost never used the character style variant. I’m sure it’s lovely.
For a running header, we are usually referring to a topic that is ongoing, and so we want the most recent use of it. Thus, I chose Last on Page for Use. We can choose a wide variety of special characters to automatically be added before or after the text we’re grabbing, or we may type into the Text Before or Text After fields. InDesign even supplies a thoughtful way to remove punctuation or change the case of the text.
To insert the variable, we locate our cursor in a text frame (for running headers, this is usually on a master page, and often near the Current Page Number marker), right-click, and choose Insert Variable > [name of variable].
Warning: Yes, another bug! When you change the text to which a variable refers, you’ll have to force the page to redraw. Simply zooming out and in again will do it. Otherwise, it appears that the variable is not updating.
Cross References
Cross references are cousins of text variables with a bit of TOC genes thrown in. They refer to and can echo text that uses a certain paragraph style, and they most often cite the page on which to find it—e.g., “see Hogwarts on page 993.” Since cross references are also hyperlinks in electronic documents like ePub, I often suppress the appearance of page numbers there. The Cross References panel can be opened via Window > Type & Tables.
The Destination
If you need to refer to a word or phrase rather than a paragraph, you can make it a named text anchor. Usually, I’m referring to entire short paragraphs, like headers, or to parts of paragraphs, like their numbers (when the Bullets and Numbering feature is used, a common scenario for figures or tables).
To create a text anchor, highlight the text to which you anticipate making a reference later. Go to the Cross-References panel menu and choose New Hyperlink Destination…. For Type, choose Text Anchor. The Name is important, as it will be the text cited in the cross reference. When hidden characters are visible, the anchor will look like a colon. The TOC feature also has the option to create text anchors, so you may see some already.
A future cross reference doesn’t have to use a text anchor; it can cite an entire paragraph, a paragraph number if it exists (or both), or a partial paragraph up to some character you can specify (like a tab). By using the supplied building blocks when editing the reference’s format, you may also include a Chapter Number and a File Name, and you can even apply a character style to portions of the reference. You don’t have to build a lot of text anchors in your documents.
Building a Cross Reference
First, insert the text cursor where you want the reference inserted. If you’re to make reference to text in another document in a Book, make sure that document is open! Then you can use the Cross-References panel menu to choose Insert Cross-Reference… or use the Create New Cross- Reference button at the bottom of the panel. You’ll then be looking at the New Cross-Reference dialog box (Figure 7).
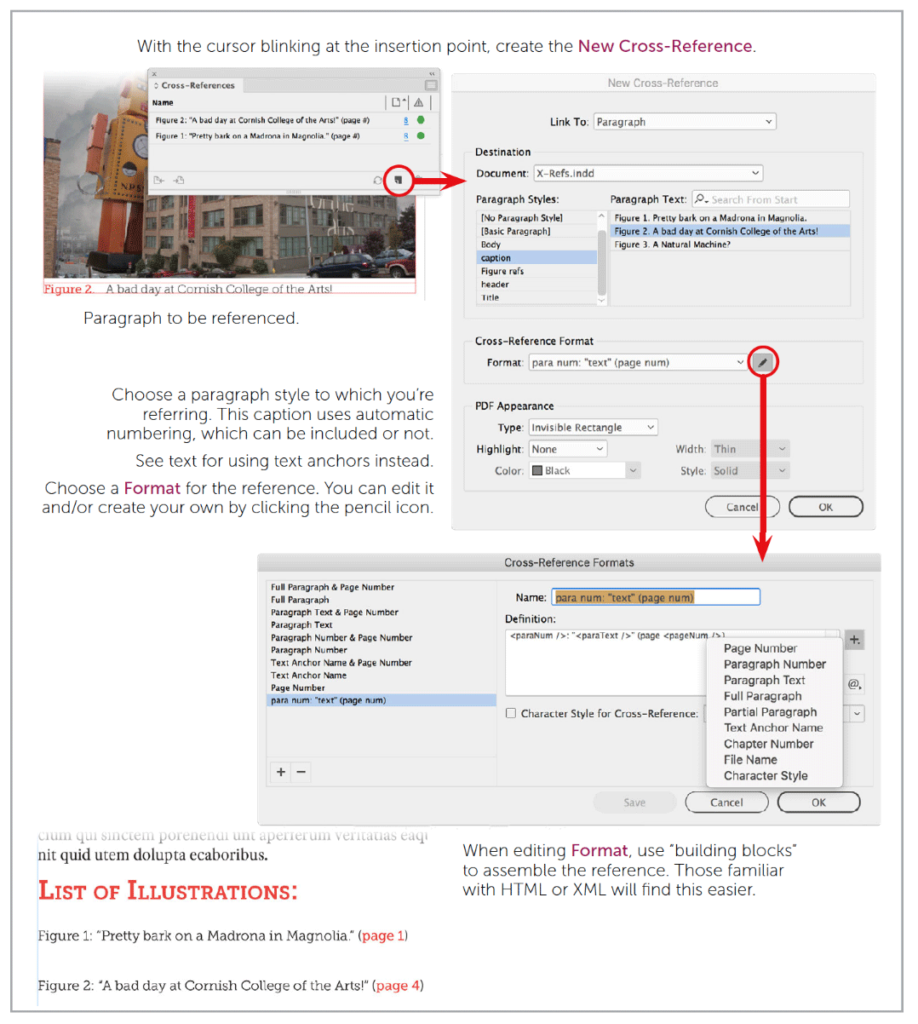
Figure 7
Choose what to Link To: a paragraph or text anchor. Then choose the Document that contains the reference’s destination. If you’re linking to a text anchor, you simply choose its name. If you’re linking to a paragraph, it can get a little trickier. On the left, choose the Paragraph Style that your destination is using. Yes, despite the search feature there, it’s much easier if you know the style. Once the correct style is highlighted, a list of each occurrence in the destination document is presented on the right. If you highlight one of those occurrences and look where your cursor was blinking, you’ll see a preview of the cross reference forming.
The formatting may not be what you want, yet. The built-in list in Format may be sufficient for most needs. If you simply want to cite the page number, choose that. You may choose Full Paragraph & Page Number or Text Anchor Name & Page Number. In the classroom, I often get asked the difference between Full Paragraph and Paragraph Text because few see any difference. There is no difference unless the paragraph uses automatic numbering. If it does, Full Paragraph includes the number and Paragraph Text does not.
Note that there’s a choice for Paragraph Number & Page Number. The example in the previous figure shows a caption that reads, “Figure 2. A bad day at Cornish College of the Arts!” Everything leading up to the “A” (“Figure 2.” and the em space) is part of the paragraph number as defined in the paragraph style for that caption. So Paragraph Number & Page Number would yield “Figure 2 on page 4.” However, I based my custom format on Paragraph Text & Page Number. I chose that, then clicked the pencil icon to its right, opening the Cross-Reference Formats dialog box (and disabling the preview, sadly).
Since I was making a custom format, I added it by clicking the plus sign (+) at the lower left of the Cross-Reference Formats dialog box. I input a name that mimics the format I’m building so I can readily identify it. The Definition field is where we construct our format by a combination of typing and choosing from the Building Block () or Special Character () menus. Building blocks look like HTML or XML tags using “<” and “>” to form wildcards of sorts (Figure 8).

Figure 8
The above yields the paragraph number; a colon and space I simply typed; the paragraph’s text in quotes; a space; and, in parentheses, the word “page,” a space, and the page number.
*Affiliate link disclosure: CreativePro will earn a commission on any purchases made through the Amazon links in this article, at no additional cost to you.
Commenting is easier and faster when you're logged in!

Recommended for you

InDesigner: Raphaël Freeman
Addison Lalier shows how one designer has mastered the complex layouts and types...

Peter Kahrel’s Long Document Scripts for InDesign
Find out what these amazing InDesign scripts can do for you!

How to Mirror a Layout
Flipping a whole layout from a left to a right hand page doesn't have to be a pa...