
Bonus Features of Styles
Styles can do a whole lot more than just provide consistent formatting.

This article appears in Issue 97 of InDesign Magazine.
Nobody buys a cell phone these days just to make calls. Of course we still use them for that purpose, but bundled up with that telephone is a whole lot of useful bonus features—surf the net, snap a pic, take a note, make an appointment, pay a bill, set an alarm—all this functionality is available to you just because you bought that phone.
Similarly, when you use text styles in InDesign, along with applying fonts, colors, and spacing to text, you get a bundle of bonus features. Text styles are the “hooks” for some of the most important long document features and in this article, we’ll consider three of the best bonus features of styles: adding running heads, building a table of contents, and making cross-references.
Perhaps you’re creating a directory, a textbook, or a technical manual—hey, even a novel! You probably want the name of the current chapter (or section, or topic) to be displayed at a set position on your page, usually as a header or footer. It allows people to see which section they are currently in, and to easily navigate to different sections as they flip through the document. If you’re manually adding running heads to your pages and you reflow the text, you’re in for a lot of pain, since it’s inevitable that the heads will get out of sync with your content and you’ll have to keep moving them. Instead, when you’ve applied your styles consistently, you can make use of InDesign’s text-variable feature to create and update running heads automatically.
In the following example, I’m laying out The Dictionary of Needlework (a fascinating document, first published in 1882) that gives definitions of needlework terms. I want to print the first and last terms that
appear on each spread at the top left and top right to assist the reader when looking up a particular needlework term.
I’m using a paragraph style named Needlework Term on the listings. It incorporates a nested character style named Technique that applies a taupe color to the terms at the beginning of each paragraph. Having used these styles for formatting, creating my running head is a cinch.
To start, I first defined the running head by choosing Type > Text Variables > Define, and then clicking New. I gave the running head a name (I used RunHead Left), and selected my options. I wanted to refer to the first piece of text on the spread that is formatted with the Technique character style, so I chose Running Head (Character Style) for the type and selected Use:First on Page (Figure 1).
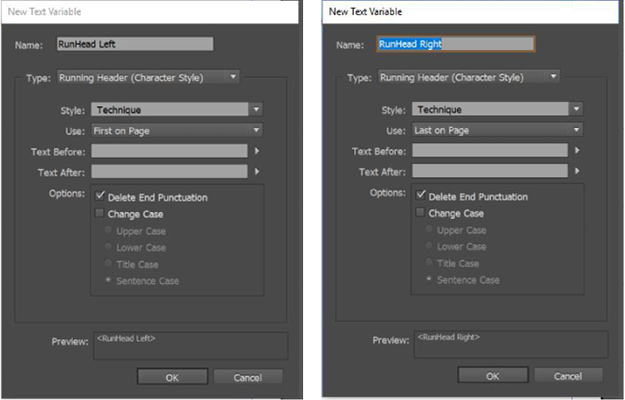
Figure 1: Define two Running Head text variables.
I repeated the process for RunHead Right, selecting Last on Page instead. Already, my text variable setup was done. Note: this technique works equally well with paragraph styles.
It’s important that the defined running heads be included on master pages. That way, they have to be placed only once, and they can appear on as many document pages as needed. I created a text frame at the top left of my master page and chose Type > Text Variables > Insert Variable and selected my previously-defined variable (RunHead Left). A text placeholder was inserted on the master page that I could format using the regular text formatting tools (Figure 2).

Figure 2: The Running Head variable on the master page.
Finally, I repeated the process to insert my RunHead Right text variable on the right side of my master page spread, and formatted that, too.
Returning to the pages of my document, I see that the running-head placeholders at the left and right of my header are now referencing the first and last pieces of text on the spread that are formatted with my Technique character style (Figure 3).
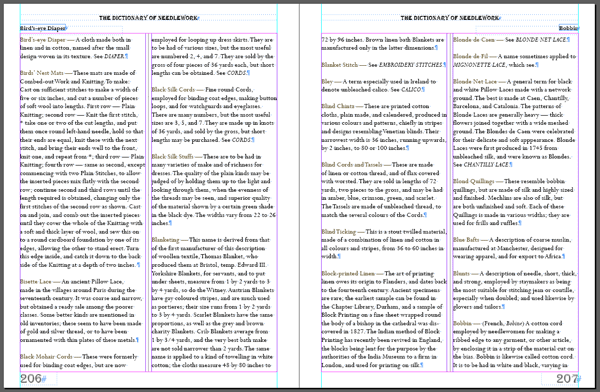
Figure 3: The completed layout with the running heads in place.
Running heads can be set up to reference paragraph styles or character styles. Either way, when text reflows, the running heads will constantly update without any intervention from you. Styles save the day!
Long documents cry out for tables of contents (TOC), but they can be time- consuming to create manually and a nightmare to keep up to date as the document layout changes. Never make a TOC manually! Instead, use the styles that already exist in a long document to build the perfect table of contents. With text properly styled, just decide which headings to include in your TOC, and let InDesign generate (and update) it.
In my example, I was working on an assignment about the city of Sydney. I used paragraph styles to format the headings in my document. I used styles called Heading 1, Heading 2, and Heading 3 for formatting and structure purposes, although I wanted only text formatted as Heading 1 and Heading 2 to appear in my TOC.
Here are the basic steps for building a table of contents.
Step 1: Set up the structure of the TOC
Choose Layout > Table of Contents.
Add an optional title for the Table of Contents, and select a style to be applied to it (a new style named TOC Title is created automatically).
Using the Add button, make sure all the styles to be included in the TOC appear in the Include Paragraph Styles list box.
For each style that’s listed, select the style that should be applied to it in the TOC (a new style named TOC Body Text will be automatically added). I tend to use TOC1 for my Heading 1 and TOC2 for my Heading 2, and so on (Figure 4).

Figure 4: Styles are the “hook” that can be used to gather content for a table of contents.
Click OK.
Note: TOC settings can be edited at any time by choosing Layout > Table of Contents and changing your selections in this dialog box.
Step 2: Place the TOC
The text pointer is loaded with the newly- generated TOC. Click to place it into the document at an appropriate location.
Step 3: Format the TOC
Sometimes the table of contents looks pretty raw to begin with. While all the content is there, the formatting is never particularly appealing. The good news is, it’s easy to fix. Just apply formatting and redefine the TOC styles to jazz it up pretty quickly.
Format the text, set some tab stops (usually with leaders), and adjust the spacing before and after until the TOC looks right. Figure 5 shows my freshly-generated TOC and the same TOC after I’ve updated the TOC1 and TOC2 styles.

Figure 5: The TOC before and after editing the TOC styles.
Note: To change the structure of a TOC (for example, to include extra heading levels, insert something other than a tab character as the separator, or to apply character styles to the page numbers or leaders), go back to Layout > Table of Contents, and adjust the settings in the dialog box. If content has changed in the document or the layout or pagination has changed, choose Layout > Update Table of Contents to make sure the TOC is up to date.
To use a TOC with a similar look and structure in other locations, check out Table of Contents Styles (explained in this free video from Lynda.com).
When exporting a document to an Adobe PDF (Print), make sure Bookmarks and Hyperlinks are selected on the General tab. This will build a bookmark for every listing in the TOC (displayed in the Bookmarks panel in Acrobat), and every page number that appears in the TOC becomes a hyperlink to that page. And, once again, you get this extra functionality simply because you used styles. Sweet!
Ever need to include text that refers to a different section of your document? Please don’t type in the name and page number manually, because there’s every chance that reflowing text will reposition the reference point, messing up the cross-reference. Instead, set up an automatic cross-reference, and let InDesign keep track of where that sucker is located. And how do we make it happen? With styles, of course!
In my Sydney assignment, I needed a cross-reference in the Modern Development section to remind the reader to visit the Architecture section. To create a new cross- reference, I went to the position where the cross-reference should appear (Modern Development), and typed the word “See.” Then I chose Type > Hyperlinks and Cross-References > Insert Cross-Reference.
Because I used styles for my headings in this document, I could just select “Heading 2” in the Destination list on the left side of the dialog box. All the paragraphs formatted with Heading 2 in my document appeared in the right list box. (Note: Cross-references can also be set up to jump to other documents, but this can sometimes lead to problems with broken references. You’ll get the best results when the source and destination of each cross-reference are in the same document.) I just clicked the destination I wanted the reader to jump to (Architecture), chose how it should look in my document (Full Paragraph & Page Number), and clicked OK (Figure 6).

Figure 6: Select the destination of the cross-reference.
It’s possible that the target destination will be repositioned onto another page as my document repaginates. So make sure all of your cross-references are up to date before printing or exporting by choosing Type > Hyperlinks & Cross-References > Update Cross-References. If you ever forget to do this, InDesign gives a message at output time to remind you (Figure 7).
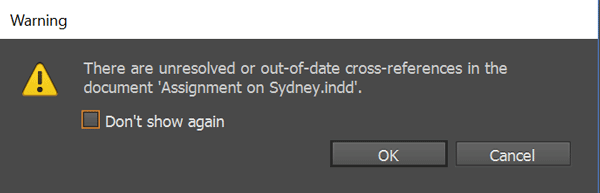
Figure 7: Oops! A cross-reference is out of date.
When exporting to PDF (Print), make sure to select the Hyperlinks option on the General tab. This will make the page numbers in the cross-references become hyperlinks to their destinations.
Note: Cross-references can also be made using text anchors (see this article on InDesignSecrets), but if you’ve already used paragraph styles, the above technique is the easier option.
The Smartest Way to Go
Just like some folks don’t go anywhere without their smartphone, I don’t create any InDesign documents without styles. Not only do styles give my documents a professional look and increase my productivity tenfold, they also make it possible to produce elements like TOCs, running headers, and cross-references in an efficient way. And that is more than just a bonus, it’s a necessity!
Commenting is easier and faster when you're logged in!

Recommended for you

A Script to Edit Styles with Find/Change
Bookraft Solutions has created a really useful script that will be of interest t...

How to Style a Callout Paragraph Automatically in InDesign
Learn how to style a paragraph in InDesign with helpful callout text and have In...
InDesigner: Ebook Expert Laura Brady
Anne-Marie Concepción provides a close-up glimpse of Laura Brady’s ebook design...