


Build Your Own Mount
It’s easy to make your own panoramic camera mount once you have chosen your camera and lens combination. I have made a number of successful camera mounts, each one better than the last. I have measured and tinkered, and made a few guesses (it’s nearly impossible to measure the exact nodal point of a lens that is inside the body of a 1.25 inch thick camera). My first few mounts featured sturdy rubber bands to hold the camera in place while I ran field tests; tripod screws would come later.
I dubbed the QTVR mount I took to India in 1997 as the Mark I. It was a featherweight mount made of two small blocks of clear fir and a small piece of plywood. The design has evolved over the last few years, but the basics are the same.

The Mark I, mounted here on a precision Kaiser ball-level. Originally I used the Mark I with a standard tripod marked for rotational positions.
To build your own QTVR head, you can begin with the plan I show below. The distance from the vertical portion of the mount to the hole in the bottom portion should be the distance from the bottom edge of the camera to the center of its lens. Dimension A should equal the distance from the side of the camera that will be in the down position to the center of the tripod mounting hole on the camera’s bottom panel. The offset of the mounting hole C (the pivoting point for the mount on the tripod) from mounting hole A should be the difference between the nodal point for the lens (more on this in a moment) and the center of the camera’s tripod mounting hole.
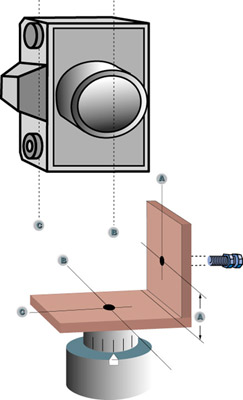
S QuickTime VR camera mount holds the camera vertically and so that the mount rotates about the optical center of the lens. (Illustration ©1997, Brian P. Lawler, from “QuickTime Virtual Reality how to make panoramic images,” available here.)

The rotation point of the camera mount should be around the nodal point of the lens — which is usually about half the length of the lens.
To connect the mount to the tripod head, I use a 1/4-20 brass threaded insert (available from mail-order woodworking catalogs) to create strong metal threads inside my wooden block. To connect the camera to the tripod at A, I originally used a 1/4-20 machine screw and nut from my coffee can full of such items (later I would substitute a wing nut, which looks much more professional).
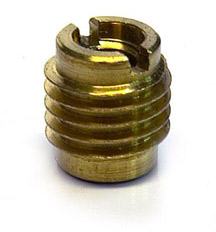
A 1/4-20 brass threaded insert in the bottom of the amount provides a strong connection for the mount on the tripod head.
Finding the Nodal Point
One of the trickiest parts of planning your QTVR mount is determining the nodal point of the lens. An approximation of half the length of the lens seems to work very well, but I found a trial-and-error method that lets exacting types get it just right, though you’ll need a good bit of patience and a camera with a through the lens (TTL) viewfinder to pull this off: Mount the camera on the panoramic mount on the tripod, and have somebody hold a broomstick or some similar object about a meter from the camera. Then looking through the viewfinder, rotate the camera on the tripod. You’ve found the nodal point when the broomstick no longer shifts left to right relative to the background as you rotate the camera on the tripod.
This article was last modified on December 13, 2022
This article was first published on April 10, 2001
Commenting is easier and faster when you're logged in!

Recommended for you

Tips for Fixing Overset Text
For an experienced user, fixing overset text is so simple that we overlook it, b...

X-Ray Magazine's $25,000 Software & Cool Stuff Giveaway
X-Ray Magazine, published by ThePowerXChange, has just announced a worldwide sof...

Turn your iPhone into a pro-quality light meter with Luxi
If you ever struggle to choose the right exposure settings on your camera, but y...