


It was the spring of 1997, and I was scheduled to travel to India to teach some classes for Apple Computer. One of the topics was to be QuickTime VR imaging — Apple’s “immersion technology” — which makes it relatively easy to create high-quality 360-degree panoramic images.
I was no stranger to panoramic photography when I accepted the assignment: In an earlier decade I was a charter member of the International Association of Panoramic Photographers, and I had long been a devotee of panoramic images using conventional rotating panoramic cameras. While I had dabbled with QuickTime photos, however, I had done so with borrowed equipment and had stitched together the panoramas using the QuickTime VR software installed on a friend’s system. Clearly, it was time for me to get going with a QTVR setup of my own.
Apple sent the QuickTime VR software, and I jumped in. I ordered a commercial QuickTime VR camera mount, and then I waited by my mailbox every afternoon as my departure date approached. With nearly three weeks to spare, I figured the mount would arrive in time to learn how to use it, and then I would take it with me to India. The mount never arrived, despite the assurances of the merchant that it had been shipped, but shifting to Plan B — making my own panoramic camera mount — turned out to be an experience that has served me well throughout the years: My own simple (and inexpensive) design has evolved to suit my needs better than any commercially available solution.
I have a workshop in my garage where I have a variety of tools for making furniture. I backed the car out of the garage and began making sketches of camera mounts. Three days before my departure for India, I had a camera mount made of pine and plywood. It was perfect for the task at hand.
I traveled to India, taught my classes, made a panoramic photo of the Taj Mahal, and then continued onward with a week in northern Holland and a couple of days in London on the way home. In each location I made panoramic images, and they remain some of my favorites.

A panorama the author shot of the Taj Mahal in 1997, using his first homemade QTVR camera mount. To see a larger version along with more of the author’s panoramic images, click here.
That teaching experience in India was the beginning of a passion for panoramic photography that has now overtaken my other photographic interests. I have made hundreds of panoramic photos, and I print them out as 44-inch-long prints on my Epson ink jet printer. They are fun to make, fun to show, and fun for people to see.
The QTVR Revolution
The panoramic photo has been with us for more than a century, but until recently it was the exclusive realm of those who could justify the expense of special cameras that rotate during exposure. Some photographers have long tried gluing together still photos to create panoramas, but the results are rarely if ever acceptable: The natural distortion of the lens, combined with minor variations in exposure between frames, will conspire to spoil such efforts.
Apple Computer changed all that with the development of QuickTime VR (QTVR) imaging software. Developed in the early 1990s, QTVR uses a series of photos, taken with a normal camera, and then “stitched” together into a continuous panoramic image. The software removes distortion, finds common points in adjacent images, and then merges them into a seamless image.
To make panoramic images, you need a normal (film or digital) camera, a tripod, the stitching software (Apple has a number of competitors by now), and a panoramic camera mount that holds the camera in position to make sequential photos in a circle. Beyond that, all you need is a panoramic location and the time to do the job.
In my next column, I’ll discuss Apple’s QTVR software and its more-recent competitors in more detail — including how to use them to the best advantage. This time around, I’ll focus on the hardware you’ll need to generate high-quality panoramic images — most notably, a camera mount designed for panoramic imaging.
Choosing Your Tripod
You’ll definitely need a tripod if you want to get started with panoramic photography. You should be able to find an adequate tripod for about $100, such as the lower-end models made by Bogen/Manfrotto, and having a tripod will also open up other photographic opportunities, such as photographing at night or indoors without a flash.
As with tripods for any purpose, keep a couple of qualities in mind as you shop: The tripod must be strong enough to hold your camera and panoramic mount without shaking, and a model sturdy enough not to easily tip or blow over is a good thing. I use a fancy carbon-fiber model with my rotational mount on top, but there are lots of modestly priced aluminum units that will do the job.
Tripod legs are often sold separately from tripod heads, so that you can buy the kind of head that best suits your needs. For panoramic photography, consider a low-end video head that includes a level.
The Right Camera
You can get started with panoramic photography with pretty much any camera, but I discovered relatively quickly that my point-and-shoot camera is not perfect for the style of panoramic photography I do: Though small and exceptionally sharp, my point-and-shoot camera does not allow me to lock exposure; as a result, the camera tries to compensate for the light as each frame is exposed, and each frame is slightly different than its neighbors. This can be fixed in the image, but it’s better to use the right camera at the outset. In short, try to use a camera that lets you lock exposure. You also want a camera that can be focused manually or that allows focus to be locked at infinity (as does my point-and-shoot model).
I quickly moved to a full-featured 35mm SLR — specifically, a Nikon N70 — for my panoramic imaging, and it proved to be a good choice: Like most cameras in its class, it allows full manual operation, which is a real boon for panoramic photography. It’s also small and light, though substantially bigger than my point-and-shoot model. Ultimately I gravitated to a Nikon D1. Though larger and more expensive than my N70, the D1 is a dream to use and has sold me on the benefits of digital photography.
The specific make and model of the camera you use is much less important than its features — such as the ability to lock or manually control exposure and focus. Of course, you’ll also need a camera with a tripod mounting hole, but it would be at least something of a challenge to find a camera without one. Most cameras the world over have standard, 1/4-20 U.S. threaded tripod mounting holes, though some have the larger 3/8-18 U.S. mounting holes.
Wider is Better (to a Point)
One misconception about panoramic images is that they require ultra-wide lenses to be effective. A moderately wide lens works well, but extra-wide, fish-eye lenses create fishy panoramas. I like to stick with a 35mm focal length of about 28mm, but it’s always a good idea to experiment with your own equipment to see what works best for you.
Panoramic Mounts
When shooting panorama’s, the camera should be positioned vertically, square to the horizon, to yield images that aren’t ridiculously wide for their height. The point of rotation should be centered on the optical center of the lens — or nodal point (more on this in a moment). A proper panoramic head will have a vertical camera bracket, a rotational index to facilitate accurate stepping from frame to frame, and a spirit level for setting level at the plane of rotation. Normal tripod heads do none of these well, so it’s important to use a mount that provides these features.
A number of firms make tripod mounts for panoramic imaging. Companies that make top-notch commercial panoramic mounts include Kaidan, Peace River Studios, and Bogen/Manfrotto. These camera mounts provide the hardware to hold the camera vertically, with a sliding base to allow the camera to be positioned on the optical center of the lens.
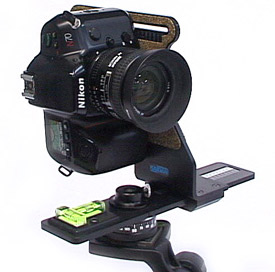
High-quality commercial mounts such as the Kaidan Kiwi shown here are highly adjustable, allowing cameras of various sizes to be mounted for panoramic imaging. The Kiwi also features interchangeable ball-detent disks, which allow for a variety of turning stops for different lenses.
The benefit of adjustable camera mounts is that they can be used with a variety of cameras and lenses, a feature I enjoyed during my experimentation stages. Once I homed-in on a camera and lens combination that worked well for me, however, I wanted faster set-up more than I needed the versatility of commercial mounts, and I found that custom-built camera mounts are more effective for me. My set-up time is nearly nil, I never worry about whether the optical center of the lens is correct (with my custom mounts I have no choice), and I don’t have to deal with the weight and multiple parts of the commercial mounts.
This article was last modified on December 13, 2022
This article was first published on April 10, 2001
Commenting is easier and faster when you're logged in!

Recommended for you
InReview: Typefitter 5
The latest version of this venerable plug-in from Typefi gives you unparalleled...

Free Guide to InDesign Special Characters
Download this comprehensive field guide to all the hidden characters and markers...

How to Design an Amazing Portfolio
For a grpahic designer, the importance of a portfolio cannot be overstated. In f...