

It was Thursday evening and I needed a teleprompter.
I was making a video about panoramic photography, and for the scenes where I speak directly into the camera I looked like a cross-eyed newscaster. While trying to read cue cards on a stand in front of the camera, my eyes were cast downward, and that looked odd.
To overcome this problem, I decided to read from the screen of my PowerBook instead. I figured that I could put the PowerBook display closer to the lens, and thus not appear to be looking down when looking at the camera.
But even with the text on the PowerBook screen, I still looked slightly downward when I wanted to look directly into the lens of the camera. A teleprompter was the solution, but there are no teleprompters in our area, and renting one from Los Angeles or San Francisco – both hundreds of miles away – was impractical and beyond my budget. I decided to build one.
Discipline Makes Successful Video
I am careful when making video productions to enforce a moviemaker’s discipline upon myself and my hired crew and helpers. This is a skill learned from experience. When one is making a video, attention to detail, continuity, and story are critical. I find that I can’t go back — ever — to shoot a fill-in scene; something will have changed, someone won’t be available, the light will be different — something will prevent success. Instead, I work to get it right the first time!
In the back of my sketchbook I keep a cardboard template with four windows cut to the proportion of a television screen. I use this to draw frames for my storyboards, and then I sketch ideas and stories into the frames. My sketchbook thus becomes the foundation of many of my projects. I had been working on the storyboard for this video for several months, and the story and scene ideas covered many pages of the book (see Figure 1).
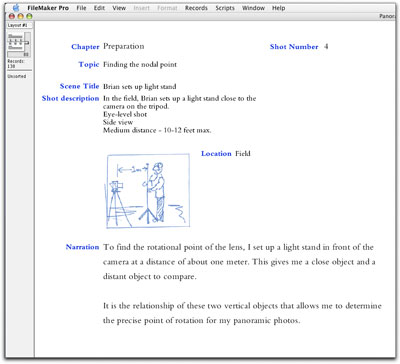
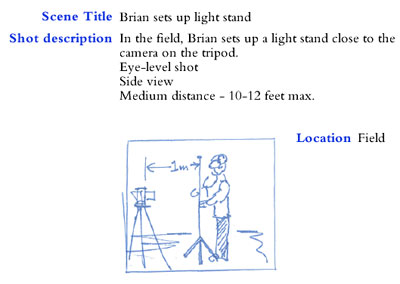
Figure 1: The FileMaker database with my storyboard sketches forms the backbone of my script (top). On each page of the database I enter a description of the scene, the shot number, and the narration (detail. Bottom). Once it’s complete and sorted, I export the narration to text, which is then imported into InDesign to create the narration PDF document for the teleprompter.
From Sketchbook to Database
After deciding to use a teleprompter, I wanted to convert the sketches in my book to visual elements of a script database. I scanned the pages of the sketchbook, and then cropped the individual frame drawings into small photos that I stored in a folder. I then built a FileMaker template, and imported all the images into that database. FileMaker is very accommodating in this respect — it imported my entire folder of numbered images into the database automatically.
Once the sketches were imported, I added descriptions, scene and shot numbers (used to sort the story into chapters), and the narration text. This method allowed me to develop the text that I would read into the camera using the teleprompter. Using FileMaker’s sorting functions, I then generated a story that was in logical order with a narration that flows smoothly and which I could read easily. After sorting the script, I exported the script records into text, and then placed the resulting file in Adobe InDesign for my teleprompter needs.
Construction of the teleprompter
Having seen a number of commercial teleprompters over the years in television studios and at trade shows, I understood the concept. A teleprompter is a made of a sheet of glass suspended in front of the camera lens at a 45-degree angle. The glass reflects the image of a TV screen without affecting the light entering the lens. In the most sophisticated units, there is a controller — and an operator — to set the pace of the text scrolling on the screen. Mine is more primitive.
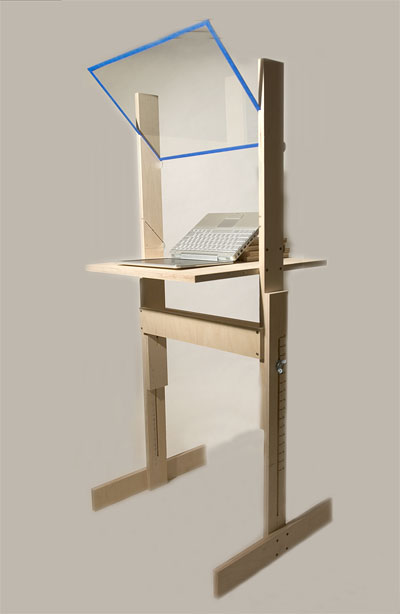
Figure 2: My homemade teleprompter has adjustable height (marked with a felt pen on the legs), a platform for the PowerBook, and a sheet of window glass mounted at a 45-degree angle in front of the lens. In the studio it works great. In a brightly-illuminated setting it would have to be draped with a black cloth to prevent ambient light from overpowering the image.
My prompter is nothing more than a sheet of window glass supported in a plywood frame in front of the camera at the correct angle (see Figure 3). I probably spent three hours cutting and building. Once it was finished, I set the PowerBook on it, and practiced reading the text as it paged-by. Without the sophistication of the scroll-speed controller, I use a PDF document, and I put a mouse with an extension cord on my knee to click when I want to change pages.

Figure 3: The PowerBook display is placed flat on the platform, and the glass reflects the image of the narration to the subject in front of the camera. The camera looks right through the glass, and is unaffected by the image on the computer.
Even with years of experience reading film negatives, handset type and such, my backwards-reading skills are limited. The image on my home-built teleprompter was — of course — backward. I tried to find a way to reverse the entire screen, but that was fruitless. I then placed my narration text into an InDesign document, formatted it with a style that would be very legible (white letters on a black background), then printed the file to disk as a .ps file with the image flipped horizontally (in the Output settings of InDesign’s Print window). Distilling this file into a PDF made the final document perfect for my reflecting teleprompter (see Figure 4). I was immediately reading with proper attention and eye movement — directly into the lens!

Figure 4: With the text flipped, I can read the narration from the PDF document displayed while looking directly into the lens of the video camera. With a mouse on an extension cable, I control the changing of the pages, and thus the pace of the narration. At first I thought the diminutive PowerBook would be too small to read easily, but have since learned that teleprompter screens are intentionally narrow to keep the reader’s eyes from moving too far back and forth while reading.
With my home-built teleprompter, the recording of the narration went smoothly, and now I have the device anytime I need it.
And I bet I’m the only person on my street with his own teleprompter!
This article was last modified on July 18, 2023
This article was first published on December 16, 2004
Commenting is easier and faster when you're logged in!

Recommended for you

Tab Leaders (Part 6): Tips and Tricks
This is the last installment in the back-to-basics-and-on-to-advanced “Tab...

Scanning Around With Gene: How to Achieve Happiness
I’ve always admired happy people. My natural tendency is toward the depressed, a...

PaperSpecs Webinar Roundup
Among the offerings at PaperSpecs.com, the leading online paper database, is a s...