
Automatic Text Formatting in InDesign with Nested Styles
Learn how to automate text formatting in InDesign via nested styles, line styles, and GREP styles.


This article appears in Issue 47 of InDesign Magazine.
Styles are vital to an efficient InDesign text workflow. Going from macro to micro, first there are object styles that can trigger a paragraph style (or even a sequence of styles) with a single click. Next come paragraph styles, where formats are applied (not surprisingly) at the paragraph level. Locally, we have character styles, used to make for-matting exceptions within a paragraph—for example, to give emphasis to a book title, company name, or any other range of text you want to call out.
But that’s not the end of the styles lineup. There are line styles, GREP styles, repeating styles…and we’ll touch on all of those, but the ones I really want you to know about are nested styles.
Nested styles allow us to mix things up by embedding—or nesting—character styles inside of paragraph styles. These in turn can be incorporated into object styles. It can get very Matryoshka Doll-esque. Maybe you’ve seen nested styles demonstrated by an InDesign pro—one click and the document’s formatted, the laundry folded, and everyone gets to go home early. In real life, it doesn’t work like that. While it’s possible to construct amazingly powerful nested styles, what you’re not seeing is that it probably took longer to create the nested style than it would have to format the document “normally.” Complex nested styles are great party tricks, but can confuse people and go awry in the hands of anyone but their Dr. Frankenstein. There’s much to be said for keeping it simple—especially if you’re working as part of a team. When you create styles, you may not be the only person using them. Or you may find yourself returning to documents that you created weeks, months, even years before. But I’m not trying to scare you off; I’m setting you up for nested-style success.
The best nested styles are those that are easy to set up and that you use frequently. Look at just about any newsstand magazine and you’ll find a host of examples of simple nested styles in action: styles that took just seconds to create and over the course of a publication’s lifetime save hours of tedium (and ensure consistency).
To create a nested style, first create the character styles you will add to a paragraph style definition, then follow these steps:
- Double-click on the paragraph style you want to edit.
- Select Drop Caps and Nested Styles from the list on the left side of the Paragraph Style Options dialog box.
- Click New Nested Style.
- Choose from the list of available character styles in the first column.
- Specify how to disable the character style. For example, either choose a specified number of words or characters, or a condition from the drop-down menu that appears when you click on the last item following your specified style. You can also type a specific character such as a colon (:) into this field. Without a delimiter, the character style never gets turned off, and will affect the whole paragraph. Choosing Through includes the character that ends the nested style, while choosing Up To formats only those characters that precede the designated character(s).
If you have more than one nested style, you can click the up or down button to determine the order in which the formatting is applied. The formatting of the second style begins after the formatting of the first. Here are some examples of nested styles that offer a high return on the investment it takes to set them up.
Chapter or Section Openings
For chapter openings that begin with a drop cap, it’s a common convention to style the drop cap in a contrasting font, perhaps also in a different color, and to transition to the upper- and lower-case of the body text with a specified number of words in small caps (Figure 1).
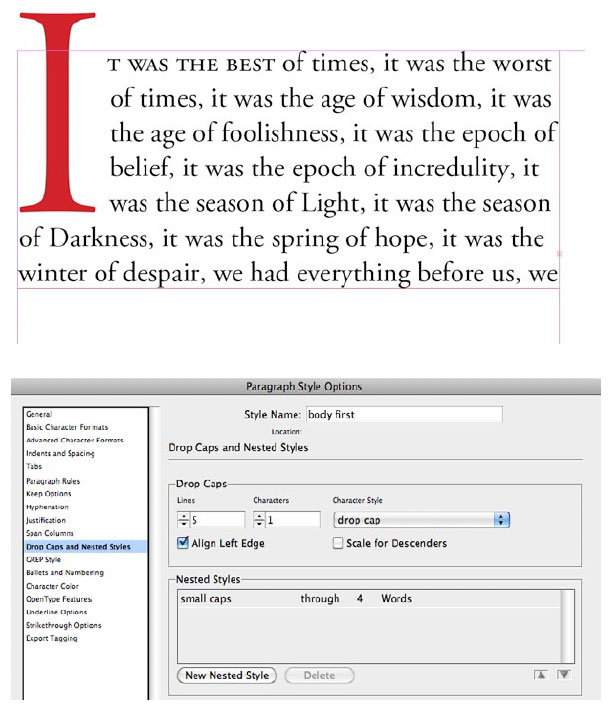
Figure 1: Nested Styles at their most simple—and perhaps most useful—here used to format a chapter opening paragraph, applying with a single click both the drop-cap formatting (red, Titling alternate, increased size) and OpenType small caps to the first four words.
Fiddly stuff, to be sure, if you had to format it manually every time—but it’s just a single click once you’ve set up a nested style. (Note that if you want to apply small caps to a whole line rather than a specified number of words, you have to use the Nested Line Style feature instead of nested styles—Figure 2.)
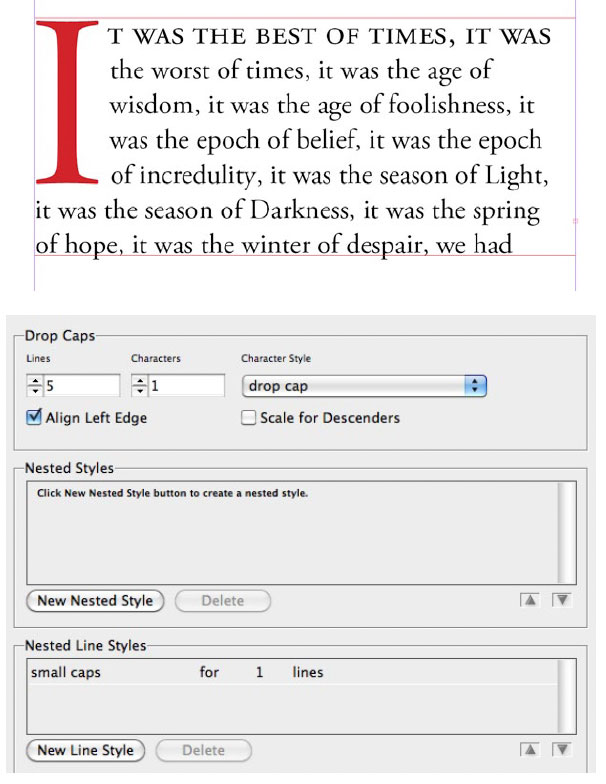
Figure 2: To apply small caps to the whole line, use a Nested Line Style.
Run-in Heads
Run-ins are usually third-level subheads that have the heading on the same line as the body text that follows, thus making them space-efficient. The heading is distinguished from the body text with a contrasting font. The key with run-in heads—and for all nested styles—is that they use some identifiably consistent element. For example, this element could be a colon or en space that separates the subhead from the body text. If you want a particular character like this, you need to type it yourself, replacing the word “Words” or “Characters.” Also, note that if you type more than one character into this field, then InDesign stops the nested style at whichever it encounters first. So if some run-ins end with a colon and others end with a full stop, you can type both characters into this field (Figure 3).
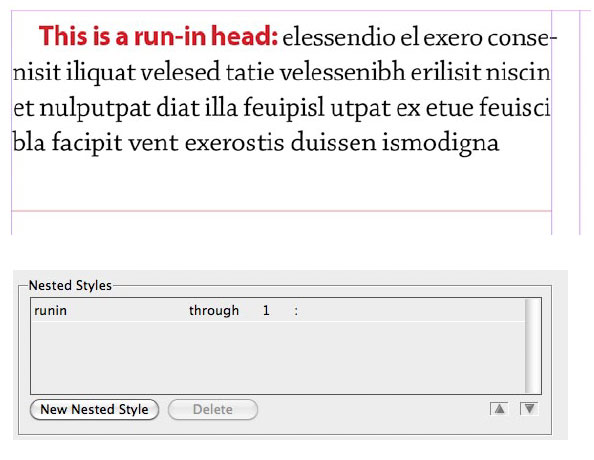
Figure 3: A simple run-in head is created by using a colon as the delimiter to disable the character style.
Contents Page
Contents pages often use a page number as a run-in head. Additional run-in elements can include identifying tags like “Cover Story” or “Feature Article,” which can be added as GREP styles (see below). The problem with pages like this is that they’re often not consistent in the number of words or characters or other things easily-definable as an endpoint to the nested style. Fortunately, InDesign has an invisible “end nested style” character that can force a nested style to stop (Figure 4).
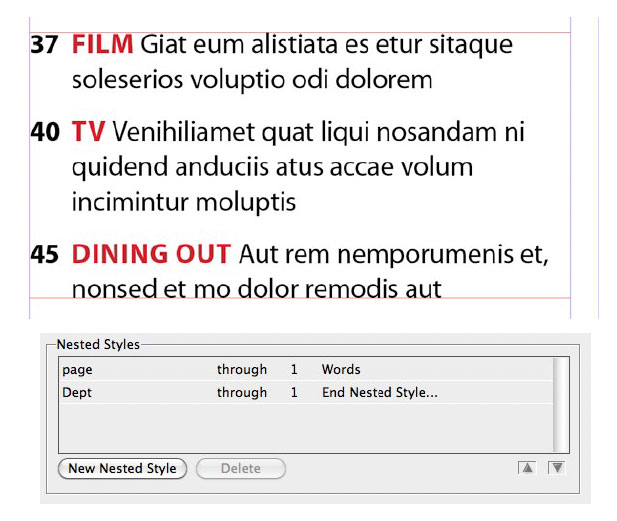
Figure 4: Because some of the departments are one word, others two, an invisible End Nested Style Here character (Type > Insert Special Character > Other) is inserted after the department name to disable the Dept character style.
Repeating Styles
To repeat a sequence of nested styles, effectively creating a loop of styles within a paragraph, choose [Repeat] from the Nested Style drop-down menu, and specify the number of styles to repeat. One helpful way to use this is to give alternating contrast to a list of names in a single paragraph (Figure 5). Another idea might be to have it change character styles each time it finds a tab character, so that each “column” in tabular data shows up in a different style.
![Figure 5: The [Repeat] option is useful, for example, for giving emphasis to individual words or phrases when a bulleted list would take too much space.](https://creativepro.com/wp-content/uploads/2024/06/nested-styles-fig5.jpg)
Figure 5: The [Repeat] option is useful, for example, for giving emphasis to individual words or phrases when a bulleted list would take too much space.
GREP Styles
A GREP style automatically applies a character style to consistent patterns within the text, regardless of where they occur in the paragraph. To create a GREP style, you specify a GREP expression—i.e., the text you’re looking for—and choose a character style to apply to it. All paragraph text that matches the GREP expression is formatted with the character style. An obvious application is when you want a product name or the name of your publication to be formatted with specific character styling—bold, italic, a certain color, whatever. Any time you type that combination of words, it automatically takes on the right formatting. If you want to apply a GREP style to multiple text patterns, separate each with a vertical pipe (|) character. For example, to apply a particular character style to the words “red” and “blue,” type red|blue in the To Text: field (Figure 6).
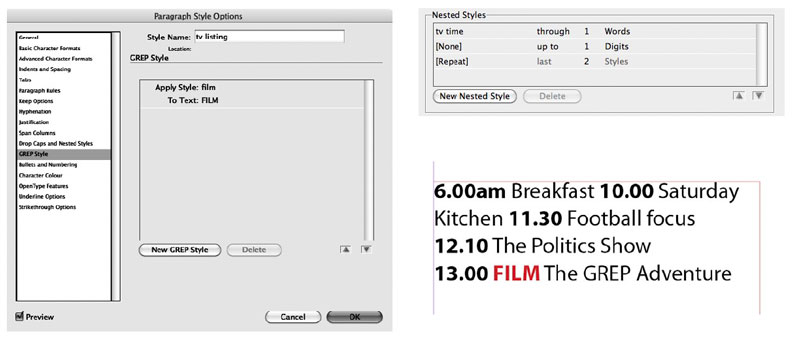
Figure 6: For this TV listing, a nested style sets up an underlying pattern between times and text. Then a simple GREP style is used to call out “Film” in color. The GREP style is necessary because the position of “Film” will vary from paragraph to paragraph.


I hope these simple examples give a flavor of what’s possible with nested styles. By all means take them further, but you’ll likely find that in terms of bang for your buck, it’s these simple, everyday nested styles that you’ll use day in and day out.
This article was last modified on June 6, 2024
This article was first published on June 6, 2024
Commenting is easier and faster when you're logged in!

Recommended for you

3 Ways to Fix Runts in Your Text
In typography, a “runt” occurs when the last line of a paragraph end...
Find Spacing Problems by Displaying Spaces Instead of Text
Our friend and colleague Nigel French (author of the book InDesign Type) reminde...
Now available: GREP in InDesign, 3rd Edition
Learn how to harness the power of GREP in InDesign to supercharge your work. And...