
Jamie McKee shows how to use defined lists to take the time and toil out of numbering tables and figures in InDesign.
Q: I’m editing and repurposing a book containing several dozen figures and tables. Each is titled and numbered consecutively, but most of these figures/tables are going to be shuffled and reordered. Is there a GREP or script that can help me renumber them once the project is finished so I don’t have to do it all by hand?
A: You’ve run into a common scenario that many people have to deal with. And while given enough time (and likely money), a script could likely be written to solve this, there’s an easier solution right within InDesign that can handle this task for you: Defined Lists.
Defined lists are an option of automatic paragraph numbering. When you create a paragraph style for numbering, you can assign a “list” to the style, and paragraphs are numbered in that style according to where they appear in that defined list. This lets you make more than one numbered list in the same document, and make lists that continue numbering even across multiple unthreaded text frames.
The first paragraph to appear is given number 1 (“Figure 1,” maybe, for your book project,) and the next paragraph is given number 2 (“Figure 2”), even if it appears several pages later. Because both paragraphs belong to the same defined list, they will be numbered consecutively no matter how far apart they are in the document or book. And because InDesign is keeping track of their numbering, even if you move one item in the list before or after another, the items in the list will be renumbered accordingly. Best of all, you can define a list for
each type of item you want to number—one for figures, another for tables—and even if you interrupt one list with another, the number sequences of each list will be maintained.
To illustrate the process, let’s start with the figures. Begin by creating a paragraph style for the figure captions, styling as needed. Switch to the Bullets and Numbering section of the Paragraph Style Options dialog box. Set the List Type to Numbers and, in the List drop-down menu, choose New List. Give the list a name, and select the options that pertain to how your book is set up: Continue Numbers Across Stories continues the numbering within your document through multiple unthreaded text frames; Continue Numbers From Previous Document In Book continues the numbering through multiple files set up as part of an InDesign Book file (Figure 1).

Figure 1. The New List dialog box, with a descriptive name already filled in.
Now, still in the Paragraph Style Options dialog box, you can finish setting up the other options for your figure captions. For instance, you may want to set Numbering Style to “Figure ^#: ” which translates to the word “Figure” followed by a space, the metacharacter for figure number (^#), followed by a colon and a space. Finally, be sure to set the Mode to “Continue from Previous Number” so that the figures are numbered sequentially (Figure 2).
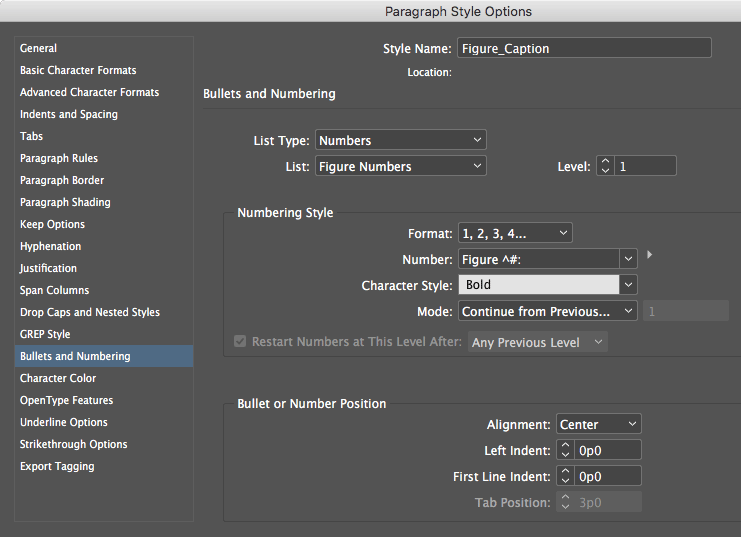
Figure 2. Setting typical numbering options when using a defined list.
Once you go through your document(s) and apply your new Figure Caption paragraph style, all your figure captions will be sequentially numbered, and even if you swap them around, delete some, or add others, they will retain their sequential numbering.
When you’re ready to tackle your tables, set up the paragraph style the same way, creating a new Defined List for your tables (and be sure to swap the word “Figure” with “Table” in the Numbering Style text box). Once you apply the new paragraph style to your table captions, you can then move them around with abandon, secure in the knowledge that they too will remain sequentially numbered.
One more trick: If you need figure references inside your body text that “point” to the numbered figures (or tables, or whatever), you can create those with a cross-reference. See my article in issue #79 for the full story on working with cross-references.
Commenting is easier and faster when you're logged in!

Recommended for you

Multi-Level Automatic Numbering in InDesign
Making multiple levels (like 1A, 1B, and so on) in a list seems confusing at fir...

How to Preserve the Appearance of Text When Updating Tables
It is always frustrating when a table formatted in InDesign needs to have its co...

InDesign How-to Video: How to Align Auto Numbering on a Decimal
In this week’s InDesignSecrets video, Mike Rankin explains how easy it actually...