
Automate Text Formatting with Tagged Text
You can export data directly from Excel or a database, ready to flow as preformatted text onto your page.


This article appears in Issue 124 of InDesign Magazine.
When you have a lot of data in a spreadsheet (such as Excel) or a database, you have many options for placing it into InDesign, but I want to offer you one that you probably have not considered before: tagged text. This method lets you apply tags to your data so that you can flow it into InDesign completely formatted with paragraph styles, character styles, special characters, and more.
In this article, I’m going to use the example of creating a directory. However, this technique could be used for many different types of documents, including signage or catalogs. I probably would not use this technique if I wanted to:
- Import the data as a table (I could just import an .xlsx file for that);
- Create a catalog or ads with lots of images (you’d probably want to use a plug-in such as EasyCatalog or InData for that);
- Use a basic template to create many versions of the same thing, such as name tags or a flyer (I’d use InDesign’s built-in Data Merge for that).
However, if you have a ton of data that you need to format quickly into a long story, there are few techniques as fast and powerful as tagged text.
What Is Tagged Text?
Tagged text is a way to describe text formatting using codes, sort of like how HTML describes text for a web browser. I say “sort of” because tagged text is very different—it has its own weird and very strict rules. The easiest way to get a sense for InDesign tagged text is to format a small bit of text in a text frame, choose File > Export, and then choose InDesign Tagged Text from the Format pop-up menu of the Export dialog box. InDesign
asks you if you want Verbose or Abbreviated tags (Figure 1), and you almost always want to choose Verbose, which is much easier for humans to read. In most cases you will also want to choose ASCII encoding, unless your text contains glyphs that require Unicode.
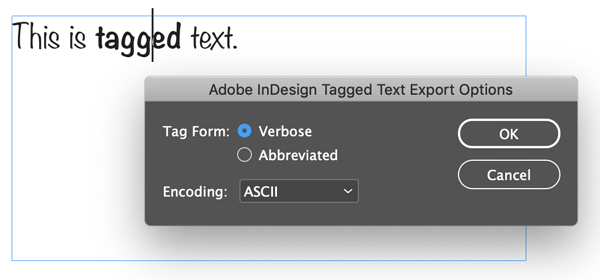
FIGURE 1. Exporting InDesign tagged text
Once you export your tagged text file, you can open it in a text editor, such as BBedit, TextWrangler, or NotePad. (You want to be sure to use a text editor rather than a normal word processor, which might break the code by doing things like changing straight quotes into typographer’s quotes.) If you only applied basic formatting to the text in InDesign, the tagged text should be relatively easy to read (Figure 2).

FIGURE 2. Simple tagged text
Of course, InDesign can read tagged text as well as write it. Our task is to make Excel (or whatever spreadsheet or database you’re using) write tagged text that InDesign can then read. It’s not hard, but it does require some geeking out and an obsessive attention to details.
Make the Template
The first step is to make a template in InDesign that looks like what you want your spreadsheet or database to spit out. It doesn’t need to be long, but you should make all the paragraph styles and character styles; ensure everything is formatted exactly the way you want it to end up (Figure 3).

FIGURE 3. This is the sample template for our directory.
In our example, we’re making a directory that contains all the data from an Excel spreadsheet (Figure 4).
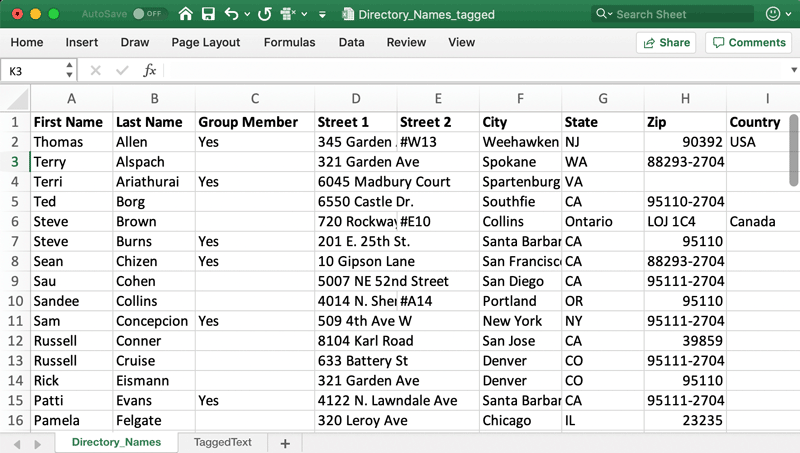
FIGURE 4. This is the data we’ll be using for the directory.
Next, export your sample story as tagged text, and open it in the text editor. It will probably have a bunch of extra tagged text that you won’t need, such as tags that begin with “FeatureSet,” “ColorTable,” or “DefineParaStyle.” You can ignore those.
The tags you care about are the ones directly affecting text, such as the tags that start with “ParaStyle,” which is (obviously) the tag that applies a style to that paragraph of text (Figure 5). For example, in the parlance of InDesign’s tagged text, “<ParaStyle:Name>” will apply a paragraph style called “Name” to the paragraph.
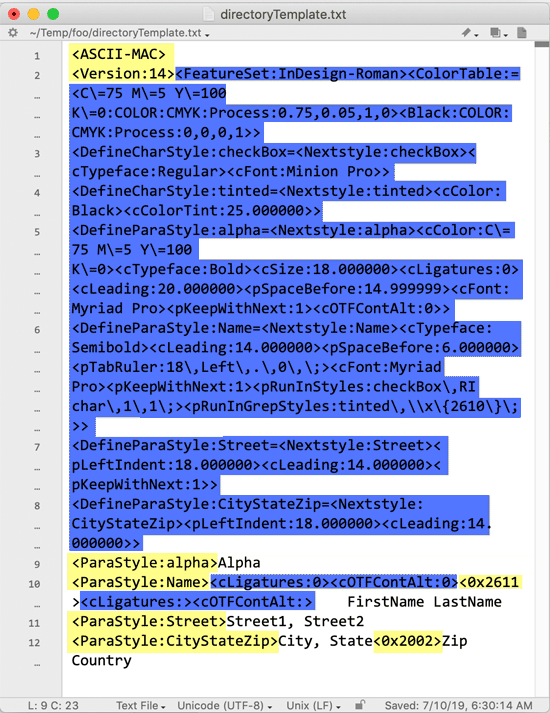
FIGURE 5. For our purposes, we’ll ignore the text highlighted in blue and focus on the tags highlighted in yellow.
After exporting your “sample template” and analyzing the exported tagged text for relevant tags, the next step is to build those tags into your spreadsheet or database.
More About Tagged Text
When you’re tagging paragraphs with styles in tagged text, you do not need to “close” the paragraph style tag—that is, the tag is only at the beginning of the paragraph. Some other tags do require closing tags. Unfortunately, InDesign Tagged Text is not well documented, and to figure these things out you often just have to export sample text to test it. However, if you find yourself curious to learn more, you can find some good insights in this PDF file.
Calculating Fields
In general, the way to combine your data with formatting tags is to use calculation fields. In a database, these might be invisible fields that grab data and add the tags. In a spreadsheet, these are fields that include a function that concatenates the data and the tag. These functions can live on the same worksheet as your data or on a different worksheet.
In my example spreadsheet, I’ve created two fields with formulas that help me export the tagged text. First, I made a formula that builds my “alpha” letters—that is, a letter of the alphabet that appears before each new section of the directory. I did this by comparing the first letter of the person’s last name with the one in the row above it (Figure 6).
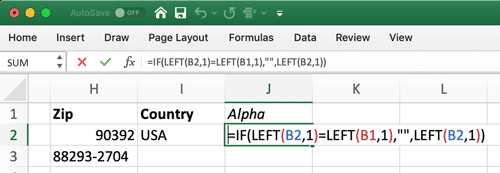
FIGURE 6. This Excel formula compares the first letters in two cells and—if they’re different—adds an “alpha” character.
Next, in a new worksheet (in the same file), I added a cell that contains this formula:
=”<ASCII-MAC>”&CHAR(13)&”<Version:14>”
This is the beginning of the InDesign Tagged Text, and types two lines of text. The ampersands (&) mean add the text together, and the “CHAR(13)” means add a carriage return. Note: If you are using a Windows version of Excel, you would use CHAR(10) instead.
The next cell down is where all the rest of the tags come together—using that same basic structure of ampersands to bring bits of text together, including data in other cells, special characters, and tags (Figure 7). I admit it appears scary at first, but it’s actually relatively straightforward if you take it piece by piece.

FIGURE 7.
The formulas on the second worksheet combine data from the first worksheet with tags and special characters.
Again, I’m using Excel, but lots of spreadsheets and databases let you do similar calculation fields that bring data together with text. Of course, the particular formulas to use may be different in those other apps.
Understanding the Codes
Let’s look at each piece of what we see in cell A2 on the previous page:
|
= |
Formulas always begin with = |
|
IF(Directory_Names!J2<>””,” <ParaStyle:alpha> “&Directory_Names!J2&CHAR(13),””) |
I’m using several IF functions, which always include three parts inside parentheses, separated by commas. This first one says if the “alpha” cell (J2) is not empty, then include that letter along with some tags and a carriage return. |
|
&”<ParaStyle:Name>” |
Add a tag to apply the paragraph style “Name” |
|
&IF(Directory_Names!C2=”yes”, “<0x2611>”,”<0x2610>”) |
If cell C2 equals “yes,” then include the Unicode character for a ticked checkbox; otherwise, include the empty checkbox character. |
|
&CHAR(9)&Directory_Names!A2&” “&Directory_Names!B2&CHAR(13) |
Add a tab, followed by the first name, then a space, then the last name. End it with a carriage return. |
|
&”<ParaStyle:Street> “&Directory_Names!D2 |
On the next line, set the paragraph style to “Street,” and add the data from D2. |
|
&IF(Directory_Names!E2<>””, CHAR(44)&” “&Directory_Names!E2,””)&CHAR(13) |
If E2 is not blank, then type a comma, a space, and then the address from E2. |
|
&”<ParaStyle:CityStateZip>”& Directory_Names!F2&CHAR(44)&” “&Directory_Names!G2&”<0x2002>” &Directory_Names!H2 |
On the next line, set the paragraph style; then add the data from F2, followed by a comma and space, then G2, followed by an en dash, followed by H2. |
|
&IF(Directory_Names!I2<>””,” “&Directory_Names!I2,””) |
Finally, if I2 is not blank, then add a space followed by I2. |
Exporting to Text
Once your cells are all set up properly, you need to export a plain text file, which InDesign can import. There are various ways to do this, but the method I usually use with Excel is:
1. Select and copy the tagged text calculation cells.
2. Create a new document, and choose Edit > Paste Special.
3. Choose Values, and click OK (Figure 8).

FIGURE 8. Paste Special lets you convert the cell data into actual values.
4. Choose File > Save As, and choose Tab Delimited Text (.txt) for the format.
5. Open the file in a text editor, and use Find/Change to get rid of the quote marks. (I’m not sure why Excel places quotation marks at the start and end of each paragraph; it’s really annoying!)
6. Save the file.
Again, if you’re using a database or some other tool, the process will be different. The goal, though, is the same: a plain-text file equivalent of the data.
Now you’re ready to place your text file into InDesign. You can do that with the normal File > Place feature. InDesign automatically sees that the file is tagged text and “interprets” it, converting the tags into formatting (Figure 9).

FIGURE 9. When you place the tagged text file, InDesign converts the codes into styles.
Tagged Text with Super Powers
InDesign Tagged Text is a powerful way to convert plain text with codes into formatted text… but it’s limited. For example, you cannot include anchored frames or images. Fortunately, the folks at Em Software developed a tool called xTags, which is like tagged text on steroids! With xTags, you can not only automatically generate inline or anchored objects and import images, but even change text based on customizable macros, or apply master pages to each page. (For example, you could automatically apply a “chapter opening” master page to any page that has a “chapter title” paragraph style on it.)
From Data to Delight
It’s important to test your files carefully, because even a tiny error in the calculations or tags can cause major headaches—either the whole import will fail, or the text will be imported incorrectly.
However, when all the bugs in the formulas have been worked out, and you get the process perfected, it’s a joy to export plain text data from your spreadsheet or database and have it (magically!) turn into beautifully-formatted text in InDesign.
Commenting is easier and faster when you're logged in!

Recommended for you

InDesign Magazine Issue 76: Publish Anywhere with InDesign to HTML5
We’re happy to announce that InDesign Magazine Issue 76 (August, 2015) is now av...


InQuestion: List Lines, Running Headers, and Table Cells
Erica Gamet highlights the best Q&A from the incredible InDesignSecrets Facebook...