

Excerpted from InDesign Magazine, October/November 2011 (issue 44). Subscribe now!
In addition to the HTML version of the excerpt below, you can also download the excerpt as a PDF that retains the full design of the magazine. This PDF is best viewed in Adobe Acrobat or the free Adobe Reader.

Let’s say you’re trying to learn a complicated cooking technique. Would you rather read about it, see a diagram of it, or watch an expert demonstrate it in a video? Most people would choose the latter.
While you may not think of InDesign as a video tool, you’ve actually been able to place video into InDesign since CS2. With InDesign CS5 and 5.5, you can output video-enhanced InDesign files as Flash-based PDFs, SWFs, EPUBs, and even Android and iPad apps.
But just because InDesign lets you do pick a video file from your desktop doesn’t mean it’s the right format or the right size. In this article, I’ll explore your options, make recommendations, and show you how to set up your InDesign document properly when working with video files. Since InDesign CS5 and 5.5 added more video capabilities, I’ll focus on those versions of the app.
Video Terminology
Video has its own terminology. Here’s a quick glossary:
Frame rate: The number of frames that appear each second (measured in frames per second, or fps). Higher frame rates — up to 60 fps in this menu — play more smoothly but require more bandwidth and file size.
Data rate (bitrate): The amount of information, or detail, that is stored per unit of time of a video. The data rate depends on sampling frequency, the encoding scheme, and compression algorithms. It is measured in Mbps (megabits per second) or, smaller and more commonly, kbps (kilobits per second). Choosing higher data rates will create video of higher quality but also larger size and longer transmission time.
Key frames: Complete video frames (or images) that are inserted at a consistent interval in a video clip. If you use Adobe Media Encoder, it automatically determines the key frame interval based on the frame rate.
Aspect ratio: The ratio of the width of an image to its height. The most common ratios are 4:3 (standard television) and 16:9 (widescreen and high-?definition television).
Choosing The Best Video Format
Prior to CS5, InDesign only supported what are now called legacy formats: legacy-encoded QuickTime (.mov), AVI (.avi), and MPEG (.mpeg). You can still use these formats in interactive PDF files, but you’ll see a warning dialog when you place them (Figure 1), and viewers of your PDF must have QuickTime 6.0 or later installed to play those formats.
Figure 1: Legacy Format Warning.

Better formats to use are either Flash-based video — FLV (.flv) or F4V (.f4v) — or H.264 encoded video — including MP4 (.mp4), M4V (.m4v) and, somewhat confusingly, H.264-encoded QuickTime (.mov). (QuickTime is a container format than can include different encodings.) Adobe Reader 9 or higher and Acrobat 9 or higher play these formats using an embedded copy of Flash Player, so playback is identical on different computer platforms. Because of the rapid ascent of the iPad — which doesn’t support the FLV or F4V formats — as well as other tablets and smartphones, I recommend the H.264-encoded video formats; that is, MP4 or M4V.
Creating Video With The Proper Size
Video file sizes are far larger than audio, images, and text. For most digital publishing projects — especially those targeted at mobile devices — it’s crucial to keep video clips to a reasonably small file size. To reduce file size, try these tips:
* Make your clips as short as possible, trimming whatever isn’t essential.
* Avoid rapid movement in the video. Video compression is partly achieved by comparing the pixels in subsequent video frames. Rapid camera movements mean the pixels change a lot from frame to frame, so less compression is possible.)
* Make the video dimensions appropriate for the device that will display it. For example, for a tablet with a 4:3 aspect ratio, a common size is 400 × 300 pixels. For a 16:9 aspect ratio, a common size is 640 × 360 pixels. For full-screen videos in an Adobe Digital Publishing Suite project, make the width 1024 pixels. But this would likely be too large for an EPUB file where the overall file size is more constrained.
* Adjust your compression settings by choosing from the presets in Adobe Media Encoder (see the next section). I don’t recommend manual settings unless you’re a video professional.
Using Adobe Media Encoder To Convert Video
Adobe Media Encoder is a stand-alone video encoding application that lets you encode audio and video in a variety of formats. It can convert legacy video formats to Flash video and H.264 video formats. You can also choose presets for different media output that allow you to choose different aspect ratios and data rate settings.
Media Encoder comes with Adobe Creative Suite Design Premium, Web Premium, and Production Premium. If you don’t have the Media Encoder, a Web search will yield many other media conversion applications, many of them free. To convert your video, take these steps:
1. Open Adobe Media Encoder 5 or 5.5. You’ll see a single window (Figure 2, click to play video clip). In the top Queue section, click the + button to add the file you want to encode (for example, a legacy QuickTime file). Or, even easier, just drag the file into the large central area.
Figure 2: Adobe Media video clip. Click to play the movie.
2. Choose the video format you’re aiming for from the Format menu — in this example, H.264. Click the Preset menu to select a preset that best represents your target output; for example, the Apple iPad. If you’re not showing a video full-screen, you may choose a video aspect ratio that’s different from the device’s aspect ratio. You might keep the ratio of the video source file to avoid a “letterbox” effect (black bars on the sides of the frame). Some outputs have more than one aspect ratio or data rate setting for the same device, so try out different settings to see which produces the best result at the lowest file size.
3. Click the Start Queue button to create a new, usually smaller, video file.
Figure 2 above shows me selecting a high-data-rate, legacy-encoded video that is 8 seconds long. Its original data rate is 21.57 Mbps and it has a 22 MB file size. After re-encoding to H.264 at 400 × 224 pixels and a data rate of 800 kpbs, its file size drops to 852 KB. The frame rate was unchanged at 29.97 frames per second. For more technical details on bit rate and fps changes file size, see the Additional Resources section toward the end of this article.
4. For more control over the encoding, right- click the source file name and choose Export Settings. This opens the Export Settings dialog where you can tweak a variety of video settings (Figure 3).
Figure 3: Media Encoder Export Settings. Click on the image below to see a larger version.

Placing and Controlling Video Play in InDesign
You can place a video or audio file into your InDesign document in one of two ways: Choose File > Place, or click the Place a Video or Audio File button at the bottom of the Media panel (Window > Interactive > Media). Either way, it’s best to just click or drag the Place icon to create the media frame (rather than place it inside an existing frame) so the video doesn’t appear cropped. Make sure the center of the video, at least, is on the page, or it won’t export.
You control video play in three InDesign panels: The Media panel, the Buttons panel, and the Preview panel. The Media Panel (Figure 4) lets you set options for how your video will play once you’ve output your project. It also lets you preview a video with the scrubber control located under the video preview. Some controls are output-dependent:
* Most Media panel controls work when exported to Interactive PDF and SWF files. However, the Loop feature is supported in SWF export only.
* Media panel settings won’t affect video placed in EPUB files.
* For Adobe Digital Publishing Suite projects, additional video controls are on the Overlay Creator panel. Overlay Creator settings override Media panel settings.
Figure 4: Media Panel in InDesign CS5 and 5.5.

Playing Video: Clicking on a video in an interactive PDF or SWF file prompts it to play. You can also create buttons that control video play (Figure 5). With the Button panel, you can set Video actions to Play, Stop, Pause, Resume, Play from Navigation Point, or Stop All (the latter is SWF only). Caveat: Buttons don’t work in EPUB files. A user must tap a movie to make it play.
Figure 5: Play Video Button.

To start a video as soon as a page is loaded, check Play on Page Load on the Media panel. In SWF output only, the video can be repeated by checking Loop.
To begin a video at a frame other than the first one, create navigation points that can be triggered by a button. Here’s how:
1. Place the video in your InDesign document, and view it in the Media panel.
2. Use the scrubber control on the Media panel to advance to the first point you want to mark.
3. Click the + button under Navigation Points. The time code of the point appears and a field initially called Point 1 appears. Edit the name to something meaningful.
4. Repeat steps 2 and 3 to create more navigation points.
5. Create a button using the Buttons panel for each navigation point.
6. For each button, choose the Video action. Select the video name. In the Options menu, select Play from Navigation Point. Select the name of the navigation point that the button will trigger.
7. There’s no way to set a navigation point as a stopping point. The viewer will need to use the Stop or Pause controls on the Controller.
Poster Image: A movie poster is the image on a page that marks the position of the video. Think of it like a book cover. By default, InDesign displays the first frame of the video. To pick another, go to the Media panel and choose from four options in the Poster menu:
1. None shows a blank space you might choose when the video covers a background image you don’t want to obscure.
2. Standard shows a small filmstrip icon.
3. From Current Frame lets you choose a frame by scrubbing through the video using the scrubber control. Click the double-arrow button to the right of the menu to use a current frame.
4. Choose Image… lets you select a poster image you create and save as a bitmapped format supported by your digital publishing output. The separate poster image file should have the same pixel dimensions as the video. To give your audience a helpful usage hint, add a “play triangle” or a “movie clip” icon to the poster in Photoshop.
Controller: When you place a Flash-based or H.264-encoded video, you can choose from a long list of skins: controllers that appear over the video. You can make the controller appear only on rollover by checking Show Controller on Rollover. These are Flash skins, so they won’t work when you export to DPS or EPUB.
Legacy Format Controls: You can’t preview legacy video formats in the Media panel or Preview panel. You can’t create a poster image from a frame of the video, though you can select a file for a poster image. You also can’t use Flash-based skins; you can only select a simpler controller with play, pause, stop, and start commands.
PDF-Only Controls: Video in interactive PDF has some additional controls (see “Video in Interactive PDF” later in this article).
Testing Video Playback: If you’re outputting to interactive PDF or SWF, test the appearance of your video, poster image, and controller in InDesign’s Preview panel. One quick way to open the Preview panel is to click the Preview Spread button at the lower left corner of the Media panel. Since the Preview panel is Flash-based, it can’t preview DPS- or PDF-only video behavior.
Embedded Video Versus Streaming Video
Most of the video we’re talking about in this article is embedded video. The larger your embedded video file, the larger your exported file size.
However, for interactive PDF and SWF files, there is another option: streaming video. They’ll keep a PDF or SWF file size smaller, but your viewer must have access to the Internet to play this video.
Streaming video files reside on a Web server or on a Flash Media Server or Flash Streaming Service. Streaming video files must be in a Flash video format or H.264-encoded.
To set up your document for streaming video, start by creating an empty frame or select a video you want to replace. Choose Video from URL from the Media panel menu. Specify the URL and click OK.
Note that the URL must point to a file that ends in the appropriate file extension; for example, https://www.fakeURL.com/videos/Intro_Video.f4v for a file on a web server. Use rtmp:// in the URL for a video on the Flash Media Server or Flash Streaming Service.
Video In Interactive PDF Files
Several Media options pertain only to videos in PDF files (Figure 6). You can add a description that appears when a PDF can’t be played and acts as alternative text for visually impaired viewers. You can also select the Play Video in Floating Window option and specify the size ratio and position on the screen.
Figure 6: PDF Options.

Be aware that video in a PDF file performs better on desktop computers than on mobile devices. Adobe Reader for Mobile (Android, Blackberry, Palm, etc.) doesn’t display video, and only one iOS PDF reader app, ezPDF Reader, can display video embedded in a PDF.
Video In SWF Files
When you export a SWF file that contains video, it can be viewed in Adobe Flash Player and in a Web browser that supports the Flash Player plug-in. You can use all the controls in the Media, Buttons, and Preview panels to preview and control video play. However, a SWF file will only play on devices where Flash is installed, so the iPad is out of the picture.
For SWF output, you can place artwork over only part of your video content, as long as some of the video is clickable. This isn’t possible for interactive PDF files or Digital Publishing Suite projects because they always put interactive elements above page objects.
Video In EPUB Files
While it’s possible to embed video files in an exported EPUB file, there are several limitations:
* You need InDesign CS5.5. With InDesign CS5 or earlier, you have to manually edit the exported EPUB file to insert a video file.
* Only the iBooks app for iOS devices and the Nook eBook reader can display the video. The Kindle doesn’t accept files in the EPUB format, regardless of whether they have video.
* Anything you set in the Media panel will be lost when you export to EPUB, which makes some tasks much more difficult. For example, to include a poster image, you must add a reference to the poster image in the <video> tag, add the poster image file to EPUB images folder, and edit the manifest in the content.opf file to include the video file. For information on editing EPUB files, see Gabriel Powell’s article “Editing eBooks” in InDesign Magazine #32 and the eBook listed in the Additional Resources sidebar below.
Video In Digital Publishing Suite Projects
The Adobe Digital Publishing Suite (DPS) is a publishing solution to create and publish apps for the iPad and other tablets. DPS is made up of free InDesign plug-ins for creation, and a paid Folio Producer Service to manage and publish interactive content.
In DPS projects, video files and other interactive objects are called overlays. When you create a folio file, all non-interactive page items are compressed into a single background image. Interactive objects like video appear on top of the background image.
You use the Overlay Creator panel (Window > Extensions > Overlay Creator) to create interactive objects. First, place an H.264-encoded video like MP4 in InDesign. Create a separate poster image with the same dimensions as the video and select it as the poster image in the Media panel.
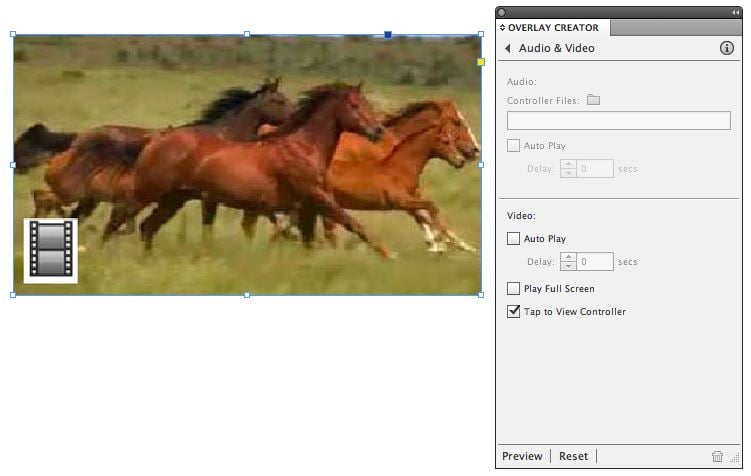
Select the video and go to Audio & Video in the Overlay Creator panel (Figure 7). Choose Auto Play to play on page load. You can also select to play a video full screen. If you want to stream video, you’ll have to use the Web Content overlay.
Figure 7: Overlay Creator. Click on the image below to see a larger version.
Additional Resources
Check out the following links for more how-tos on adding and troubleshooting video in documents that begin in InDesign.
* Adobe Media Encoder Help
* “Audio and Video in EPUB: Straight to the Point Miniguide 2.” eBook available from https://www.pigsgourdsandwikis.com/2011/05/audio-and-video-in-epub-new-straight-to.html
* Fearless Flash, Claudia McCue (Peachpit, 2011)
* Digital Publishing Suite Tips app for iPad (free), Bob Bringhurst, Apple iTunes Store
* Video encoding tips on https://www.adobe.com/devnet/video/encoding.html
* “Should You use Legacy or Flash Media in CS5? ” by James Fritz
* “Picking the Best Video Format for Digital Publishing” by Steve Werner
* “Importing Movies into InDesign” by David Blatner (for older versions)
The Time to Learn Video Is Now
As we use InDesign to create more digital publishing of different kinds, we’ll be including a lot more video in our files. The recent versions of InDesign and the Adobe Media Encoder are making that process a lot easier.
This article was last modified on January 8, 2023
This article was first published on January 9, 2012
Commenting is easier and faster when you're logged in!

Recommended for you
Announcing a New CreativePro Ebook: TypeTalk Volume 1
No doubt, fans of Ilene Strizver’s TypeTalk column have missed her writing...

Tip of the Week: Seeing Page Sizes with the Page Tool
How to see the size of any document page in InDesign, using the Page tool.

Extensis Launches FontLink; Delivers Fonts for Adobe InDesign Server Workflows
Portland, Ore—March 31, 2015—Extensis® today launched FontLink™, a new module fo...