

Excerpted from The Adobe Photoshop Lightroom 4 Book: The Complete Guide for Photographers by Martin Evening. Copyright © 2012 Used with permission of Pearson Education, Inc. and Adobe Press.
Martin Evening shows how the Adobe Photoshop Lightroom import procedure provides an adaptable import workflow, one that can be streamlined through the use of Import presets, as well as offering the ability to import files directly from the camera using a tethered shooting setup.
Part 2
Import Presets menu
As you can see, there are quite a lot of panels to configure in the Import dialog. Hopefully by now you will have seen that most of the settings are ones that you would want to apply regularly to each and every import. For example, you will probably want to add IPTC metadata to everything you import and want to keep the file handling settings the same, and as I pointed out on page 58, there are some good reasons for importing photos to a standard import folder. With this in mind, it is possible to save Import dialog settings as Import presets. The Import Presets menu (Figure 28) is at the bottom of the Import dialog and if you choose “Save Current Settings as New Preset…“ this lets you add the current Import dialog configuration as a new import preset. It also means that you can work more effectively in the compact Import dialog, where the preset settings are clearly summarized. Even if the import settings might only need to be varied slightly each time, accessing a preset and then tweaking it ensures greater consistency between one import and the next and can still save you time. You can also save modified settings as new presets or choose to update the current Import preset settings. Either way, import presets can greatly simplify your workflow at the import stage.

Figure 28: The Import Presets menu.
Importing video files
If the camera you are shooting with supports shooting video in the QuickTime movie or AVCHD formats, you can import any video files that you have recorded along with your regular stills images (see Figure 30). Once these have been imported into Lightroom they are easily distinguished from regular image files by the time clip duration badge that appears in the bottom-left corner of the grid/filmstrip thumbnails (see Figure 29). More important, Lightroom 4 now supports direct viewing and limited video editing. This means you can now double-click video files in the Library grid and play them directly in the Library module Loupe view. You can also edit the timeline start/finish times as well as apply certain types of Quick Develop adjustments.

Figure 29: A video file grid cell view.

Figure 30: This shows an example of a card import that includes video files.
Adding photos from a folder to the catalog
Importing photos using the “Add” method is the quickest and most efficient way to build up a Lightroom catalog from scratch and add photos from existing folders. If you are setting up Lightroom for the first time and have all your images neatly structured in, say, your My Pictures folder, all you have to do is choose “Add,” select the topmost folder (the root directory), make sure the Include Subfolders option is checked, and click Import. This lets you import all the photos in one go and the folder directory on your computer will appear mirrored in the Lightroom Folders panel. Here’s how it is done.
- In this example I clicked on the Import… button in the Library module to open the Import dialog shown above. I selected the 8th June, 2011 folder from the Source panel and chose the “Add” option from the Workflow bar. You’ll notice how when the Add option is selected only the File Handling and Apply During Import panels are displayed in the right panel section. Note that you’ll need to check the Include Subfolders option in the Source panel. This is because if the folder you are importing from contains subfolders, you will want the subfolder contents to be included in the import. In the File Handling panel I thought it wise to choose Embedded & Sidecar previews and to not import duplicates. In the Apply During Import panel I deliberately chose to leave everything here set to “None,” since I didn’t wish to overwrite or add to any of the existing develop settings or informational metadata.

Adding photo 1
- Before going ahead with the import I decided to save the settings that had been applied in Step 1 as an Import preset (see page 66).

Adding photo 2
- I then clicked on the Import button so that the photos would be imported using the settings configured in Step 1. As you can see, the Folders panel in the Library module shows the 8th June, 2011 folder now added to the Lightroom catalog.

Adding photo 3
Importing photos via drag and drop
Another way to import photos into Lightroom is to simply drag and drop files from a camera card or a folder of images from the Finder/Explorer/Bridge to the Library module content area. This method triggers opening the Import dialog with the dragged folder selected as the source and allows you to decide how the new images should be imported. Even when the Import dialog is already open you can use the drag-and-drop method to make the dragged folder the source.
- To carry out a drag-and-drop import, I located the images I wanted to import and dragged them across to the content area in the Library module as shown above.

Drag and drop photo 1
- This drag-and-drop action established the dragged folder as the source. From here on the steps used were exactly the same as for any other import. The drag-and-drop step simply bypassed needing to spend time navigating the Source panel. All I had to do then was to decide how I wanted these new images to be imported. In this example I wanted to copy the photos to the Lightroom 4 folder on my main computer and keep the photos organized by date in dated folders.

Drag and drop photo 2
Auto Imports
If you go to the File menu and choose Auto Import –>Auto Import Settings… this opens the dialog shown in Figure 23 In the Watched Folder section you can choose a folder to drag and drop the photos you wish to auto-import from and in the Destination section you can choose the folder you wish to import the photos to in the Lightroom catalog. The remaining sections can be used to determine how the files will be named as they are imported and also whether to apply any specific develop settings, IPTC metadata, or keywords metadata on import. Lastly, you can select an appropriate option for generating the initial previews.
Tip
The Auto Import dialog can also be used to establish a tethered import workflow for those cases where you are reliant on using third-party software programs to download the photos from the camera. For more information about this, please refer to the PDF on the Lightroom book website.

Figure 32: This shows the Auto Import Settings dialog. As you can see, the Watched folder I referenced here was located on the Desktop to which I could easily drag and drop any images I wished to auto-add to the catalog.
The Auto Import feature is incredibly useful. After you have configured the Auto Setup settings once and checked the “Enable Auto Import” box you are all set to add photos to the catalog by simply dragging and dropping them to the designated watched folder. This therefore offers you a way to quickly import photos, which bypasses the Import Photos dialog completely. Once the photos have been imported you will see them appear in the Destination folder in Lightroom. You can then, if you like, choose to move them to a new folder location.
Importing photos directly from the camera
It is possible to set up Lightroom to work in a tethered shooting mode (Figure 33). This means that photographs shot on the camera can be brought directly into Lightroom. Tethered shooting also allows clients to see the images appear as previews in the Library grid as you shoot (if you think this will help). I also find tethered shooting can be useful on model castings because it allows me to individually update the keywords or captions right after a photo has been shot.

Figure 33: This shows the computer setup that I normally use when shooting in tethered mode in the studio.
Note
Eye-Fi make SD media storage cards that incorporate an 80 11b/g Wi-Fi transmitter and relies on a dedicated USB card reader to receive the transmitted photos. When you start shooting, the photos are stored on the card and also transmitted to the computer. There are also some versions of Eye-Fi cards that can offer geotagging as well. My experience testing this technology is that while raw files are supported, it is still quite slow, even when shooting in JPEG mode. So far only specific camera models are supported. For more information, go to https://www.eye.fi.
Connecting the camera to the computer
To shoot in tethered mode you obviously need to be able to connect your camera to the computer. Ideally, you want the fastest connection possible. Most professional digital SLRs offer either a FireWire (IEEE 1394) or a USB 0 connection and these should provide a fast enough interface so that you can import the capture files at about the same speed as you can with a standard speed camera memory card. The only downside is that you must have your camera connected to the computer via the appropriate cable and this can restrict the amount of freedom you have to move about without pulling the cable out or, worse still, pull a laptop computer off the table!
Another option is to shoot wirelessly. As of this writing, wireless units are available for some digital SLR cameras; these will allow you to transmit images directly from the camera to a base station that’s linked to the computer. Wireless shooting offers you the freedom, up to a certain distance, to shoot in a tethered style, but it’s really restricted to the transmission of suitably compressed JPEGs. The current data transmission speeds for some camera systems are a lot slower than those you can expect from a FireWire or USB 0 connection. Rapid shooting via a wireless connection can certainly work well if you are shooting in JPEG mode, but not if you intend on shooting raw. Of course, this may all change in the future. For example, with some Nikons, you can shoot wirelessly via PTP/IP or FTP. It appears so far that PTP/IP is better and should rival FireWire, since PTP/IP is able to transfer files much faster due to the compression that’s built into the transmission.
Note
To get your camera to tether successfully with the computer, you may need to install the necessary drivers or driver updates for the camera you are using. In most cases the drivers are already part of the system and you shouldn’t experience any problems. For example, with Mac OS X and Windows Vista, I have never had any difficulty connecting any of the Canon EOS cameras. With Windows Vista the driver options have in the past been limited to allowing a narrower range of camera models that can connect directly.
Lightroom tethered shooting
The ability to establish a tethered connection via Lightroom should mean that your photos can be imported more quickly because the tethered process imports the photos directly to the destination folder. The one downside is that the tethered connection process is mostly one-way. Lightroom enables camera capture files to be imported into Lightroom and can read the camera settings data, but unfortunately you can’t use the Tethered Shoot control panel to interact with the camera, other than to use the shutter release button to fire the camera shutter remotely. For studio photographers like myself, who shoot people, this isn’t necessarily going to be a huge problem since I am always going to be controlling the camera anyway. For studio photographers, where the camera is static on a tripod, I can see this being more of a problem. What you have to bear in mind here is that providing reverse communication for each unique camera interface has proven a lot harder than simply enabling tethered download communication with the currently supported cameras. Multiply this work by the number of cameras that are supported by Camera Raw and you’ll get some idea of the scale of the problem. Personally, I am pleased with the progress that has been made to get us to the point where Lightroom can download images quickly and flawlessly.
Note
Check out the following link for more help and advice on tethering cameras to Lightroom: https://tinyurl.com/2fow89q.
Note
While the File menu can be accessed via all the Lightroom modules, the Tethered Capture option can only be activated via the Library module.
The tethered shooting feature in Lightroom has initially been provided for a select number of Canon and Nikon digital SLR cameras, and also the Leica S However, most digital SLR and medium format cameras will come with their own software solutions for importing photos via a tethered connection. One of the advantages of using dedicated tethered capture software is that you can control the camera settings remotely via a computer interface. This can be particularly useful where it would otherwise prove awkward to reach the camera. If this sounds like a more appealing solution then you might want to explore using such software in conjunction with Lightroom. If you go to the book website you can download the sample instructions I have provided there for working with the Canon EOS Utility program in conjunction with the Canon EOS 1Ds Mark III camera. Here, I show how Lightroom is able to appropriate the tethered shooting component of the camera communication software, and from there directly take over the image processing and image management via the Auto Import dialog. Although these instructions relate to Canon software, you should be able to translate this to working with other cameras and camera software setups.
- To initiate a tethered shoot session in Lightroom, I went to the File menu and selected Tethered Capture ? Start Tethered Capture…

Tethered shooting photo 1
Note
The main reason for choosing to shoot tethered is that it can help make the import process smoother and faster. There are a number of factors though that can affect the overall tethered shoot import speed. First, you have to consider whether you are going to shoot raw or JPEG and the likely size of the capture files. Then there is the camera interface. Professional digital SLR cameras should boast a faster buffer capacity and data transfer rate compared to budget digital SLRs. The Lightroom tethered capture feature does not appear to create any bottleneck problems and can match or exceed other tethered solutions in terms of download speed, but the actual download speed may still be compromised by the speed of the operating system FireWire/USB drivers and how well the software is able to optimize the interface connection. In my experience the biggest limitation is the interface connection. It doesn’t matter how fast your computer is or whether you are using fast hard drives—the camera interface connection is nearly always the weakest link.
- This opened the Tethered Capture Settings dialog shown here, where I was able to configure the desired tethered import settings. I used the default Studio Session text for the Shoot Name and opted to “Segment Photos By Shots.” In the Naming section I chose a suitable file naming template. In the Destination section I set the destination folder location to Studio shoots, and in the Information section I selected a Metadata preset to add on import, along with relevant keywords for the shoot. I then clicked OK to confirm these Settings.

Tethered shooting photo 2
- Because I had chosen to “Segment Photos by Shots,” the Initial Shot Name dialog appeared next. Here I needed to enter a name for the photo shoot that was about to take place. To keep things simple I called this shoot Shot 1 and clicked OK.

Tethered shooting photo 3
Note
In Lightroom 4 the Develop Presets now appear in a hierarchical order, such as when selecting develop settings via the Tethered Shoot control panel.
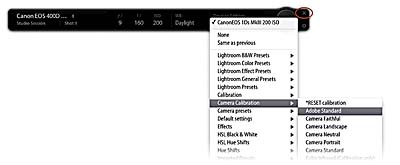
- This opened the Tethered Shoot control panel, where after I had switched the camera on, the camera name appeared in the top-left section. If more than one camera is connected to the computer you can click on the pop-up menu to choose which camera to import from. You will notice that the camera data displayed here is informational only and these settings will have to be adjusted on the camera itself, although you can use the big round shutter button to capture photographs remotely.

Tethered shooting photo 4
- If you click on the Develop Settings pop-up menu you can select an appropriate develop setting. As long as the Tethered Shoot control panel remained active I could shoot pictures with the selected camera and these would be automatically imported into Lightroom. I could hide the panel using Cmd-T (Mac) or Ctrl-T (PC) or quit by clicking on the Close button (circled). To collapse the tether toolbar, Alt-click the close button (Figure 34).
Tethered shooting photo 5

Figure 34 You can collapse the tether toolbar down by Alt-clicking the close button (circled in Step 5).
- As I started shooting, the capture images began to appear in the Lightroom catalog, where you will note that I had adjusted the sort order so that the most recently shot images were shown first (see sidebar tip). You will also notice that these photos appeared in the following folder directory: Studio Shoots/Studio Session/Shot 1. To understand the hierarchy employed here, you will need to refer back to the sections that I have highlighted in steps 2 and 3. Studio Shoots was the selected master Destination folder for the tethered shoot images. Studio Session was the default name used in the Shoot section, and Shot 1 was the name given to this first series of shots. At this point I could prepare for a second shoot by opening the Initial Shot Name dialog via the Tethered Shoot control panel (see Step 4) and enter a name for the next set of shots (or use the [Mac] or [PC)] shortcut). One last thing I should mention here is that when shooting with a Canon camera, the captured files will also be saved to the memory card, but if you are using a Nikon camera they won’t be. In practice, this means that if you are a Canon user you will need to remember to switch cards as they become full or reformat the card once the photos have successfully imported.

Tethered shooting photo 6
Tip
When you shoot using the tethered mode, it is useful to see new images appear at the top of the content area as they are imported. To enable this feature, choose View ? Sort ? Descending. You may want to switch the sort order back to Ascending for normal editing. If the Ascending/Descending toggle action appears to be broken, it may be because you have a Custom sort order selected. Also, make sure the Sort order option is set to Import Order or Capture Time.
Layout Overlay view
The Layout Overlay feature allows you to overlay an image when using the Fit to Screen or Fill Screen Loupe views and is a useful feature to employ when shooting tethered in the studio. To load an image as an overlay, go to the Library module and choose: View ? Layout Overlay ? Choose Image… (or use the Cmd-Alt-Shft-O [Mac] or CTRL-ALT-Shft-O [PC] keyboard shortcut). You will then need to select a PNG file and click “Choose.” To enable the Layout Overlay view choose: View ? Layout Overlay ? Show Layout Overlay (or use the Cmd-Alt-O [Mac] or Ctrl-Alt-O [PC] keyboard shortcut).
Tip
It can be easy to delete an overlay by accident, or lose track of a previously used overlay when you switch to use a different image. With this in mind I suggest you create a dedicated subfolder within the Lightroom presets folder for storing your overlays.
This feature is useful if you wish to overlay images with a layout so that you can see which images work well with a particular layout. It can also be useful if you need to use an art director’s layout as a guide to how things should be arranged in a shot. And finally, it might be a useful way to compare and align the photographs you are shooting with an existing photograph.
The main thing to note here is that the overlay image must be saved as a PNG file. The PNG file format supports transparency. So, if you were to edit a scanned layout and edit it in Photoshop, you would want to create a semi-transparent layer and then save it as a PNG, ready to load as a layout overlay in Lightroom.
The Layout Overlay feature in use
I am sure there are some readers who will be interested to know how I went about creating and using the layout overlay shown in use in Figure 35. So please bear in mind that the following information does assume that you have at least a working knowledge of working with InDesign, Photoshop, and Lightroom.

Figure 35: This shows the transparent PNG template file (top left) that I created in InDesign and loaded as a loupe overlay in Lightroom.
Using InDesign I took the page layout lettering and graphics (including the semi-transparent overlay areas top and bottom) and saved the layout as a PDF. I then opened the PDF document via Photoshop and saved it using the PNG file format. I then used the View ? Layout Overlay ? Choose Image… command to load this as a layout overlay and used the View ? Layout Overlay ? Show Layout Overlay command so that this overlapped the images displayed in the Fit to Screen/Fill Screen Loupe views. To make this particular layout overlay work it was also necessary for the photos to all be cropped to the same proportions as the final book cover. In this case, The Adobe Photoshop Lightroom 4 Book uses a 5:6 aspect ratio. So, I set this as a custom crop ratio and applied it to all the photos I was about to edit. Once done, I could navigate through all the photos that I had shot and preview each to see which had the most potential as a new cover image.
If you hold down the Cmd key (Mac) or Ctrl key (PC), you can control the layout overlay size, position, opacity, and matte opacity. You can see an example of the layout overlay being edited in the bottom-right screenshot in Figure 35.
This article was last modified on July 20, 2021
This article was first published on May 16, 2012
Commenting is easier and faster when you're logged in!

Recommended for you

Hands-On Review of the Microsoft Surface Studio
Recently Microsoft announced their latest pieces of hardware for the Surface pro...

Heavy Metal Madness: I'm Looking Through You. Where Did You Go?
I’m a bit late in this eulogy to a couple of products from Eastman Kodak t...

How to Make a Rippling Flag in Photoshop
How to make a realistic flag on any background with the design of your choice.