
An Introduction to Actions in Illustrator
Learn how to automate repetitive tasks to save your time for being creative.

This article appears in Issue 5 of CreativePro Magazine.
Wouldn’t it be great if Illustrator could help you work faster? It can! Actions enable you to record a series of commands and play them back with a single click or key press. There are many uses for actions, and Illustrator provides several samples to get you started. Let’s explore actions step by step.
Exploring the Actions Panel
Open a new document in Illustrator, and display the Actions panel by choosing Window > Actions.
The Actions panel’s main area shows a folder (known as an action set) called Default Actions containing the sequences that Adobe provides out of the box. At the bottom of the panel are familiar-looking Stop, Record, and Play buttons, alongside New Set, New Action, and Delete icons. You’ll also find these controls and additional options in the panel menu. Action controls and options are not found anywhere else in Illustrator’s interface, so leave the panel open while you work (Figure 1).
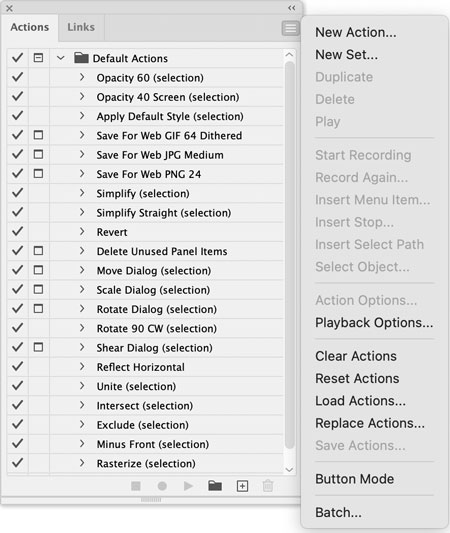
Figure 1. Illustrator’s Actions panel, showing the Default Actions set and panel menu
- Try each of these to familiarize yourself with the features of the Actions panel:
- Expand an action to reveal all its commands by clicking the > to the left of its name.
- Double-click an action’s name to edit that name.
- Double-click to the right of action’s name to edit its options.
- Toggle the checkboxes along the left edge of the panel to turn actions or commands on and off. Tip: You can exclude or include all commands except the selected command by Alt/Option-clicking its checkbox.
- Drag actions (or steps within actions) up or down to reorder them in the panel.
- Toggle the boxes in the second column of the panel to turn dialog boxes on and off. With dialog boxes on, an action pauses to await your input before proceeding further (Figure 2).

Figure 2. With the dialog box toggled on for the Rotate step in this action, you have the opportunity to set the rotation angle.
- With an action expanded, you can select one or more of its commands to play individually. To play an action from a specific step to the end, click that step in the panel, then click the Play button. To play a single step only, hold Command (macOS) or Ctrl (Windows) and double-click the step.
- Import and export actions with the Load Actions and Save Actions commands in the panel menu. Actions are saved as AIA files.
- Choose Button Mode from the panel menu to make actions playable with a single click. The individual commands within an action are hidden in this mode (Figure 3).
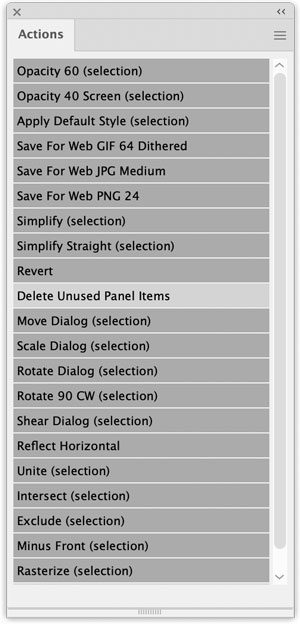
Figure 3. The Actions panel in Button mode, where a single click will launch an action
- Perform an action on multiple files by choosing Batch. In the Batch dialog box, you can choose which action(s) to apply to which files. In the Destination options, you can choose to leave the files open (None), save and close them in place, or select a new location and file naming convention for the modified files (Figure 4). You can also override Open, Save, and Export commands that are part of an action.
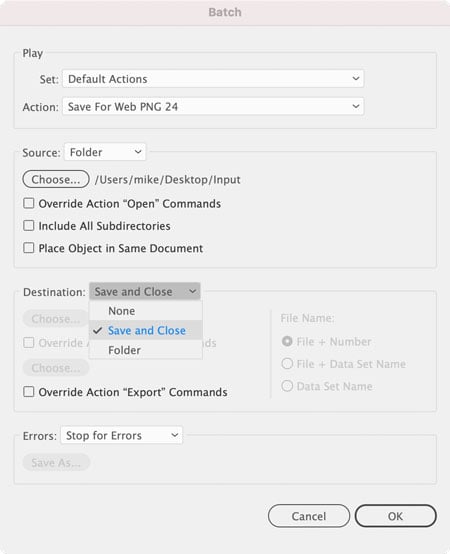
Figure 4. The Batch dialog box, with its options for applying an action to a folder full of files
Exploring a Default Action
To explore what you can do with one of the default actions, try this: Draw two overlapping shapes, and fill them with different solid colors. Select the top shape. Then, click Opacity 40 Screen (selection) in the Actions panel, and click the Play button at the bottom of the panel. Alternatively, just hold Command (macOS) or Ctrl (Windows) and double-click the action’s name to play it.
The Appearance panel (Window > Appearance) shows that by playing this action you made two changes to the top object, altering both its opacity and blending mode with a single click (Figure 5).

Figure 5. As you’d expect, the Opacity 40 Screen action reduces the selected object’s opacity to 40% and sets the blending mode to Screen.
Recording an Action
Let’s create a new action for you to perfectly center all your artwork on the active artboard. I use this action regularly to finish up my artwork, ensuring good placement for printing and exporting.
Start by adding some shapes to the artboard, then save your work and follow these steps:
- Click New Action [+] at the bottom of the panel.
- Name the action (I called mine Center All Art on Page), choose which action set you want it to go in, and click Record.
- Choose Select > All on Active Artboard.
- Choose Object > Group.
- Choose Object > Align > Horizontal Align Center.
- Choose Object > Align > Vertical Align Center.
- Choose Object > Ungroup.
- Click the Stop button in the Actions panel.
Now it’s time to test your new action: Select any of your shapes, move them around on the artboard, and then replay the action. Handy, right? And it will stay handy as any actions you record are saved with Illustrator so they’re always available.
Note that this action will merge all artwork onto a single layer, when it executes the Group step.
Pump the Brakes
The greatest benefit of using actions is that, in the blink of an eye, they can perform tasks that would take you a lot longer to do manually. The steps whiz by in a blur. But sometimes you might want to slow things down so you can really see what’s happening in each step. When that’s the case, select Playback Speed from the Actions panel menu. In the Playback Options dialog box, next choose Step By Step (Illustrator will insert a slight pause and redraw the screen after each action step) or specify a number of seconds for the action to pause between steps.

Action Recording Tips
Recording actions can be a tricky job in some cases. It may take a few tries to get it right. Use these tips to enhance your action activities:
Did a recording not work? Do it over using the Record Again command to overwrite the action without having to start a new one.
In addition to recording menu commands, you can record actions from Illustrator’s panels and from third-party plug-ins.
You can add a stop to an action, either while recording it or later, by choosing Insert Stop from the panel menu. In the dialog box, you can type a message for someone to read, and optionally, allow them to click Continue to dismiss the message and continue the playback of the action (Figure 6). If you don’t choose Allow Continue, then the user will only be able to read the message and click OK, after which the action playback will stop. They can then click the Play button to resume playback of the action.
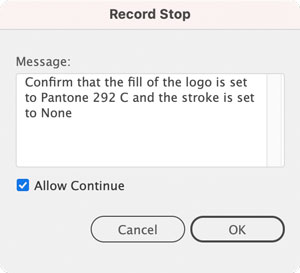

Figure 6. You can insert a stop in your actions where a dialog box will pop up to remind the user to check or do something.
You can assign function keys as shortcuts for actions. Set this up in the dialog box when creating a new action or by choosing Action Options from the panel menu for an existing sequence. Combining modifiers such as Ctrl/Command and Alt/Option gives you many available keyboard shortcuts.
Recording the Unrecordable
Some activities in Illustrator aren’t recordable, including showing panels, hiding panels, and doing anything with the Selection, Pen, Pencil, Paintbrush, Gradient, Mesh, Scissors, Eyedropper, and Live Paint Bucket tools. The same goes for the commands in the Effects and View menus. Tip: If you’re not sure a step was properly recorded, look at the Actions panel. If the step wasn’t recorded, it won’t appear there.
All is not lost though. You can add menu commands that cannot be recorded by choosing Insert Menu Item from the panel menu. In the dialog box, use the Find feature to locate the menu item you want to add, and then click OK (Figure 7).
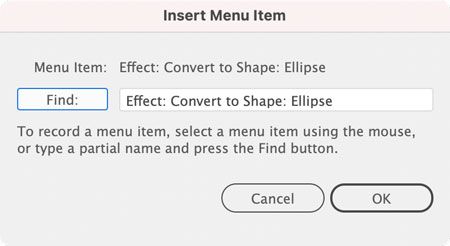
Figure 7. The Insert Menu Item command in the Actions panel menu is your remedy to the problem of unrecordable steps in many cases.
The simple act of clicking an object on the artboard to select it isn’t recordable. Instead, you need the Select Object command. To use Select Object, first you have to make a manual selection of the object. Next, open the Attributes panel (Window > Attributes) and enter a note for the object. This will be the “hook” that Select Object uses. Click the step in your action just before you need to select the object. Then, from the Actions panel menu, choose Select Object. In the Set Selection dialog box that appears, enter the exact text you entered in the note field in the Attributes panel, and click OK (Figure 8).

Figure 8. Notes about objects in the Attributes panel can be used to select those objects in an action.
You can also add a step that inserts a specific path into your document. To do this, select the path and then choose Insert Select Path from the Actions panel menu. Note that any formatting applied to the path (strokes, fills, and so on) will not be recorded in—or inserted by—the action, just the path itself and its location on the artboard. The inserted path will take on whatever the current stroke and fill are in your document.
Many Uses for Actions
Consider recording an action any time you notice tasks you’re performing repeatedly or when you’re faced with a sequence of commands that are tedious to execute manually. I asked illustrators in my network how they use actions in their work and got some great suggestions.
Margaret Trauth (egypt.urnash.com) recorded an action called Panel to Mask to create the layers she needs for her published illustrations. “I use this to set up comics panels. Start with one shape on a layer; select them both and play the action. It copies the shape for later, turns it into a layer clipping mask, locks it, then makes a new sublayer called bg, pastes the copy of the shape into it, and transforms it to 110%. Then the action deselects all and makes a new empty layer called Texture.”
Katja Gordeeva Bjerrum is an Illustrator automation expert (productivista.com). She uses a simple three-step action to make a copy of a file for sharing with others who may not have the fonts it uses (while of course keeping the original file with the live text). The three steps in the action are:
- Object > Select All
- Type > Create Outlines
- File > Save As
Off-the-Shelf Actions
The portability of Illustrator actions has led to the rise of a cottage industry of sites selling them. Big design resource sites like Graphic River and Creative Market offer hundreds of actions to automate the process of creating special effects in Illustrator. Most of them can be had for just a few bucks.

In addition to providing instant gratification, these actions can also be educational. Examining their steps and settings can demystify complex effects and inspire you to create your own unique spin on them.
Ready? Action!
Whether complex or simple, actions can save time and frustration by quickly and reliably performing tasks for you in Illustrator. Give ’em a try!
Commenting is easier and faster when you're logged in!

Recommended for you

How to Use Illustrator’s Draw Inside Feature
Learn how to use Illustrator’s Draw Inside feature, which automatically creates...

Making Abstract Line Art in Illustrator
Learn how to create stunning abstract line art effects and apply them in a varie...

How to Fix the Fill on Items with Wavy Strokes
InDesign's “fancy” stroke styles don’t adhere to shape of the path you apply the...