
Once a year I go to Oahu to teach at the University of Hawaii. (It’s a dirty job, but someone has to do it.) Each year, when I teach changing the language settings for InDesign spelling checks, the students ask if there is a dictionary for Hawaiian. Each time I have sadly replied no. Even though InDesign CS6+ supports adding custom Hunspell dictionaries, I’ve never been able to find those dictionaries for Hawaiian.
However, this year I asked in the User to User forum if anyone knew of a Hunspell dictionary for Hawaiian. I was pointed to an extension for Firefox that allows spell checking for Hawaiian. I contacted the author of the extension, Kevin Scallen from the Indigenous Tweets project and got a link to the custom Hawaiian Hunspell dictionary he created. Kevin also has an extension for Firefox which can be used for gmail and other web-based services. (Kevin is also interested in any Hawaiian-speakers to *****@***il.com“>email him with suggestions for new words to add to his dictionary.
So it turns out that finding the dictionary was the easy part. The hard part was deciphering the cryptic instructions in the Adobe Help files for Adding Hunspell dictionaries. I had hoped for a simple “Import Hunspell” command. Sadly that was not the case.
Instead, I had to follow Adobe’s rather baffling instructions meticulously in order to get the dictionary installed correctly. And if I found the tricky bits difficult, I figured many others would too. So I decided to write up this explanation.
Getting to the Help file
Perhaps the first clue that this will be difficult is that, unlike virtually every other feature in InDesign, Adobe actually put a link directly to the Help file for this topic in the program! Go to Preferences > Dictionary and then click the Hunspell button. This opens the Help file document. (There’s nothing special about going through the Preferences dialog box. You can just click that links to get there.)
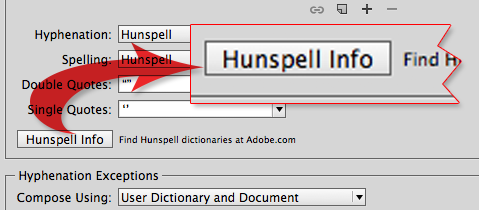
Click the Hunspell Info button to open the Help file for Adding or Removing Hunspell dictionaries
Once I opened the Help file, I had to break the instructions down into smaller segments in order to understand what I needed to do. I ended up with ten segments:
- Finding the Hunspell dictionaries
- Extracting the package contents
- Renaming the language files
- Finding the language and country codes
- Finding the Dictionaries location on your computer
- Opening the Hunspell package (Mac users only)
- Creating the Dictionaries folder and its contents
- Finding the string element “info.plist” file
- Adding the proper string element
- Finally! Testing the new language dictionary
1. Finding Hunspell dictionaries
I got my Hawaiian dictionaries through Kevin. But that’s not the only place to find Hunspell dictionaries. Adobe gives you the links to the dictionaries at the Apache OpenOffice website. You can also find Hunspell dictionaries that are extensions for Firefox.
Once you get to these pages, you need to scroll through to find the language you need.
Instead of installing the Hawaiian dictionaries, which has its own special download link, I have decided to use a language that can be downloaded from OpenOffice or Firefox. I chose New Zealand English in honour of my several friends based down there. (I never thought the Kiwis spoke anything other that United Kingdom English, but there you are!) However, there are plenty of other languages to choose such as Tagalog (Philippines), Afrikaans (South Africa), or Yiddish (almost everywhere).
In OpenOffice or Firefox, click the link for New Zealand to open its download page and click the Download button. The package downloads.

The Download link from OpenOffice.org.
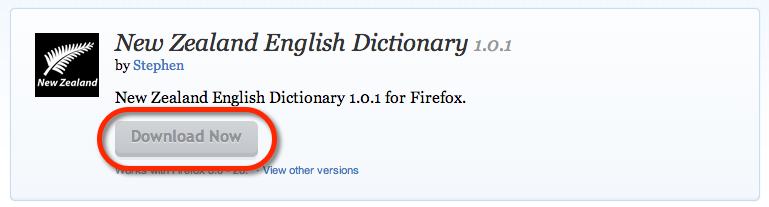
The Download link from Mozilla Firefox.
2. Extracting the package contents
When you download a dictionary from the OpenOffice site, it comes with the “oxt” extension for OpenOffice software. If you download a dictionary extension from Mozilla Firefox, it comes with an .xpi extension. You need to extract the contents of this package. If you double-click the file and it opens, then you’re set. But if you can’t open the package, then just change the extension to .zip. Once it is a Zip file there should be no problem using a default application to extract the package.

Change the file extension for a dictionary package to extract the contents.
3. Renaming the language files
Once you have the package contents, you want to look for two types of files: a spelling or hyphenation dictionary (.dic) file, and an affix (.aff) file. You want to make sure these files are named correctly. The format for naming them is created by the International Standards Organization (ISO). The dictionary and affix file code use the ISO 639-1 code for the language in lowercase, an underscore, and then the ISO code for the country in uppercase. For example, the dictionary code for english would be
en_US.dict
The affix file name would be
en_US.aff
If you have a hyphenation file, the naming format is hyph, an underscore, the ISO 639-1 code for the language in lowercase, an underscore, and then the ISO code for the country. The hyphenation file for English would be
hyph_en_US.hyph
So the New Zealand English files are named “en” for the language and NZ for the country.
en_NZ.dict
en_NZ.aff
hyph_en_GB.hyph
Notice the hyphenation file for New Zealand English doesn’t use the country code NZ, but using the country code GB for Great Britain. So the files for one language can use the hyphenations from another.
If the Hunspell files you download are named correctly, you don’t have to rename them. And you can skip the next step.
4. Finding the language and country codes
By the way, if you’re looking for the language codes, the Adobe Help file sends you to Wiktionary for the language codes. But I couldn’t find the Hawaiian codes there. Instead, I asked Kevin how he got the “haw” for Hawaiian. Kevin explained that the ISO ran out of two-letter codes, so they expanded the language codes into three letters. Adobe’s file only sends you to the original two-letter codes. ISO 639-3 contains the additional three-letter codes.
Similarly, you can look to the ISO for the country codes. The country code for the Hawaiian files Kevin sent me is US since Hawaiian is a language in the United States. The New Zealand country code is NZ. English is an an example of a language that has more than one country. You can have Canadian English, US English, UK English, and New Zealand English. Each has the same language code, but a different country code.
If you’re looking for country codes, Adobe’s Help file points you in a direction; but don’t bother, as the page no longer exists and the lists of country codes that they do have cost money. Fortunately (since I am the stingiest person I know), I found a free list of country codes at Wikipedia.
5. Finding the Dictionaries location on your computer
So now that you’ve got the files named correctly, you need to install them so InDesign can use them. This was the part that totally stumped me. The dictionary, aff, and hyph files all need to live in the proper place on your computer. But the instructions in the Adobe Help file had a major flaw! This is what the Help file says to do to find the location of the Dictionaries directory:
Create a folder named <language ISO Code> in the Dictionaries folder, and copy these renamed files in it. Depending on the operating system, you can find the directory “Dictionaries” at the locations listed below.
Then the file has a table with the location paths. This is how the table looks in my browser.

Notice that the path is cut off by the edge of the frame on the page. I spent hours trying to find the right location for the Dictionaries files. But I couldn’t find it because I wasn’t looking at the complete path. I finally got it when I inserted my cursor inside the path text and triple clicked to select all the text in that table cell.
There are several different path locations for the files depending on what version of InDesign you’re using and the platform. Look carefully at these choices. I’ll providing the complete paths here so you don’t have to go back to the Adobe Help file for the path. Make sure the path doesn’t get cut off.
Windows Users:
You need to look carefully as to which version of the Windows operating system you’re using (64 or 32 bit) as well as which version of InDesign you’re using.
If you are working with the 32 bit version of InDesign CC on the Windows 32 bit operating system, your path is:
%ProgramFiles%\Adobe\Adobe InDesign CC\Plug-Ins\Dictionaries\LILO\Linguistics\Providers\Plugins2\AdobeHunspellPlugin\Dictionaries
If you are working with the 64 bit version of InDesign CC on the Windows 32 bit operating system, your path is:
%ProgramFiles%\Adobe\Adobe InDesign CC (64 bit)\Plug-Ins\Dictionaries\LILO\Linguistics\Providers\Plugins2\AdobeHunspellPlugin\Dictionaries
If you are working with the 64 bit version of InDesign CC on the Windows 64 bit operating system, your path is:
%ProgramFiles%\Adobe\Adobe InDesign CC (64 bit)\Plug-Ins\Dictionaries\LILO\Linguistics\Providers\Plugins2\AdobeHunspellPlugin\Dictionaries
If you are working with InDesign CS6 on the Windows 32 bit operating system, your path is:
%ProgramFiles%\Common Files\Adobe\Linguistics\6.0\Providers\Plugins2\AdobeHunspellPlugin\Dictionaries
If you are working with InDesign CS6 on the Windows 64 bit operating system, your path is:
Program Files(x86)\Common Files\Adobe\Linguistics\6.0\Providers\Plugins2\AdobeHunspellPlugin\Dictionaries
Mac Users:
Mac users don’t have as many choices for which version of InDesign they are using.
If you are working with InDesign CC on the Mac OS, your path is:
/Applications/Adobe InDesign CC/Plug-Ins/Dictionaries/LILO/Linguistics/Providers/Plugins2/AdobeHunspellPlugin.bundle/Contents/SharedSupport/Dictionaries
If you are working with InDesign CS6 on the Mac OS, your path is:
/Library/Application Support/Adobe/Linguistics/6.0/Providers/Plugins2/AdobeHunspellPlugin.bundle/Contents/SharedSupport/Dictionaries
6. Opening the Hunspell package (Mac users only)
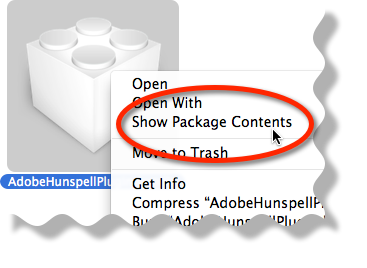
Mac users will encounter one more speed bump. Notice that part of the path is AdobeHunspellPlugin.bundle. Bundles in Mac OS X are like folders, but they don’t open if you double-click them. When you get to that point in the path, right-mouse click and choose Show Package Contents. That’s where you’ll find the Contents folder to continue the path to the Dictionaries folder.
Windows users don’t have this problem. The AdobeHunspellPlugin directory opens with a double click, just as any other Windows folder opens.
7. Creating the Dictionaries folder and its contents
Once you’ve gotten to the Dictionaries folder, create a new directory named with the proper language and country code. For New Zealand English the folder is named “en_NZ”. The dict, aff, and hyph files go in that folder. The directory will look like this:

With the new directory in place, close up the directories including the Macintosh bundle file.
8. Finding the string element “info.plist” file
Like the Dictionaries directory, you need to wade through to find the info.plist file. Fortunately that isn’t so hard now that you found the Dictionaries directory.
There are several different path locations for the files depending on what version of InDesign you’re using and the platform. Look carefully at these choices. I’ll providing the complete paths here so you don’t have to go back to the Adobe Help file for the path. Make sure the path doesn’t get cut off.
Windows Users:
You need to look carefully as to which version of the Windows operating system you’re using (64 or 32 bit) as well as which version of InDesign you’re using.
If you are working with the 32 bit version of InDesign CC on the Windows 32 bit operating system, your path is:
%ProgramFiles%\Adobe\Adobe InDesign CC\Plug-Ins\Dictionaries\LILO\Linguistics\Providers\Plugins2\AdobeHunspellPlugin
If you are working with the 64 bit version of InDesign CC on the Windows 32 bit operating system, your path is:
%ProgramFiles%\Adobe\Adobe InDesign CC (64 bit)\Plug-Ins\Dictionaries\LILO\Linguistics\Providers\Plugins2\AdobeHunspellPlugin
If you are working with the 64 bit version of InDesign CC on the Windows 64 bit operating system, your path is:
%ProgramFiles%\Adobe\Adobe InDesign CC (64 bit)\Plug-Ins\Dictionaries\LILO\Linguistics\Providers\Plugins2\AdobeHunspellPlugin
If you are working with InDesign CS6 on the Windows 32 bit operating system, your path is:
%ProgramFiles%\Common Files\Adobe\Linguistics\6.0\Providers\Plugins2\AdobeHunspellPlugin
If you are working with InDesign CS6 on the Windows 64 bit operating system, your path is:
Program Files(x86)\Common Files\Adobe\Linguistics\6.0\Providers\Plugins2\AdobeHunspellPlugin
Mac Users:
Mac users don’t have as many decisions for which version of InDesign they are using.
If you are working with InDesign CC on the Mac OS, your path is:
/Applications/Adobe InDesign CC/Plug-Ins/Dictionaries/LILO/Linguistics/Providers/Plugins2/AdobeHunspellPlugin.bundle
If you are working with InDesign CS6 on the Mac OS, your path is:
/Library/Application Support/Adobe/Linguistics/6.0/Providers/Plugins2/AdobeHunspellPlugin.bundle
9. Adding the proper string elements to the info.plist file
The following information seems to be missing from the Adobe Help file steps. But it was the only way I was able to get the Hunspell dictionaries to appear inside InDesign. However, I admit that I may have done something wrong; maybe the text strings would be added automatically on other people’s system?
Open the info.plist file using a text editor. I use Text Wrangler on the Mac because it’s free and it won’t add any formatting accidentally. You need to add string elements to three different places in this text file.
Find the text strings under Spelling Service, UserDictionaryService Element, and HyphenationService and add the following string element in each position:
<string> language code underscore country code </string>
So the string element for the New Zealand file would look like:

I inserted three tab characters so each string element lines up with the rest of the text. Remember, you need to add these strings in three places.
Also, if you didn’t add an element such as the hyph_en_GB.hyph file, you don’t have to add that string to the info.plist file.
10. Testing the new language dictionary
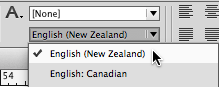
Finally, you’re done! Save and close up all the text files, the directories, and restart InDesign. You need to look for the language listed in in the various places where the language would be listed. For instance, I look at the language menu in the Control panel:
I never expected installing Hunspell dictionaries to be such an ordeal. And I can understand if these instructions have scared you off. But if you’ve made it all the way down here, you’re obviously need to add new languages to InDesign. Good luck!
This article was last modified on December 30, 2021
This article was first published on March 21, 2014
Commenting is easier and faster when you're logged in!

Recommended for you

Put One Language On Odd Pages and Another Language on Even Pages
Creating two flows with two stories isn't hard once you understand how InDesign...

User Dictionaries
Sandee Cohen takes you on a deep dive into InDesign’s obscure but important User...

Spell check text in Multi-state Objects
Keith shows how to spell check text on all the hidden states of Multi-state obje...