
Add Form and Texture with the Lighting Effects Filter

![]()

Versions: 5, 5.5
Operating systems: Macintosh, Windows
One of Photoshop’s most useful design filters is Lighting Effects. It allows you to apply a variety of lighting scenarios to your graphics as well as to textures. For such a useful filter, it’s not covered well in any Adobe literature or even the Help section. To pick up the slack, we’ll give you a basic overview of how this filter works, as well as some information on creating bump maps, which you can use in conjunction with the Lighting Effects filter. With these two techniques, you can add form, depth and realism to your images. We’ll show you the techniques we used to create the celestial objects on this month’s space cover.
Let There Be Light
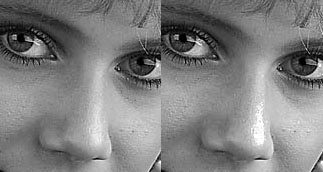
While the Lighting Effects filter isn’t as sophisticated as the lighting controls in a 3-D modeling program, it can still be used in a similar way to add a sense of depth and form to a scene. To make the most of this filter, it’s best to apply it on a layer-by-layer basis. This will give you the most control over how light hits individual objects within the image. Applying it to a flattened image lightens the entire image, as shown in the comparison in Figure A. While this may be okay for some images, it isn’t typically a good idea.

Figure A
If you use the Lighting Effects filter to apply a light type, such as Spotlight, to a flattened image, the Spotlight lightens the entire scene. You can’t control its effect on individual areas.
Filter Overview
As with most of Photoshop’s filters, your image must be in RGB mode to access the Lighting Effects filter. So, begin by opening a suitable layered image or creating one like our test image in Figure B. Make sure each object in the image is on its own layer. Select a layer and then choose Filter > Render > Lighting Effects. In the resulting dialog box, shown in Figure C, you’ll see that you have a lot of choices and settings. We’ve labeled a few of the important ones. By dragging the Light Bulb icon onto the preview window, you can add multiple lights to the scene. To remove the lights, simply drag them to the Trash icon. You can also choose your own light and shade colors.
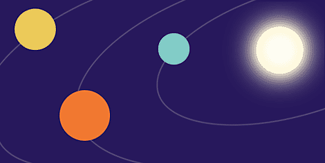
Figure B
Create an image, where the objects to be lit are all on separate layers.
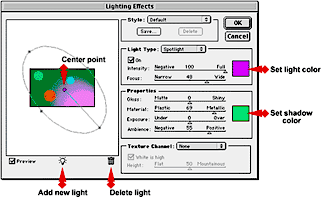
Figure C
The Lighting Effects dialog box gives you many controls to fine-tune the lighting setup.
Preset Lighting
The Lighting Effects filter comes with many preset lighting configurations, which are fairly tacky. You can choose from the variety of preset configurations located in the Style pop-up menu. While the presets are kind of strange, they can be adjusted and modified, so there may be times when you’ll occasionally find them useful.
Manual Lighting
For the most part, however, you’ll probably just want to set up your own lighting scenarios by selecting a light source from the Light Type pop-up menu and then setting your own specifications. In the Light Type menu, you have three lighting choices–Directional, Omni and Spotlight. The effects of these different types are shown in Figure D.
Spotlight functions a lot like the real thing. You can adjust its focus to create a harsh light or a soft light. Omni functions something like a point light. There is always a highlight area, with light radiating from it. This light is good for emphasizing form. The Directional option is something of a misnomer, as the light is anything but directional. In other applications, this lighting style would typically be referred to as ambient. This light creates no shadows or depth. It’s merely flat light that lightens or darkens the scene as a whole. It’s not a particularly useful setting as you could do the same thing in other ways that are more editable.

Figure D
Here, you can see the effects of the three light types on a simple circle.
Controlling the Light
Once you select a light type, you can modify its effect by adjusting its circle representation in the preview window. If you click on the center point of the light, you can position the light anywhere within the window. If you click on an edge of the circle, you can adjust the light’s range.
The Properties
The Lighting Effects dialog box also contains a Properties section that allows you to define some of the characteristics of the area being shined upon. After you experiment with them for a bit, you’ll find that they’re not all that useful, or at least they’re not what you might expect. The top two sliders won’t actually make your graphics appear very metallic, plastic, shiny or matte. These sliders simply affect how the light spreads across the graphic. Use them to make subtle adjustments.
The Exposure and Ambience sliders are the most useful settings in the Properties section. They help you adjust the light so that it blends effectively with existing light in a scene. Even though there’s a preview window that lets you see something of what you’re doing, it doesn’t show a lot of detail. Keep in mind that you may need to apply the Lighting Effects filter several times and tweak the settings before you achieve the effect that you want.
Using Multiple Lights
After you play with the Lighting Effects filter for a while, you’ll notice that working with multiple lights simultaneously can be a hassle. It’s a common mistake to try to work with too many lights at once. The scene can become cluttered and far too bright to see what you’re doing properly. If you need to place multiple lights, it’s best to approach the scene like a photographer in a studio. Position one light at a time on an object, and analyze its effect on a scene; then add additional lighting if necessary.
In the case of the planets, we need two different lighting effects to give them fullness as well as to establish proximity to the light source. To do this, we applied light to each planet individually and then lighted all the planets as a group on two separate layers. This may sound confusing, but you’ll see that it isn’t once we step you through the process.
Creating Form
To begin, merge the three planet layers into one and then name the layer, Planet Group. Now, duplicate the Planet Group layer and rename it Spotlight. Then, turn off the visibility of the Spotlight layer to keep it out of the way for now.
Now, select the Planet Group layer and then choose Filter > Render > Lighting Effects. In the resulting dialog box, you should see all three planets in the preview window. Your default light is Spotlight, so select Omni from the Light Type pop-up menu. Position an omni around each planet, as shown in Figure E. Keep the Intensity setting for each omni fairly low, because you just want to enhance form, not apply dramatic lighting. We used an Intensity setting of 25 for each. Be sure to keep the size of the omni lights as close to the size of the planets as possible, while still being able to position the highlight somewhat off-center. Click OK and you should get a result similar to the one shown in Figure E.

Figure E
Our planets now have form, but there isn’t a real sense of directional light from the sun.
Light Fall Off
In space, light goes on forever because there’s no atmosphere to stop it like we have on Earth. Hence, our example isn’t technically accurate, but its simple forms and arrangement make it good for illustrating concepts. What we’re about to replicate is a concept called fall off. Light doesn’t go on forever within our atmosphere. In fact, it falls off at a regular and predictable rate. Even though this couldn’t actually happen in space, you can still learn from the effect and use it on your earthbound images.
To begin, turn on the visibility of the Spotlight layer, select it, and then choose Filter > Render > Lighting Effects once again. Your old lighting arrangement is showing. To remove the unnecessary lights, simply select them by their center points and drag them to the Trash icon. Leave just one light in place. From the Light Type pop-up menu, choose Spotlight to change the light’s style. Move the light into position so that it corresponds with the light source in your image. You can see our arrangement in the lighting setup in Figure F.
Once you’re satisfied with the setup, click OK, and then choose Image > Adjust > Desaturate. Your planets instantly become grayscale. This allows you to combine the lighting on these planets with those in the Planet Group layer without introducing any color shifts. To combine the lighting, set the blending mode of the Spotlight layer to Multiply. You can the see the result in Figure G.

Figure F
Position a spotlight in roughly the same area as the sun, or the light source, in your image.

Figure G
Set the blending mode of the Planet Group layer to Multiply; this combines the two layers’ lighting effects.
Applying Texture
The Lighting Effects filter gives you the ability to apply a texture at the same time you apply a lighting scenario. Though this is sometimes useful, it’s not the best way to use this filter. Instead, we’ll show you how to apply the texture to a different layer rather than directly to your original texture image. This method will give you more flexibility down the line as you create your artwork. You’ll be able to apply other filters or effects to the texture without affecting your original graphics. You can also adjust the texture’s opacity to help it integrate better with the original graphics.
When you feed the Lighting Effects filter a bump map, which Adobe calls a texture channel, it translates the bump map into an actual texture with the appearance of height. You can adjust the appearance of the texture by modifying the lighting setup.
Setting Up the Bump Map
Once you have a texture created, select it and then copy and paste it into a new alpha channel within the image you’re working on. To create a new channel, switch to the Channels palette and click on the New Channel button. If your texture is in color, it converts to grayscale as soon as you paste it into the alpha channel. The alpha channel is automatically named Alpha 1. Now deselect the alpha channel, and return to the Layers palette. Create a new layer and fill it with 50-percent gray. Name the new layer Bump. Now, you’re all set to use your bump map.
Making the Texture
Now, choose Filter > Render > Lighting Effects. In the Lighting Effects dialog box, set the Texture Channel pop-up menu to Alpha 1. The texture derived from your bump map appears in the preview window. Adjust the lighting and use the Height slider to make the texture as raised as you want it. Be sure the White Is High check box is selected. When you’re happy with the texture, click OK. To apply the texture to the original pattern, set the blending mode of the Bump layer to Hard Light. Adjust your layer opacity as necessary. You can see our texture and the result of combining the two textures in Figure H.

Figure H
The Lighting Effects filter allows you to import bump maps to generate textures.
Working with Bump Maps
Even after you apply color and lighting effects to a graphic, it might still look too plastic. You can enhance the realism of your graphics by applying surface textures that enhance their appearance and identity. For example, you can create the wall of a house, but it won’t look like stucco unless you can make the surface look rough and bumpy. This is where a bump map comes into play. A bump map is just a grayscale image that can be transformed to create an artificial appearance of height and depth. The light areas of the bump map push regions of the image upward, while dark areas of the map push regions of the image downward, creating the effect of an irregular surface. In Figure H, you can see how adding the bump map helped refine the form of the object, more than color or shading alone could do.
A typical image is textured in a series of steps. Initially, you just have your graphic. Next, you can layer a texture on top of it. However, many textures won’t have too much tactility without the aid of a bump map. If your basic texture map has enough contrast, you can use it as the basis of your bump map, or you can create a separate bump map altogether. We’ll show you how easy it is to create the bump map.

Figure I
Adding a bump map on top of your color or texture can enhance the form of your object.
Creating a Bump Map
Making your own bump map is simple. As we said before, it’s just a grayscale image. Let’s assume that you have a texture pattern that you want to use, such as the one in Figure J. To create a bump map that corresponds to this texture pattern, duplicate the Background layer and name the new layer Bump. Then, choose Image > Adjust > Desaturate to get a grayscale version of the original texture. You want to turn the image to grayscale so as not to introduce any unwanted colors when you blend the texture into your finished image. Depending on the contrast of your Bump image, you may also want to increase its contrast by choosing Image > Adjust > Brightness/Contrast. While you’re making the adjustment, keep in mind that the black areas will become the lowest points, while the white areas will become the highest points. This grayscale image is your bump map.
Once you’re satisfied with the contrast, you need to apply a filter that will create the perception of height. Several of Photoshop’s filters will do this. Two of the most common are Lighting Effects and Emboss. Lighting Effects is superior to Emboss, but for this example use the Emboss filter so that you can compare the two. Choose Filter > Stylize > Emboss. In the Emboss dialog box, set the lighting Angle to 150 degrees, the Pixel Height to 8, and the Amount to 125%. Click OK, and you now have an embossed version of your bump map similar to the one shown in Figure K.
Now that you’ve created a raised texture with the bump map, combine it with the background texture by setting its blending mode to Hard Light. At this point, you can adjust the opacity of the Bump layer until you achieve the desired effect. For our final effect, we set the Bump layer to an opacity of 70 percent and then flattened the image by choosing Layer > Flatten Image.
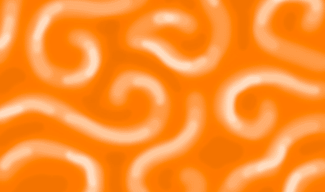
Figure J
Almost any pattern or texture that you create can be the source of your bump map.

Figure K
Use the Emboss filter to generate a texture from the bump map and then blend it into the original.
Wrap Up
You should now have a pretty thorough understanding of the Lighting Effects filter and the most efficient way to generate textures. With these techniques, you can now texture and light your graphics very effectively. You may even be able to fool some people into thinking that you know how to do 3-D modeling. After you work with it for a while, we’re sure you’ll agree that Lighting Effects is a very nifty filter indeed.

Copyright © 2000, Element K Content LLC. All rights reserved. Reproduction in whole or in part in any form or medium without express written permission of Element K Content LLC is prohibited. Element K is a service mark of Element K LLC.
This article was last modified on January 3, 2023
This article was first published on December 28, 2000
Commenting is easier and faster when you're logged in!

Recommended for you
How to Make a Cinemagraph in Photoshop
Cinemagraphs are images in which just a portion is animated on an endless loop....

Editing Highlights and Shadows in Adobe Lightroom and Camera Raw
Adobe Photoshop Lightroom and Adobe Camera Raw have two sets of controls for mak...
Out of Gamut: A Two-Pass Approach to Sharpening in Photoshop
In my last column, which delved into a couple of useful sharpening techniques, I...