


Now that CS5 has shipped, don’t you want to kick the tires on some of this newfangled animation stuff and see how it works?
I thought you might.
Here’s a fun little trick for making objects seem like they move through each other.
Click the image below to play the animation.

As you can see, the arrow threads its way through the words, alternately appearing in front of and behind the letter shapes. The trick is accomplished by creating an animation sandwich. The arrow is the filling, and two copies of the text converted to outlines are the bread. The top copy of the outlined text has no fill, but contains some ‘pasted into’ objects that mask the arrow.
Here’s how to do it:
1. First type the text you want.

2. Convert the text to outlines.
3. Create the object you want to thread through the text. In my case, I drew an arrow.
![]()
4. Place it over the text. I also stretched the text vertically to give the arrow a little more room.

5. Copy and Paste in Place the outlined text. You should now have the right stacking order: the two copies of outlined text sandwiching the arrow.

6. Draw some simple objects where you want the arrow to appear behind the letters. I filled them with blue temporarily just to see them better.

7. Select all the masking objects you made in the last step and make them into a compound path.
8. Cut the new compound path and paste it into the top set of text outlines.

9. Change the fill of the top set of text outlines to None. Then change the fill of the compound path masking object to match the text underneath.

OK, now to make the arrow fly. For this you need to use three new panels that debut with CS5: Animation, Timing, and Preview.

Start in the Animation panel. With the arrow selected, give it a name (not required, but always a best practice). Then from the Present menu, choose Fly in from Left.

Some new indicators are added to the arrow. There’s a set of three bubbles to show that animation has been applied to the object. And there’s a green path to show the location, direction, and speed of the animation.
![]()
You can change the animation by editing that green path and by changing the settings in the Animation panel. Describing what all those settings do is far too much for this little blog post, but to sum up, I changed the duration, speed, and opacity in the panel…
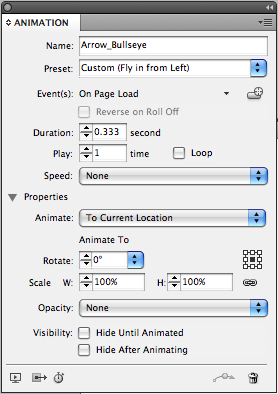
…and I changed the distance the arrow travels by lengthening the motion path.

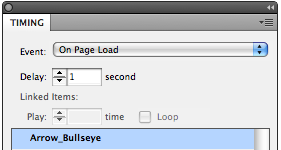
I also made a visit to the Timing panel to specify that the animation not start until 1 second after it loads.
The Preview panel allows you to see the effects of tweaking those settings without constantly going back and forth to the browser.

I love the fact that I can drag the bottom right corner of the panel to see the preview at whatever size I want.
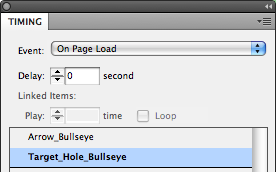
Finally, to sell the effect a little more, I drew a small object in the center of the target and added a little Bevel and Emboss to hide the arrow tip, making it look like it had punctured the target.

This too is animated, using the Appear preset. In the Timing panel, I made sure the hole appears right after the arrow stops.
Obviously this is just a tiny taste of what InDesign’s new interactive features can do. With CS5, you can really let your imagination fly.

PS: CS5 ships with a fantastic resource for learning InDesign’s new animation features. Look in the Scripts panel. In both the AppleScript and the JavaScript folders, you’ll find something called AnimationEncyclopedia. Run the script. It creates a six-page document with working examples of everything you can do with animation. It’s awesome!
This article was last modified on December 20, 2021
This article was first published on May 24, 2010
Commenting is easier and faster when you're logged in!

Recommended for you

Navigate Panels from the Keyboard
You don't need a mouse to navigate through many of your InDesign panels. You jus...
Group Work
InDesign CS5 adds a double-click feature. When working with groups it allows us...

How to Create Focus with Animation in PowerPoint
Learn how to create focus on a topic or bullet point by creating simple fade-in...