
Showing results for 58c choke7 cs2 choke7 cs2 co1093625 20°c 58c choke7 cs5 choke7 co1093625 20 c 58c cc’s cs2’s c’s cc’s cs2’s cs5’s
Based on articles originally published in the DesignGeek e-zine.
Let’s say you’re in Acrobat and you need to add text to a PDF, maybe in the margin or under an image or to fill out a static form field, and you want that text to appear in printouts, just like the rest of the text. The original file that was exported to PDF isn’t available; all you have is the PDF itself. Which tool do you turn to?
Many people would say the Typewriter tool, and that’s a good answer. You can access it in Acrobat 7-9 by opening the Typewriter tool bar (View > Toolbars > Typewriter) or from the Tools menu. Click on the Typewriter icon in the toolbar and you can click anywhere on a PDF page and start typing.
The problem is that the Typewriter tool is clunky. The text you type won’t automatically wrap to the next line, for example — you have to hit the Return/Enter key to stop your text from continuing out past the page edge.
Also, you’re limited to your system’s default font. You can change the text’s size, line spacing, and style with the Properties toolbar (Command/Ctrl-E), but there’s no way to change the typeface itself.
A Better Text Tool
The next time you need to add text to a PDF in Acrobat Pro, try the Text Box tool. It’s part of the Comment group, so go to View > Toolbars > Comments & Markup to access it. Unlike most of the other comment tools, text you enter in a Text Box remains visible all the time; it doesn’t close up to an icon like a pop-up note. (Like all comments, though, you can choose to Hide it, which might come in handy.)
Select the Text Box icon in the Comments & Markup toolbar and use it to drag out a box (a text frame) on the page, just as you would in a page-layout program. Release the mouse button and the text insertion cursor is blinking inside it, ready for you to start typing. The text wraps as soon as the cursor hits the edge of the frame.
The initial look of the text and the box itself is probably not what you want, but I’ll tell you how they’re easily changed, and how to set your own default appearance for it.
Modify the Box
To adjust the box’s position, click on it with the Text Box or Hand tool. The frame itself highlights, meaning you can drag the frame around on the page or drag one of its handles to resize it.
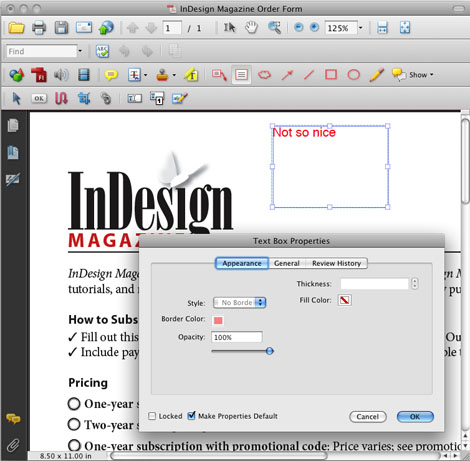
The default style for the Text Box frame is a one-point red stroke, which would make sense if this were an actual comment we wanted a reviewer to notice. For our purposes we don’t want any border surrounding the text box.
To change it, right-click on the box’s edge (highlighting the box first if necessary) and choose Properties from the context menu. In the dialog box, change the line Style to “No Border” so the red line disappears. Note you can choose a fill color for the box (White is the default) — I usually change this to No Color so my boxes don’t accidentally mask out existing text — and even an Opacity. I’d leave it at 100% opacity, though, since the setting affects the text as well as the fill.
To make these settings the default look for all the text boxes you’ll add to the document, turn on the checkbox next to Make Properties Default at the bottom of the dialog box.
Modify the Text
The text you enter inside a text box is easily modified, but you have to select it first. If you’ve moved out of text editing mode, just double-click on the text with the Text Box tool to jump back in.
Drag over the text to select it and open the Properties toolbar (from the View > Toolbars menu, or press Command/Ctrl-E). Now you can change the selected text’s color, horizontal alignment, typeface, and style (bold, italic, underlines, etc.). You can mix formatting in the same text box and changes will be applied just to the characters you select.

These fonts get embedded in the PDF, by the way, so go ahead and add some text in Bickham Script if you want! Even users with Adobe Reader will see the text just as you entered it.
To make your modified text formatting the default for all future Text Boxes in this PDF, you need to select the box with the Text Box tool (so the frame highlights), right-click on it, and choose Make Current Properties Default from the context menu.
Paste in a Text Box
Here’s one last neat trick: If you select some of a PDF’s text with the regular Select Text tool (to the left of the Hand tool), copy it (Edit > Copy), and paste it in, it automatically comes in as an editable Text Box. You can even copy/paste from one PDF to another, a neat way to grab some content from one PDF and add it to another.
Ensure PDF Text Box Comments are Printed
Recently, I was adding some language to a contract a vendor had sent me as a PDF. The Text Box tool worked wonderfully to add exactly what I wanted to include, in the right place and in the right font. I saved my changes, but before I closed the file and e-mailed the revised contract back to them, I printed out a copy for my records.
I grabbed the pages from the laser printer and took a look. Ack! Where did my edits go? The printout didn’t include them. It was the original contract they had sent me.
I checked my settings in Acrobat’s Print dialog box and found the problem. I had set it to print “Document Only” from the dropdown menu. Acrobat didn’t print the additional text I entered with the Text Box tool because it considered those to be comments. To get the printout I wanted, I needed to choose “Document and Markup” from the menu instead. I did so, and when I made a new printout, my Text Box additions were there.
Okay, so now I knew how to make sure my new contract language appeared in the printout, but how could I make sure the vendor I was sending the file to knew? It’s not something you can set and save in Acrobat, like you can with a PDF’s initial view scale.
I was planning on returning it to them as a PDF attachment. (Yes, I could always put my good printout in an envelope and mail it to them, but — puh-leeze!) When my vendor’s admin opened the attachment in Reader or Acrobat to print it, would they remember my accompanying instructions to specify Document and Markup in Acrobat’s or Reader’s Print dialog box?
I think not. And this was a contract … it was vital that my edits always appear.
Solution: Burn Them In
Here’s what I discovered. To convert Text Box comments into actual type embedded in the PDF, you must print the PDF from within Acrobat to the virtual Adobe PDF printer. (This is also known as “refrying” a PDF). The virtual printer is installed automatically when you install any recent version of Adobe Acrobat.
It’s easy to do. Open the File > Print dialog box and choose Adobe PDF 8.0 (or whatever version you have installed) from the Printer dropdown list. When you click OK, you’ll get an Open/Save dialog box where you can name the PDF and choose where to save it. It should open automatically in Acrobat when it’s done.
To test that your Text Box text has been “burned into” the new PDF, press Command-Shift-8 (Ctrl-Shift-8 on Windows), the shortcut for Hide Comments. Your text should remain visible, nothing should change. To show comments again, press Command/Ctrl-8.
Nothing else I tried worked, by the way — OS X’s Save as PDF, PDF Optimizer, exporting to PDF/X-1a, and so on. Either they couldn’t generate a PDF at all, or the comments remained as comments. It’s likely that exporting to PostScript and then distilling would work (I think), but once I found that printing to PDF did the trick, I was happy.
Note: I don’t recommend refrying press-ready PDFs you’re going to send to a commercial printer. It’s fine for other PDFs, though, that you’re using as final documents.
How many times have you e-mailed a PDF proof to your client and then received a call from them that went something like this:
Client: Thanks for sending this. We only have a couple changes.
You: No problem. Go ahead.
Client: Okay, on page six, can you make the picture of the winners bigger?
You: Sure. How much bigger?
Client: About 20 percent. We need to see their faces a little better.
You: (scribbling notes to yourself) … Okay, but do you really want the picture bigger, or do you want me to just scale it up 20 percent?
Client: Um, both, right? Aren’t they the same thing?
You: I mean, I can make the picture itself bigger, but then I’d need to move text over and re-do the caption. Or I can keep the picture the same size, but make the image larger.
Client: Huh?
You: I could just increase the scale of the picture, but keep the frame the same size.
Client: Frame? There’s no frame. We don’t see a frame on the proof over here. Maybe it didn’t PDF right?
You: No, not a frame like a border. I mean the overall box, the actual dimensions. I’m asking if we could keep the dimensions, but make the faces bigger. So we don’t have to change the layout — where the text is and all that.
Client: (long pause, muffled conversation) Well, we really just need the picture bigger. Can you send it to us both ways? Whatever ways you just said?
This is not fun for either of you, is it? Little Mr. Guilt on your shoulder is telling you that what you really need to do is get your butt out of the studio, drive over to the client’s office, and go over the proof in person. But except for the biggest clients and the most important jobs, who’s willing to foot the bill for that anymore?
Here’s a solution we’ve been using for over a year in my own studio, with great success: screen sharing. Your client sees the project on your screen, just as though you brought your laptop to their office and opened it up in Acrobat, QuarkXPress, InDesign, or whatever. Except you’re in your own office, they’re in theirs, you’re both on the phone and your client is seeing your screen in a window in their Web browser (Figure 1).
Figure 1. Here’s what my client, Michael, sees when I share my computer screen with him. On my computer, it looks like I have the layout open in InDesign. On his end, everything in my screen appears in the main panel of the screen-sharing application running in his browser. If he wanted, he could enable his own video camera so we could see each other as we talked (his face would appear next to mine, upper right). Alternatively, a guest can click the Full Screen button at the lower left to hide the interface, enlarging the host’s screen to fill their monitor. Click on the image for a larger version.

So, as you scale up the image (but not THE FRAME) in your page-layout program, they see exactly what you mean. And they can say “That’s perfect” when it is, in real time. Clients love it. And aren’t you thrilled when clients love what you do? I know I am.
A Lot Easier than You Think
I know what you’re thinking: Oh man, screen-sharing with my clients? Technical nightmare! Ports and routers, firewalls, dynamic IPs, Windows vs. Macs … it would never work.
But none of these are an issue if you use the right screen sharing software. We’ve settled on Adobe’s Acrobat Connect (which has nothing to do with Acrobat, by the way; don’t ask me why they call it that); but I’m sure there are others that are just as easy and seamless. While I personally haven’t had good luck with GoToMeeting, WebEx, or any open-source VNC gizmo, I hear Glance is pretty good. And screen sharing in Mac’s new Leopard OS sounds great, but most of my clients are on Windows… and besides, I haven’t upgraded my production Macs to Leopard yet. (I’m waiting for Apple to release10.5.9999.)
I like how easy Connect is to set up and use. As soon as you register via a simple form, and Adobe installs its tiny Connect Add-In plug-in in your browser, you’re good to go. From then on, all that Connect requires from you or your clients is Internet access and any Web browser running a reasonably recent version of the Flash plug-in. In other words, virtually everyone. (Adobe says Flash plug-in market penetration is about 97%.)
It makes no difference which OS either of use or which browser: Firefox, Safari, Internet Explorer, they all work. I don’t even ask my clients if they’re on Mac or Windows anymore. When we’re on the phone and I think it’d help if they could see my screen, I just ask, “Are you in front of the computer?” and tell them the URL of my online Connect room. (You choose it when you sign up.) I log in to the same URL, turn on screen sharing, and ten seconds later we’re collaborating online (Figures 2 and 3). No biggie.
Just a minor miracle.
Figure 2. After you log in to your Connect room (or Brio room, the upcoming version of Connect, shown here) with your username and password, have your client go to the same Web page. They log in as a Guest … no software to install, no registration required. Click on the image for a larger version.

Figure 3. This is called the “lobby.” It’s what everyone sees when they’re logged in but no one is sharing their screen yet. Avatars for logged-in participants appear in the bottom row; in this screenshot, only I’m in the room. I’ve opened the Pods menu, only available to the host, to choose which pods (panels) my guests will see. Click on the image for a larger version.

Connect Standard, Professional, and Brio
A Connect Standard account is $39 per month, but there’s a free 15-day trial. You can have up to 15 people “in the room” (connected computers) including yourself — more than enough for client collaboration.
Adobe also sells a high-end version called Connect Professional, meant for enterprise accounts, which starts at $5,000 to $10,000 per yr. Connect Pro has many more features and can accommodate hundreds of meeting participants (it’s what Adobe uses for their own eSeminars), but it’s overkill for what I’m discussing here.
Adobe is already previewing the next version of Connect, code-named Brio, as a public beta. Learn more about Brio, download it and test it for yourself — yes, you can even hold screen sharing meetings with it, even though it’s free — from the Adobe Labs site. It’s brio-utiful. It has the same basic functionality as Connect, but with some long-requested features (such as Voice Over IP, so you don’t even need the phone call) and a redesigned, elegant interface. All the screen shots in this article are from Brio.
Be aware, though, that your Brio room has an upper limit of only two guests plus yourself (compared to Connect Standard’s fifteen total), and the very latest version of the Flash plug-in is required, so your clients may be prompted to download FlashPlayer 9 and install it the first time they connect to your room. And, did I mention it’s beta? At least it’s in late beta, so most of the bugs have been squashed, as far as I can tell. But if it doesn’t work for you, go with Connect Standard for now, or another service.
Screen-Sharing Tips and Tricks
When you’re sharing your screen with a consumer-level service like Connect Standard or Brio, your image data is sent through your ISP to the host’s servers (in this case, Adobe’s dedicated Connect servers), and from there to your client’s computer screen. It’s important that your own Internet connection be as fast as possible. If you’re running your e-mail program, downloading files, and listening to live radio in iTunes while trying to share your screen, your connection will degrade and your client will see a stuttering screen, or worse, it’ll take a minute or two for your actions to appear on their screen. This is known as the dreaded screen lag.
So don’t do that! ;-) Quit out of programs that use up bandwidth before starting a screen-sharing session. To see what it’s like for your client, set up a laptop near your computer and log on to the room as a guest from that laptop. That way you can tell if something goes glitchy during the meeting, and compensate for it.
Connect/Brio doesn’t require you to reserve a room in advance, another reason I prefer it over other services. So you can jump into it on the fly, as I described above.
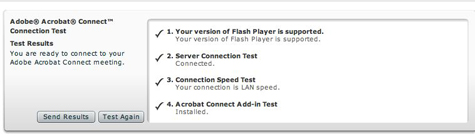
Nevertheless, when possible it’s useful to set a meeting time in advance with your client. That way you can e-mail them the URL of the room, and maybe include a link to a “Test Your Browser” page if they’re at all nervous about it. Connect’s testing page is at https://na1.connect.acrobat.com/common/help/en/support/meeting_test.htm (Figure 4); other screen-sharing services have their own.
Figure 4. If you send your clients to the Connect test page, they can assure themselves that screen sharing will work on their computer. If anything goes awry, the test automatically runs a wizard to bring them up to speed, such as installing the Flash plug-in for them.
Scheduling a screen-sharing session in advance also gives you a chance to quit out of your other programs before you start (do you really want them reading the e-mail you left open?) and maybe comb your hair, for God’s sake, before you enable your camera. Open the documents you’re going to share so they don’t have to sit through any “Missing Font” alerts, too. Most importantly, close any browser windows you don’t intend to share; these tend to be the first things your clients see as soon as you start screen sharing!
As Natural as Web Surfing
Once I became comfortable with screen sharing, I started seeing opportunities for live screen cast enhancements everywhere. You will, too.
Besides online proofing with my clients, I also use it for sales presentations, reviewing a client’s Web site with them, holding group meetings with my staff on the road, and of course, a lot of remote training for clients with far-flung employees, or who don’t have a travel budget.
Screen sharing can go both ways. With Connect or Brio (or other services, I imagine), your invited guests can share their screens with you and anyone else logged in. So when my client says she can’t print the PDF I sent her, I can see her screen from Connect and make sure she’s choosing the right Print options. With Connect, you can also allow participants to control your screen (it’s weird watching the cursor move around “on its own,” but fun-weird), and if they’re sharing their screen, you can control theirs! This opens up a whole world of possibilities.
A couple weeks ago I had an appointment with my accountant, but the traffic was snarled due to yet another rush hour snowstorm in Chicago. So instead, I had him go to my Connect room, where I opened my Excel and Word files with all my financials and shared my screen, then gave him control of it. We went over everything on the phone, and as he disallowed deduction after deduction, a ghostly mouse selected line items and deleted them. It was like a nightmare, come to think of it. But at least I didn’t have to drive through a blizzard to experience it!
Anne-Marie, a design studio owner and busy software trainer, is the geek behind DesignGeek, a free monthly tips and tricks e-zine for digital designers that she’s been publishing since 2003. She’s also the co-host of the InDesignSecrets.com blog and podcast, with David Blatner.
Based on an article originally published in the DesignGeek e-zine.
Many illustration programs ship with gobs of free clip art, templates, and other goodies, and Illustrator CS2 is no exception. When you install the program, it copies more than 150MB of templates and sample files to your hard drive, virtually all of it high-quality artwork you can use as is or as a starting point for your creative muse (Figure 1). And there’s another 170MB of excellent clip art and stock photos on the installation CD.

Figure 1. One of Illustrator CS2’s free sample files.
But to use this windfall, you have to answer two questions: Where are these files located, and how can I see them without having to open each one in Illustrator?
Track ‘Em Down
I’m assuming you’ve long since clicked the Don’t Show Me Again checkbox in the Illustrator splash screen — you know, the modal dialog box with buttons leading to things new users might like to do, including a Browse Templates button. Clicking that button opens the Illustrator templates folder in Adobe Bridge.
No worry. Just look in Illustrator’s File menu. Right under the New command is New from Template (Command/Ctrl-Shift-N). When you choose New from Template, Illustrator opens the Open/Save dialog box and pre-selects the folder holding all the free artwork (Figure 2).
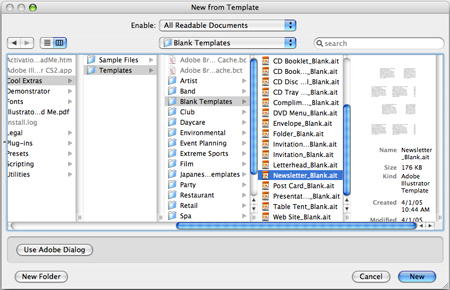
Figure 2. Ta da! Tons of templates at the tips of your fingers.
Alternatively, you can investigate the contents of this folder in the OS X Finder or Windows Explorer. Go to your Applications folder on your hard drive (Programs folder, in Windows) and go to Adobe Illustrator CS2/Cool Extras/Templates/.
Inside the Templates folder you’ll find such folders as Band, Party, and Restaurant, each of which contains six to ten or more separate files using that theme as a basis for postcards, posters, stickers, CD inserts, even Web sites. The individual files have cool color schemes (grab those swatches), embedded raster art, custom graphic styles, folder die cuts, and more. I often pluck out the illustrations of band instruments (Party > Party Hat) and paste them into new files when I teach Illustrator or Photoshop Smart Objects.
The Templates folder also includes a strong collection of Blank templates (Templates > Blank Templates) for brochures, envelopes, table tents, Web sites — there are 24 in all.
The folder of clip art and stock photography I referred to above is on the Illustrator CS2 installation CD. If you bought the Creative Suite, you’ll find these assets in the Resources and Extras CD that came with the product. Look in the CD’s Goodies folder for the Illustrator CS2 folder, and copy and paste its two subfolders (Clip Art and Stock Photos) anywhere on your hard drive.
Make Your Own Image Catalog
The problem with the two methods above is that neither the Open/Save dialog box nor the Finder/Explorer can show you previews of Illustrator templates. You have to open the file in Illustrator to see what it looks like. Clip art and stock photos don’t have this problem, but even then, you can only see one thumbnail at a time in the dialog box or OS window.
We old farts remember when companies used to include a printed image catalog with clip art (shocking!), making it much easier to scan through artwork and locate the one you want. How ’bout it, Adobe? Make a PDF of all the clip art, stock photos, templates, and sample files, and sell it for $5.95 on your Web site. Bam, you’ve got yourself a new revenue stream.
All right, all right, I know why Adobe’s not doing that. It wants us to use Bridge to view these. Fine. Grumble.
Here’s how to make your own Illustrator Freebies online image catalog:
- Open Adobe Bridge, switching to the Default Workspace in the Window menu if necessary.
- In the Folders panel, locate and select the Cool Extras folder in the Adobe Illustrator CS2 program folder. This reveals the folder’s contents — the two subfolders called Sample Files and Templates — in the large thumbnails area on the right.
- Right-click or Control-click on each subfolder and choose Add to Favorites. You could also choose Add to Favorites from the File menu.
- Back in the Folders panel, locate the goodies you copied over from the installation CD, if you did that. Add the Clip Art and Stock Photos folders to your Bridge Favorites, too.
From now on, whenever you want to browse through the riches of the free artwork Adobe included with Illustrator CS2, just click on that folder in your Favorites panel in Bridge. Thumbnails of the contents appear instantly in the large area on the right (after the first time Bridge builds the image cache). Double-click on the one you want to open in Illustrator, or select one or more of them and choose File > Place to immediately import the selection into Photoshop or InDesign.
You can also take this one step further and use a pre-built Photoshop or InDesign scripts in the Tools menu to create a PDF contact sheet of all the artwork you’re looking at. But that’s a topic for a different article.
Adobe’s new Lightroom CC application is a streamlined sibling to Lightroom Classic CC—though “streamlined” can also be a euphemism for “contains only a subset of features.” But don’t let Lightroom CC’s 1.x version number scare you off. Although it doesn’t match Classic’s feature set, it does include helpful features that make it more than a bare-bones image editor. Here are some features you may not know are available that can help you edit and manage your photos.
1. Your best friend, Option/Alt
“Streamlined” can also mean “every feature doesn’t require its own button.” In Lightroom CC, holding the Option (Mac) or Alt (Windows) key unlocks several helpful editing features.
- In the Edit panel, hold Option/Alt when dragging any slider in the Light controls to check for clipping—areas that are completely white or completely black.

Option/Alt-dragging the Exposure slider reveals areas that have blown out to white.
- When you hover the mouse pointer over a tool name, you can click to reset that tool (the name changes to indicate this, such as “Reset Exposure”). When you hold the Option/Alt key and click the name of a pane, such as Light or Color, all of the pane’s sliders are reset to their default values.
- In the Detail pane, hold Option/Alt when dragging the Sharpening slider to view a grayscale preview, which helps check for crispness.
- Similarly, holding the modifier while dragging the Radius and Detail sliders (click the exposure triangle to the right of the Sharpening slider to reveal these finer controls) previews the image as an embossed, high-pass view to see where the settings are affecting the image.
- Also, in the Sharpening controls, hold Option/Alt while dragging the Masking slider. A higher Masking value applies the Sharpening setting to contrasting edges, but leaves larger areas alone. It’s great for sharpening a person’s facial features, like eyes, without exaggerating the texture of the skin on their cheeks, for instance.
- Hold Option/Alt when applying a vignette to see a starker version of the effect that gives you a better idea of where it’s being applied.
In a similar vein, one great feature in Lightroom Classic CC is the ability, when using the Spot Removal tool, to turn on Visualize Spots and see an inverted, high-contrast version of your image that exposes dust spots and grime. Lightroom CC doesn’t include that specific command, but a variation of the feature is there: with the Healing Brush active, press the A key.
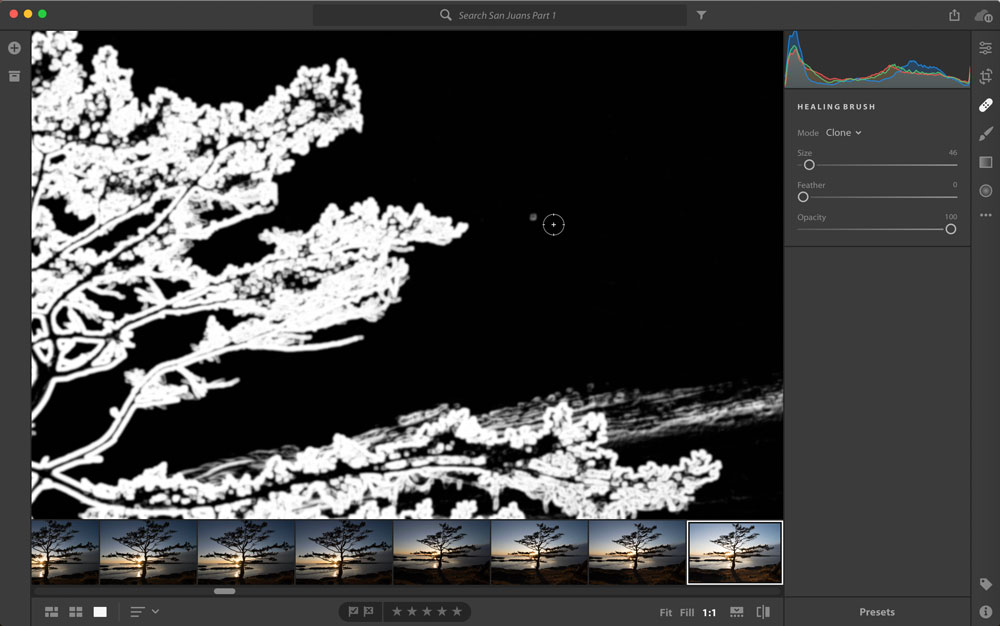
Press A with the Healing Brush active to find artifacts from a dusty lens or sensor.
2. Copy and paste edits
Lightroom CC includes the same core image editing engine and features as Lightroom Classic CC, and also one of the most helpful features when working with multiple photos from the same shoot. When you make adjustments to one image, you can copy those settings and paste them to a similar image.
- Open the Edit panel if it’s not already open (press E or click the Edit button at top right).
- Click the ellipses (…) button and choose Copy Edit Settings, or just press Command/Ctrl-C.
- Switch to another image.
- Click the ellipses (…) button and choose Paste Edit Settings, or press Command/Ctrl-V.

Copy the edits from one photo and then paste them onto another.
All of the edit settings are copied and pasted, including linear and radial gradients, Healing brush fixes, and Brush tool strokes. Unlike Lightroom Classic CC, however, you don’t have the option of choosing which adjustments to apply when you paste them. Also, you can paste to only one image at a time, not a bunch in one action. Still, it’s a great time-saver when you want to make a common correction to many photos, such as fixing white balance.
3. Load and Save presets
If a company ships an image editor without presets, does it really exist? Lightroom CC includes an array of editing presets for one-click color and black-and-white adjustments. In the Edit panel, click the Presets button and then choose from the list that appears.
The advantage of presets, though, is to be able to apply your own styles. If you’ve used (or continue to use) Lightroom Classic, it’s likely you already have a bunch, or you’ve downloaded third-party ones. Lightroom CC can use them, but you need to copy them to the right location:
- In the Edit panel with the Presets list visible, click the ellipses (…) button and choose Open Presets Folder; the Develop Presets folder opens
- In the Finder (macOS) or Explorer (Windows), copy the presets file you want to add (which ends in .lrtemplate) to the Develop Presets folder.
- Restart Lightroom CC.
Going in the other direction, if you hit upon a combination of edit settings that you want to use for other photos, create your own preset, like so:
- Edit a photo to your liking.
- In the Edit panel with the Presets list visible, click the ellipses (…) button and choose Create Preset.
- Give the preset a name and click Save. The preset appears in the User Presets category in the list.

Create your own presets to use later.
4. Store originals on an external disk
Lightroom CC stores your entire library in one place. On the Mac it’s in a package file, which is a folder that looks and acts like a file (within your Pictures folder); under Windows it’s a folder buried a few layers deep (specifically, Username\AppData\Local\Adobe\Lightroom CC). That’s great if you have a multi-terabyte hard disk as your startup drive, but less ideal if you’re on a space-constrained laptop.
Even in the latter case, Lightroom CC does something smart: since all your photos are uploaded to Creative Cloud, the application selectively removes image files from your disk. They’re still available—if you edit one, it’s downloaded from the cloud as needed. But that means you’re relying entirely on the cloud to store your originals. From a backup perspective, that makes me nervous.
Instead, store your originals on a large external disk connected to your computer. That makes it easy not only to have instant access to your photos while you’re at the computer, but you can create a duplicate of that drive for backup purposes.
- Open Lightroom CC’s preferences and click the Local Storage option.
- Enable the “Store a copy of all originals at the specified location.”
- Click the Browse button and specify a location on your external disk.
- Click Done.

Choose an external disk for storing your photo originals.
A copy of each original is still stored on Creative Cloud, giving you access to any image in your library on all versions of Lightroom CC—desktop, mobile, or Web. When you’re not connected to that hard disk, you don’t lose any capability to edit your photos. As you edit a photo, the original is downloaded to Lightroom CC.
Here’s the best part: Let’s say you take your laptop on a photo shoot, and the external drive holding your originals remains at home. As you import new images, they’re saved to the internal disk. But when you return home and connect that external drive, Lightroom CC automatically moves all the new originals to that drive, without any action on your part. (In Lightroom Classic CC, you need to manually move the images between disks in the Library module.)
Islands in the Stream(line)
Lightroom CC has deservedly gotten some knocks for not being as full-featured as its older sibling, Lightroom Classic CC, and part of that is because the interface and approach are less cluttered. But there’s still plenty of activity under the surface if you know where to look for it.
If you’re here reading CreativePro, chances are you’re an expert in some aspect of graphic design, production, or publishing, right? Do you also love what you do—and love sharing your expertise with others? Do you enjoy speaking in front of crowds? If you answered “yes!” to all of the above, then we invite you to submit your session ideas to us for next year’s CreativePro Week, in beautiful New Orleans, June 4–8, 2018.
The deadline for Speaker submissions is September 30, 2017, so don’t wait!

What is CreativePro Week?
CreativePro Week is the industry’s only conference for graphic design and publishing with an emphasis on how-to.
It is not just one event, it is actually three conferences scheduled back-to-back, with special events and workshops throughout the week:
- Ps/Ai: The Photoshop & Illustrator Conference for Designers: June 4–5, 2018
- The InDesign Conference: June 4–7, 2018
- PePcon: The Print & ePublishing Conference: June 6–8, 2018
CreativePro speakers are a special breed
Our speakers are a rare combination of expert users and expert teachers. They avoid slides, instead, they demonstrate with live files on their laptops and mobile devices. They prepare detailed handouts that attendees receive beforehand, and our speakers make themselves available and accessible to attendees throughout the conference.
Our attendees are special!
CreativePro Week attendees are a distinctive mix of production managers, creative directors, and graphic designers from all over the world. They are eager to stay on top of best practices and learn expert tips on how to get things done in Photoshop, Illustrator, InDesign, print, PDF, and digital publishing.
Join us in 2018
 Please fill out the “I want to present!” form on the CreativePro Week website by September 30, 2017. If you’ve never spoken at one of our events before, we’ll need to see a list of other events at which you’ve spoken, and links to videos of your prior talks (or you can make us a sample video). We’ll let you know either way by November 30. Looking forward to hearing from you!

For the past month I’ve been playing with GoProof, a free new online proofing add-on for the CC 2015 versions of Photoshop, Illustrator, and InDesign. It adds a proof tracking panel to each app that integrates with my (free) account at GoProof.net.
If you have a Creative Cloud account, you can go to the Adobe Add-ons page at https://creative.adobe.com/addons and search for free and commercial add-ons, like GoProof. There are tons of them!
After downloading and installing the GoProof add-on, I found a new GoProof panel in each of these apps, located in their Window > Extensions fly-out menus.
Let’s say that I’m working in Illustrator CC 2015, mocking up a few new web site page designs for my client, Acme Industries. Instead of sending the five reviewers at Acme a PDF of each Illustrator file, and trying to make sense of the five commented PDFs I get in return, I can use GoProof!
Using GoProof to Manage Proofing Rounds
First, with the document active in Illustrator, I open the GoProof panel from the Window > Extensions panel and log-on if necessary. Then I choose a client and project from the panel’s menus, and click the Send Proof button lower right.
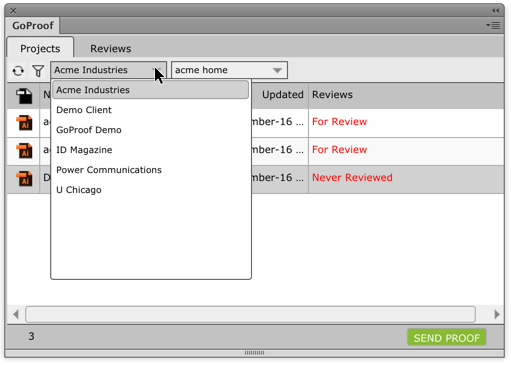
The GoProof panel remembers client names and project names that you’ve used before. You can create new clients and projects on the fly from the panel menu.
GoProof then takes you through a few additional screens where you specify who should get this proof (actually, they get an email with a link to the proof online), add a Subject line and message, and review everything before it finally gets sent. That’s it, you can go on working on the next job. In the background, GoProof is uploading a PNG version of your file to your space on the GoProof secure servers and sending out the emails.
When your clients click the link in the email that GoProof sent, they’re brought to the online proof in their browser. They don’t need to log in or install anything. They can use the service’s commenting tools to mark up the proof, and add their comments on the right. The person you assigned the Gatekeeper role to can add additional reviewers, send reminders (as can you), and finally “calls it” when their proofing is done.
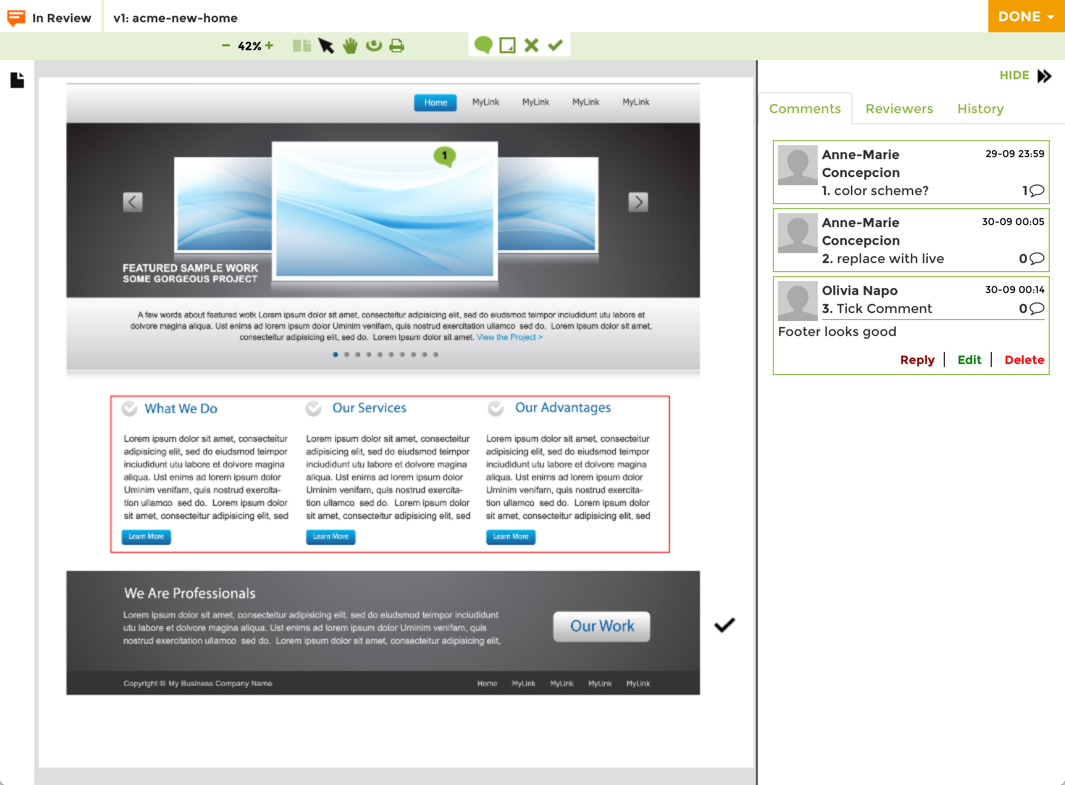
A set of four basic commenting tools is available at the top of the screen. With them, you can add a text comment, draw a box, apply an X for “not good,” and a checkmark for “good.” You can add your own comments to any of these items, and reply to others comments, in the right-hand comments pane. I do wish GoProof had a wider range of commenting tools, but after all, it’s a new service. I’m sure they’re feverishly working on new tools and features—indeed, they released a number of them in the past month. These updates get pushed through automatically to the Add-on. Neat!
Okay, so collaborative commenting is useful. But how do you see all the comments back in Illustrator? Answer: in the GoProof panel! I love this. The same panel that you use to send proofs and manage proofs is used to view commented proofs. Just click the Reviews tab (next to the default Projects tab) at the top of the panel.
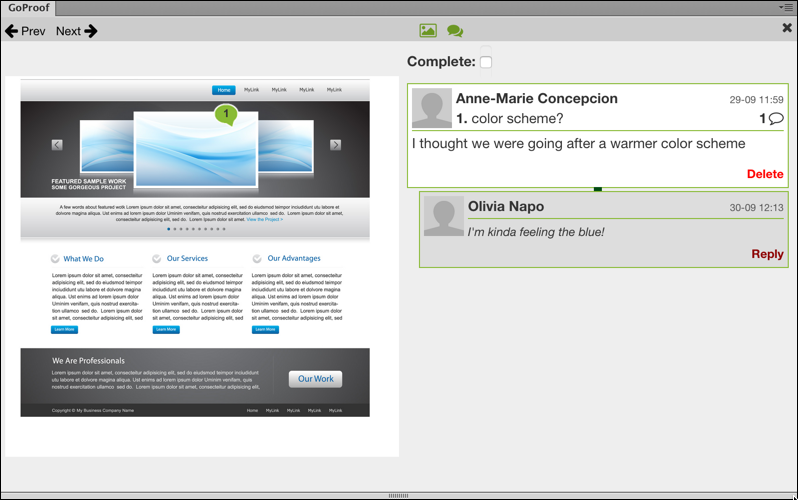
The larger you make the panel, the larger the preview of the page becomes. You can cycle through each numbered comment with the Previous and Next links at the top, make that change to the live document, then click the “Complete” checkbox. When you’re done, you can re-send this as a new version of the proof. No need to rename your file, GoProof just adds “v2” to the proof name in its own system. Anyone can look at previous versions right in the GoProof web site.
Mobile versions of GoProof were just released, on iOS and Android. I haven’t had a chance to check those out yet, but they look promising.
GoProof Pricing
Have I mentioned that all of this is free? For you and your clients. The (reasonable) catch is that if you like the service, you’ll probably start using it for multiple clients and multiple projects. But remember, GoProof uploads a PNG version of your files to their server space for each proof version of each project file. If you need more space than the free service allows, you can upgrade to “Pro” level, which is $10/mo for 5GB of space, per user. They also have enterprise plans available, useful for ad agencies, for example.
I’ve enjoyed playing with this release, and the few clients I’ve had a chance to try it out on found it useful too. I’m a big fan of any technology that makes it easier to collaborate on projects, and GoProof certainly does so. One question: Why hasn’t Acrobat figured this out yet?
Listen in your browser:
InDesignSecrets-026.mp3 (13.4 MB, 25:32 minutes)
or read the transcript of this podcast
- The Pleasures of CS2’s Spine Alignment (Align to/Away from Spine) feature
- InDesign Quiz Contest #2! (See note below)
- Obscure InDesign Feature of the Week: Convert to Profile/Assign Profile
Links mentioned:
- InDesign Magazine (Pariah Burke’s article on using spine alignments with anchored objects is in issue #8, Oct/Nov 2005)
Note: Comments were closed for 24 hours (to this post only) to give people a chance to listen to the podcast and figure out the answer to the Quiz. The comments are now open! The first complete and correct quiz answer posted here as a comment will win. We’ll officially declare the winner as well, via a comment like last time.
Listener Comment Line: +1-206-888-INDY (-4639)
Talk to us, baby: Leave a message!
A very special episode, recorded in front of a live audience at The InDesign Conference 2016! Scroll down to see a couple pictures.
In this episode:
- News and Updates:
- Quick history lesson about our podcast
- InDesign CC 2017 released last week
- Fun times at AdobeMAX!
- InDesign Magazine Nov. 2016 is magical (literally) and comes with videos!
- Registration open for the 2017 InDesign Conference, May 22-25, part of CreativePro Week
- Interview with Mohammed Javed Ali, InDesign product manager
- Our top 10 OIFOTW’s (Obscure InDesign Features) from episodes 3 to 237
- And this episode’s Obscure InDesign Feature of the Week: Alpha Channel
News and special offers from our sponsors:
>> Teacup Software is a consulting firm and a vendor of simple, elegant, and unobtrusive plug-ins for InDesign, including BarCodeMaker, PatternMaker (developed with our own David Blatner), and DataLinker, for linking to databases. They’ve recently updated their plugins to support InDesign CC 2017, too. Support your local InDesign developer!
- InDesign CC 2017: New features, Keeping older versions, Updated ID New Features Guide
- CreativePro Week 2017
- Where does Javed Ali and the rest of the team work? In Noida, Delhi, and Gurgaon
- Join the InDesign prerelease team
- Here are the OIFsOTW we talked about!
1. Non-joiner
2. Flush space
3. Barbell
4. Magnet
5. Float
6. Choke
7. Straight Hash
8. Folder Zero
9. Butt Cap
10. Jumbo - This episode’s OIFOTW: Alpha Channel
Here are a couple pictures from The InDesign Conference 2016:
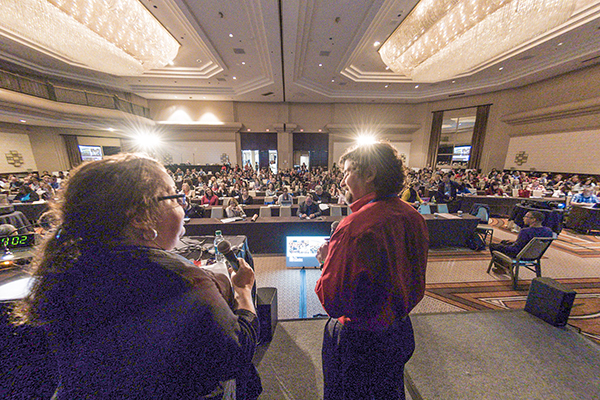
Anne-Marie and David welcoming the crowd to The InDesign Conference 2016

Anurag Wahi and Javed Ali, InDesign product managers/engineers, answering questions during the Ask Adobe Anything session
Press Release
Creative Commons announced the release of the Public Domain Mark, a tool that enables works free of known copyright restrictions to be labeled in a way that clearly communicates that status to the public, and allows the works to be easily discovered over the Internet. The Public Domain Mark effectively increases the value of the public domain by making works that are already free of copyright readily accessible to the public. The Mark makes it clear to teachers and students, artists and scientists, that they are free to re-use material. Its release benefits everyone who wishes to build upon the rich and vast resources that are part of the shared public domain.
Europeana — Europe’s digital library, museum and archive — is the first major adopter of the Public Domain Mark. The tool will become the standard mark for works free of known copyright that are shared via the Europeana portal, playing an important infrastructural role in the EU’s efforts to ensure that all works shared online are marked with rights information. Europeana, whose partners include the Rijksmuseum in Amsterdam, the Bibliothèque nationale de France and Germany’s Bundesarchiv (Federal archives), estimates that the millions of out-of-copyright works made accessible via its searchable database will be labelled with the Public Domain Mark by mid-2011. Europeana will announce the adoption of the Public Domain Mark at the upcoming Europeana Open Culture 2010 Conference, to be held 14-15 October in Amsterdam.
“The Public Domain Mark is a further step on the path towards making the promise of a digital public domain a reality,” said Michael Carroll, a founding board member of Creative Commons and a law professor at American University. “Marking and tagging works with information about their copyright status is essential. Computers must be able to parse the public domain status of works to communicate its usefulness to the public. The metadata standard underpinning the Public Domain Mark and all of CC’s licensing and legal tools are what makes this possible.”
“An important part of our mandate is to ensure that digitized works made available through Europeana are properly labelled with rights information, including when a work is free of known copyright restrictions so that teachers, students and others can freely use it in their work, changing it and remixing it as they wish,” noted Jill Cousins, Executive Director of Europeana. “The legal and technical rigour applied by Creative Commons throughout the development process makes the Public Domain Mark the natural choice for Europeana’s infrastructure. We have also worked with Creative Commons and our content providers to develop a Usage Guide for public domain works to help users of cultural content use it responsibly — by crediting the provider, among other things.”
The Public Domain Mark in its current form is intended for use with works that are free of known copyright around the world, primarily old works that are beyond the reach of copyright in all jurisdictions. Creative Commons is mapping the next phases of its public domain work, which will look at ways to identify and mark works that are in the public domain in a limited number of countries.
Creative Commons worked closely with Europeana and several of its members throughout the development of the Public Domain Mark. That process also included a public consultation period and review by CC’s worldwide affiliate network comprised of legal experts from more than 70 jurisdictions. The Public Domain Mark, to be used for marking works already free of copyright, complements Creative Commons’ CC0 public domain dedication, which provides an easy and reliable way for adding new works to the public domain prior to the expiry of copyright.
More information about the Public Domain Mark can be found on the Creative Commons website.