


Here’s a tip that’s related to one of the techniques found in the InDesignSecrets Guide to Special Graphic Effects. The technique in the ebook shows how to create the illusion of interlocking objects with the Paste Into command.
The tip I’m about to describe uses the power of Paste Into to make a more convincing bevel and emboss when you’re working with one path that overlaps itself.
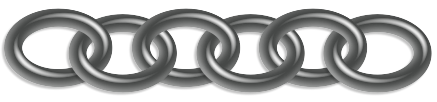
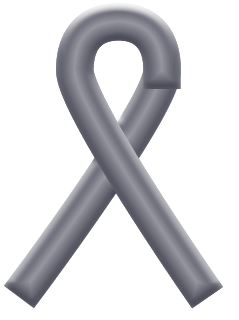
Normally, if you apply an effect like Bevel and Emboss to a path that crosses itself, the path segments look fused together where they cross. There’s no sense that one segment is on top of the other. And that’s bad news for an effect that’s supposed to give your objects a 3D feel.
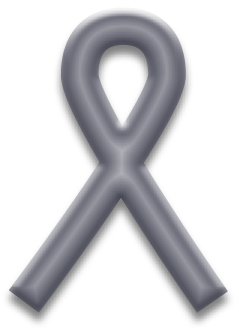
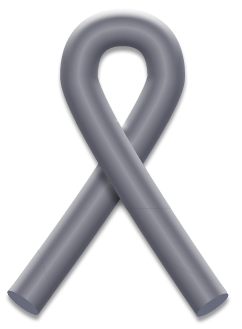
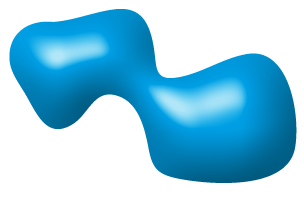
If you want the object to look like it was molded or welded together, fine. But if you’re trying to show a steel bar bent by Superman, this is not what you want. You probably want something more like this.
If that’s the case, Paste Into is the solution. Just draw the path, then apply a bevel effect via the FX menu in the Control panel or Effects panel.
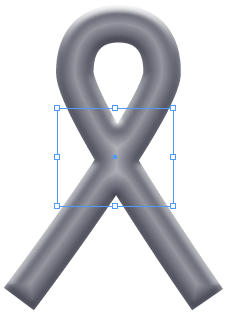
For now, hold off on other effects that extend beyond the object, like a drop shadow or outer glow. Copy and paste the path in place. Choose which segment is going to be underneath where the path segments cross. Select that segment with the Direct Selection tool and delete it.
Cut the remaining path. Draw a new empty frame over the area where the paths cross.
Choose Edit > Paste Into (Command+Option+v/Ctrl+Alt+v).
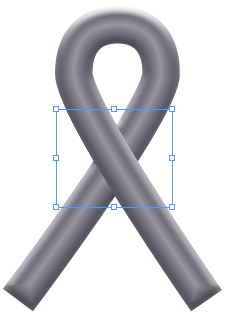
The pasted segment appears like it’s on top. Well, actually it is on top. But the frame you pasted into acts like a mask and provides the illusion that we’re looking at just one path. If you do need a drop shadow or glow, you will have to take extra care to get it to look right where the path crosses itself. You might have to take some time to shape your mask (the frame you pasted into) perfectly. Or you could use an extra object,

placed where you need to create that crossing shadow

and moved behind the top path. Sure it’s cheating, but it works.

Four out of five bevelers surveyed preferred the “Paste Into” bevels on the right.

Now you know the trick, how about some tips about beveling?
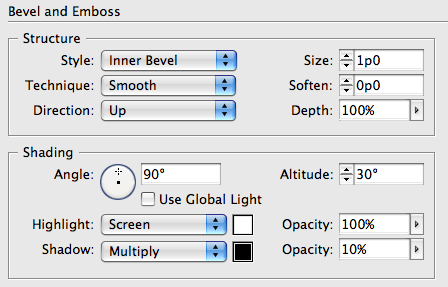
1. You can adjust the gloss level of your bevels super-quick and easily by adjusting one setting, the altitude of the light source.

The higher the altitude, the shinier the effect. You can adjust the numerical value or you can just click and drag on the target inside the circle to adjust both the Altitude and Angle of the light source at once.
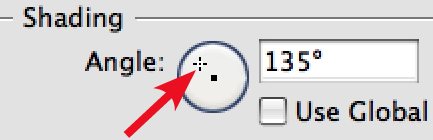
Drag toward the center of the circle to increase gloss.
Just by changing the Altitude of the light source, you can go from matte (60°),

to satin (70°),
to gloss (80°).

If you go to far, you’ll remove the blur from the highlight completely, and it will start to look very fake. At an altitude of 90°, the highlight itself will disappear.

2. You can transform the shadow of a bevel into a second highlight just by changing its color and blend mode.
![]()

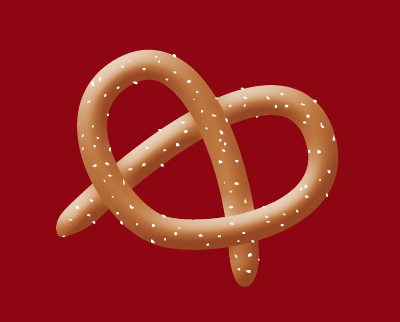
With these tips in mind, you’re free to bend steel bars, bake pretzels,
or decorate cakes (click for a close-up view)

all without leaving with InDesign.
Sweet.
This article was last modified on August 20, 2021
This article was first published on September 2, 2010
Commenting is easier and faster when you're logged in!

Recommended for you

Create a Flat-Bottomed Stroke, Part 2
In Part 2, Kelly shows a variation of her clever flat-bottomed stroke effect, us...
Filling Live Text with Images in InDesign
Want to get an image inside some text in InDesign? You don’t have to convert it...
Help Squash This Bug: Placed Images Showing Outside the Frame
Here’s an annoying little InDesign bug that maybe we can get Adobe to finally sq...