

Welcome to the debut of View Source, a monthly column on Web design.
You’re undoubtedly familiar with GIF and JPEG file formats. GIF has been a long-time workhorse for Web designers. Because it’s limited to 256 colors, the GIF format is best used for images with solid colors and text, such as logos and line art. JPEG is the format of choice for photographs or any image displaying a wide range of color and gradations.
You may be less familiar with the Portable Network Graphic (PNG) file format. It’s a great file format that can produce smaller file sizes than GIFs, higher quality than JPEGs, and can add sophisticated transparency effects to your Web pages… if you know how to use the PNG format correctly.
Understanding PNGs
The first thing to know about the PNG format is that there are two versions: PNG 8 and PNG 32 (which Photoshop confusingly calls PNG 24). Each offers different quality and compresses to different file sizes. You need to pick the right type for the right job.
PNG 8 is simply a replacement for GIFs. The “8” in PNG 8 means 8 bits of data, which can accommodate only 256 colors, just like GIFs. PNG 8 files are usually smaller than GIFs, however, and the only thing you can’t get with PNG 8 file is animation (oh my, no dancing hamsters!).
Although PNG 8 is a better file format than GIFs, it hasn’t won over all Web designers. The biggest problem Web designers have encountered with PNG files is that the gamma of the exported PNG file can change from the original — that is, the color changes when saved as a PNG. This means the PNG image might not match the background color of a page or your corporate identity guidelines. The problem, however, isn’t with the PNG format, but with the way Photoshop saves PNGs. In versions prior to CS3, Photoshop embeds color profile information in the PNG file that can sometimes drastically change the color of a PNG.
Fortunately, there are a couple of ways to overcome this problem. First, you can upgrade to Photoshop CS3; if that’s not an option, the free SuperPNG Photoshop Plug-in from fnordware.com will do the job. This plug-in produces better-quality PNG files without a shift in color. If you use Fireworks, you’re fine — PNG files created in this program don’t shift color.
For greater image quality and more features, there’s the PNG 32 format. Unlike its little sibling, PNG 32 can reproduce a full spectrum of colors just like the JPEG format, but without the visual artifacts introduced by JPEG compression. The downside is that PNG 32 files tend to be a lot larger than JPEG files. So in general, when file size and download time are a consideration, JPEGs are usually better. However, there’s one thing PNG 32 files offer that GIF and JPEG files can’t: full alpha transparency. (The “32” in PNG 32 refers to 24 bits of color + 8 bits of transparency data.) Alpha transparency opens up a wide range of design effects you can’t achieve any other way.
Transparency on the Web
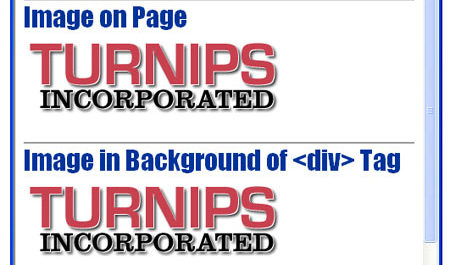
GIF (and PNG 8) have a very basic form of 1-bit transparency: You can knock out just one color in the image to allow the background below to show through; for example, you can use this feature to let the background of a page show through a non-rectangular image. To save a GIF file with transparency, you must define a “matte” color — the color that the transparent areas are above. As long as you place the GIF on top of a background that’s the same color as the matte color, everything’s fine (Figure 1, top-left image). But place the GIF on top of a different color, and you end up with a nasty-looking halo around the image (top-right image in Figure 1).
PNG 32, on the other hand, supports real transparency. It preserves delicate drop shadows, or subtle 50% opacity overlays, so you can place a PNG 32 image over any background color and the transparency remains (bottom two images in Figure 1).

Figure 1. Delicate drop-shadows turn into eye-shocking “halos” when using transparent GIF images (top). PNG 32 files, however, preserve the subtle character of transparent images (bottom). Click on the image to see a larger version.
Creating and Using a Transparent PNG File
Most image-editing programs let you create subtle transparency effects; for example, in Photoshop and Fireworks, you can set the opacity (another word for transparency) for any layer. In addition, drawing tools like the brush tool usually have soft, feathered edges with varying transparency. Likewise, most image editing programs can create transparent drop shadows on text.
To export a transparent PNG image in Photoshop, choose Save for Web from the File menu, then choose PNG-24 from the optimization menu (Figure 2). In Fireworks, choose PNG 32 from the Optimize panel, and choose Export from the File menu. (Avoid the PNG 24 option in Fireworks — it doesn’t preserve any transparency.)

Figure 2. Confusingly, Photoshop calls PNG images with transparency PNG-24 files, while Fireworks refers to them as PNG 32 files. Click on the image to see a larger version.
Once created, you can add a PNG 32 file to a Web page just like any other Web graphic. For example, in Dreamweaver, choose Image from the Insert menu, then select the PNG file you wish to add to the page. You can also use the CSS background-image property to place a PNG image in the background of any HTML element on a Web page.
Working with Internet Explorer 6
Transparency opens a wide range of effects for the Web designer; for example, drop shadows and the “reflection in a glass pond” look pioneered by Apple can easily be added to any image and dropped onto any page with any background color. Unfortunately, PNG files with transparency don’t work in Internet Explorer 6 — yet another reason this graphic file format isn’t as commonly used as it should be. IE 6 adds a light-blue background to the transparent areas of the image (Figure 3). Although Microsoft added support for PNG transparency in IE 7, IE 6 still remains the leading Web browser as of this writing.
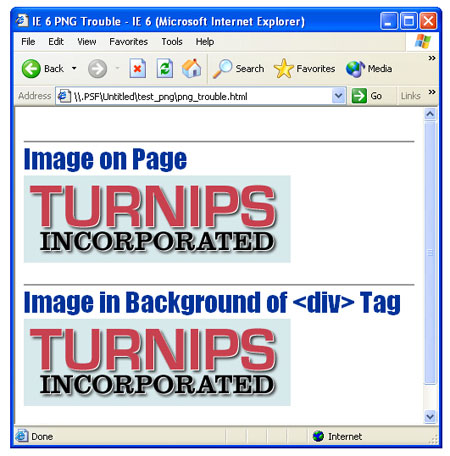
Figure 3. Internet Explorer 6 doesn’t like PNG transparency. All transparent parts of a PNG 32 file are colored light blue by IE 6.
Fortunately, you don’t have to abandon PNG transparency or leave IE 6 users high and dry. There’s a relatively simple way to force IE 6 to support PNG transparency.
Internet Explorer includes a Microsoft-only CSS feature called “filters.” A filter is a way of adding a special effect to an element or an entire Web page. Ironically, while IE 6 can’t display transparent PNG images like other browsers, it does support a Microsoft filter, called AlphaImageLoader, that lets you insert a PNG image that contains transparency!
There are many ways to take advantage of this filter to successfully display PNG images in IE 6, from techniques that require you to handcraft specific CSS styles to fix each PNG image, to JavaScript-based methods that automatically force IE 6 to display PNGs correctly. My favorite solution, created by Angus Turnbull, requires very little effort.
In a nutshell, you need to download two files, place those files in your Web site, and then add a little code to the PNG-laden Web page. Here are the two files:
* iepngfix.htc and blank.gif
The iepngfix.htc file is an HTC (HTML Component) file. This is another Microsoft-only technology that’s essentially a small program that can dynamically interact with content on a Web page. The blank.gif file is a 1×1 pixel transparent GIF file that’s used by the programming magic in the HTC file. Make sure you keep these two files together on your Web site — for example, keep them both in the site’s top-level folder.
Once those files are on your site, you can add the necessary code to make them work. If you’re using an external CSS style sheet, the simplest technique is to add the following code to that file:
* html img { behavior: url(iepngfix.htc); }
The part inside the parentheses — iepngfix.htc, in this example — is the path from this style sheet to the .htc file you added to your site. When the style sheet and .htc file are in the same folder, the above code will work. If the files are in different locations, you’ll need to update the path accordingly. For example, if the CSS file is in the site’s main folder, but the .htc file is located inside a folder named “images” inside the main folder, you’d add this to the style sheet:
* html img { behavior: url(images/iepngfix.htc); }
For simplicity’s sake, it’s best to keep the external style sheet, the .htc file, and the blank.gif file together in the same folder on the site.
The * html part of the code is a tricky way (called a “hack”) to send a style to only IE 6 and earlier. IE 7 and all other browsers simply don’t understand this style and will skip it. Since IE 7 correctly displays PNG transparency, there’s no need to have it run the programming code in the .htc file — that would simply make IE 7 waste time and computer resources.
The above technique only fixes transparent PNGs that are inserted into the HTML of the page. There’s yet another way to add graphics to a page: the CSS background-image property. This CSS property lets you place an image in the background of any HTML element. Of course, if the background image is a transparent PNG, IE 6 will mess up that, too, and the above hack won’t fix it. To force IE 6 to correctly display transparent background images, you need to add the name of the CSS selector used to create the background image to the code above. Add a comma to separate each selector. For example, say you’ve added a transparent PNG image as a background image to a div tag with an ID of banner applied to it; in other words, you’ve created an ID selector – #banner. To make the transparent image work for both that style as well as PNG images that are added normally to the Web page, change the above code to this:
* html img,
* html #banner { behavior: url(iepngfix.htc); }
Add more CSS selectors to fix any other background-image problems you’re having with IE 6. Once you’ve added these CSS style, IE 6 correctly displays the transparency (Figure 4).

Figure 4: Internet Explorer 6 can display transparent PNGs correctly — it just takes some clever programming and a CSS style.
The PNG file format has a lot to offer: smaller file sizes when using PNG 8, and superb transparency support in PNG 32. Once you follow the few rules and techniques in this article, you’ll be able to take advantage of the features offered by this underused image format.
This article was last modified on December 17, 2022
This article was first published on June 13, 2007
Commenting is easier and faster when you're logged in!

Recommended for you

Snapheal offers high-end photo retouching at a low cost
Without a doubt, one of the most amazing features of Photoshop CS5 and CS6 is co...

How to Make a Portrait out of Type in Photoshop
When a person’s image is well-known, it can be recognized even under sever...
Adobe Paper Textures by Russell Brown
You can completely change the mood evoked by an image by adding textures and ble...