


Few of the changes to InDesign CS3 will make you gasp in wonder — most of the improvements this time around are about efficiency, not eye candy. While that’s a letdown for journalists hoping to sprinkle their articles with exclamation marks, it’s good news for InDesign users who just want to finish their work and knock off early.
The standalone version of InDesign CS3 is $699, and you can upgrade for $199. Here’s what you’ll get for your shekels:
Shiny!
The new object Effects — basically, Photoshop code stirred into InDesign — are the source of things that make you go “Ooh” (Figure 1). They let you nondestructively apply shadows, glows, bevels, embosses, and feathers to objects on the InDesign page.

Figure 1. The Effects palette. Click on the image for a larger version.
The Transparency palette’s features have migrated to the Effects panel, as well. In CS2 and earlier, you could apply transparency only to an entire object; now you can apply transparency to an object’s stroke, fill, or text (Figure 2). You can even apply separate opacity settings and blend modes to one object’s stroke, fill, or text.

Figure 2. You can fade an object into the background using the new Gradient Feather.
For a step-by-step tutorial on using the new Effects, look for issue 17 of InDesign Magazine. While the full issue won’t be available for download until April 11, new subscribers will receive this tutorial and one other as a thank-you gift right away.
Interface Changes
To save on precious screen real estate, Adobe introduced adjustable docks (Figure 3) that can show palettes full-size, reduced to panel names and icons, or collapsed to icons only. To collapse and expand one palette (now called a panel), just click its icon. Move the dock to the left or right of your screen, whichever suits you. In another space-saving measure, the Tools palette is now a svelte single column.
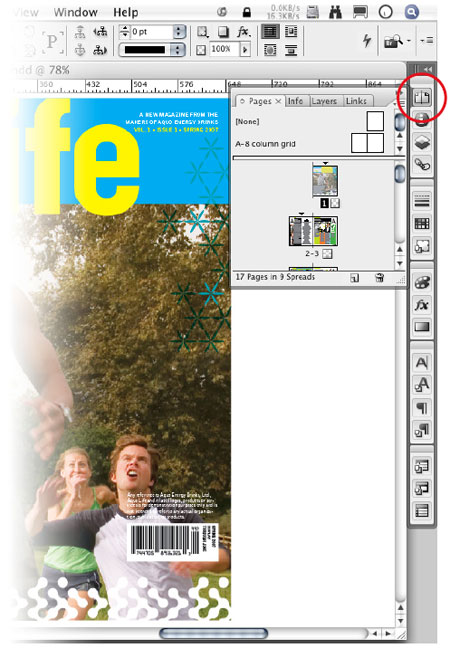
Figure 3. You can expand a panel by clicking in its icon, as shown here with the Pages panel.
The context-sensitive control panel now displays more options on wider displays. If you’re not blessed with a massive monitor, you may want to take advantage of the new ability to populate it with only the options you use the most.
Table Styles and Cell Styles at Last
If you’ve formatted many sizable tables in InDesign, you’ve wished for table styles. Now you’ve got two kinds: Table styles that affect the entire table, and cell styles that affect only cells (Figure 4). It’s like the relationship between paragraph and character styles.
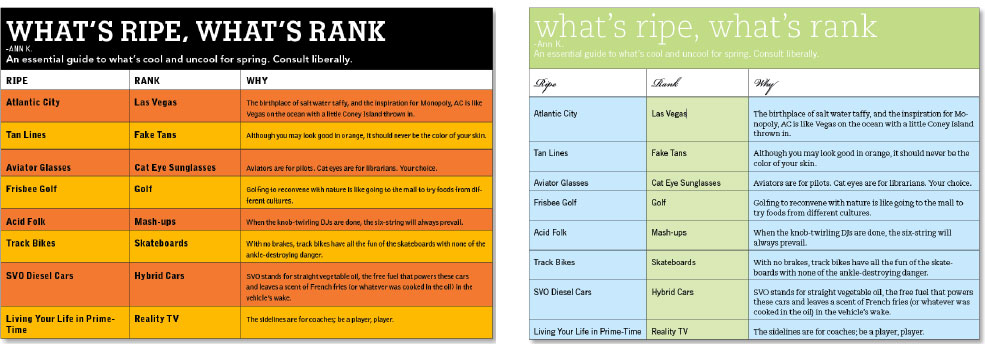
Figure 4. I just about yodeled for joy when I saw table styles and cell styles. Click on the image for a larger version.
Plus, tables that you link to an Excel spreadsheet or another external source can reflect the updates you make to the source file without losing body-row formatting. That’s right, InDesign preserves only body-row formatting — header-row formatting disappears when the linked source file is changed.
Place It Again, Sam
Say that you’ve established your layout grid and imported the text. Now you’re ready to populate the file with images. You could go File>Place, File>Place a gazillion times, or you could use the new Multi-file Place to load your place cursor with all the images all at once. A thumbnail preview shows you which file is ready to be placed, but if it’s not the one you want at the time, just cycle through the files with the up and down arrow keys (Figure 5).

Figure 5. The Place cursor (shown magnified on the right side of this figure) previews the file that’s next in line to be placed. The number in parentheses reflects how many images are loaded in the cursor. Click on the image for a larger version.
InDesign Files Inside InDesign files
In what looks to be a step toward a new workflow methodology akin to QuarkXPress 7’s Composition Zones, you can now place InDesign files in your document as you do images and text. When someone changes that placed InDesign file, just update it from your Links panel to see the changes in your layout. It gives you more flexibility than placing a PDF, for example, which you’d have to replace entirely if changed.
It’s not without its limitations, though. You can’t edit the placed InDesign file within your document; you’ll have to open the original. And if you don’t have the fonts or images used in the placed file, the placed file may not print properly.
Find/Change (Don’t Skip this Section)
This is one improvement you’ll want to ignore because it sounds so boring, but its potential for saving you hours — and I do mean hours — of drudgery is huge.
You can find and change text, sure. But in CS3, you can also find and change text insets, text wrap, text and object colors (stroke and fill), transparency, baseline grid, straight quotes, smart quotes — just about anything (Figure 6).
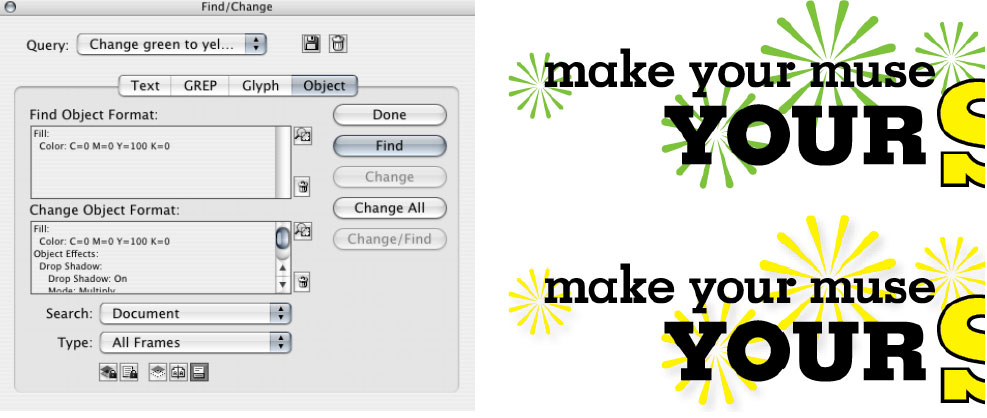
Figure 6. Change objects based on their colors? Why not! Click on the image for a larger version.
And I haven’t even told you about GREP yet. GREP (which stands for General Regular Expression Parser) has long been a mainstay with programmers who need to perform complicated search-and-replace operations. Now pre-made GREP search strings are in InDesign. And if you’ve really got your geek on, you can make up your own. For example, you could find all the text between parentheses and automatically give it a character style. That may sound simple, but it’s nigh impossible without GREP.
For a five-page step-by-step on using GREP, subscribe to InDesign Magazine. While the next issue won’t be available for download until April 11, new subscribers get the GREP tutorial as a thank-you gift.
Goodies for Long and Technical Documents
When it comes to cranking through long documents, InDesign CS3 is still no substitute for FrameMaker, but people who don’t want to or can’t use Frame should welcome some new automation features.
InDesign catches up to word processors with new support for text variables, such as time and date stamps and running headers and footers. You can apply paragraph and character styles to text variables to maintain visual consistency with the rest of your document.
Numbered and bulleted lists are a lot more flexible and easier to automate in CS3 (Figure 7). The hierarchical sequences and figure numbers keep track of themselves even when you’re using them across documents in an InDesign book.
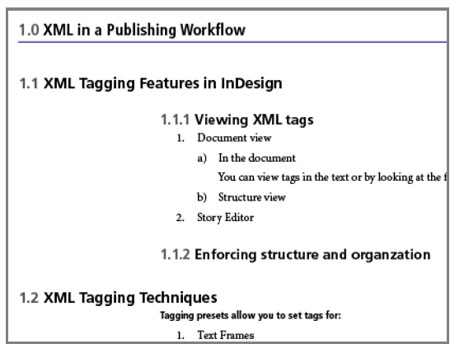
Figure 7. This kind of numbering sequence would have been a manual chore before CS3.
Whiter Whites and Brighter Brights
Most every other new or improved feature of InDesign CS3 is about making your workday easier or more efficient.
Pages panel. The little pages in the Pages panel are now thumbnail previews of what’s on your real pages — no more guessing about what page that table or image or sidebar is on (Figure 8)!
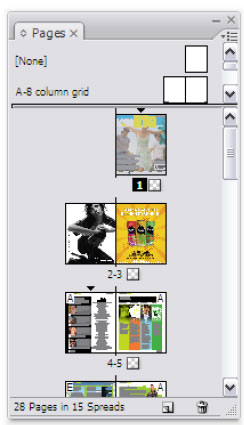
Figure 8. Thumbnail previews make the Pages panel much more useful now.
Nested style looping. Nested styles confuse some people, but if you’re into productivity, you already know that they’re your friends when you need to format text inside paragraphs with different character styles. Now you can repeat a nested style until the end of a paragraph (Figure 9).

Figure 9. Once you set up a nested styles loop, repetitive formatting like you see here is applied with one click of the finger.
Picture fitting. When you place an image into a regular InDesign frame, the image comes in at its actual size. Now you can set an empty frame’s fit options (method, alignment, cropping, and so on). Once you place something in that frame, it just fits! It’s a great timesaver for layout templates.
Export to XHTML. Adobe took this ability away after InDesign 2 (unless you count the Package for GoLive in CS2), but now it’s back. You can use the resulting code in any XHTML editor.
XML: The Change Without a Face. Getting XML into and out of previous versions of InDesign was no laughing matter. Adobe seems to have conceded that most designers are not ready to become code monkeys, so XML features have largely gone underground. If you know what you’re doing, you’ll find them; if you don’t, you won’t. I don’t, so I’ll end this section before I say something stupid.
Go to other pages in the CS3 Overview:
This article was last modified on January 10, 2022
This article was first published on March 27, 2007
Commenting is easier and faster when you're logged in!

Recommended for you
Acrobat How-to: Traditional Proofreading in PDF
It is interesting to note the advances that have been made in the concept of sof...

A Script to List Hyperlinks From Your InDesign Document
Use a script to generate a list of hyperlinks from an InDesign file.

Making Some Text Obvious… Temporarily
Here's an oldie but goodie trick for making text stand out when you need it (whe...