

With CS1 or CS2, an InDesign/InCopy workflow works best when everyone (design and editorial) has read/write access to the same local file server. If an editor working from home wants to use InCopy to edit stories in the layout, the best you can do is to e-mail him a mess of files (assuming you can figure out which files to send them), hope that he doesn’t rename or rearrange any files at their end, keep your fingers crossed that he sends you back the right ones and hope you remember where to put them.
 That’s all over with in CS3. Both InDesign and InCopy now offer a spiffy “Package” command in their Assignments panels that take care of automating all of the above, and more. In fact, with CS3 it’s possible to run a completely virtual workflow if you want: One designer, umpteen remote InCopy users, all keeping each other up to date with e-mailed Packages. Let me show you how the new remote workflow works in four simple steps!
Step 1: Create the Assignment in InDesign
Packages can only be created from Assignments, so you need to make an Assignment first in the Assignments panel. The basic principle of creating Assignments is unchanged from CS2: Tell InDesign which stories an editor needs to work on, and InDesign includes just those spreads containing those stories when it creates the assignment. (So an Assignment might be only four pages long even if the .indd file has hundreds of pages.) If you need to send the editor the entire layout, just include all the layout stories in the Assignment.
Exporting stories to InCopy and creating Assignments is a lot easier in CS3 because of its new support for drag-and-drop. For example, to do both tasks at once, drag and drop a text frame(s) onto the New Assignment icon in the Assignments panel (see left image below). InDesign takes care of the filenaming and saving for you, and bam, your Assignment is ready (right image).
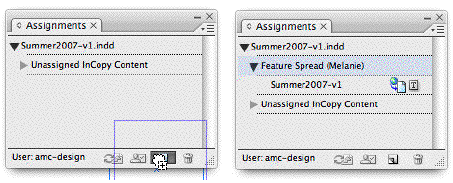
To add additional stories to an existing Assignment, just drag and drop text frames right from the layout onto the name of the Assignment in the panel.
Step 2: Package for InCopy
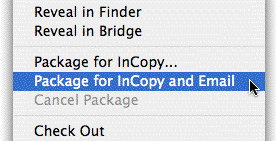
In InDesign, select an Assignment in the Assignments panel, and from the panel menu, choose Package for InCopy. InDesign creates a single, compressed file – “[AssignmentName].incp” – containing the Assignment file (.inca file), the stories and images you included (the .incx files), and a few small “package management” files that quietly work in the background.
You can put the .incp file on an FTP server for an editor to download, or you can e-mail it to them, either manually or the lazy way, by choosing “Package for InCopy and E-mail” from the panel menu:
InDesign automatically creates an outgoing e-mail in your default e-mail program and attaches the package to it, it doesn’t actually send it. Yes, you still have to enter the editor’s addy and press Send. So much work!
Immediately after you make an InCopy package, InDesign automatically checks out the associated stories to the person you entered in the “Assigned To:” field in the Assignment options dialog box:

This prevents on-site users from inadvertently checking out the stories while the off-site editor is working on them. And check out the cute little package icon next to the Assignment name, reminding the designer that an off-site editor is working on it.
Step 3: Edit the Stories in InCopy and Return it
All the remote InCopy user needs to do is double-click on the .incp Package file you sent them. The Assignment opens up in InCopy on their local computer and they can check out the stories and edit them as usual. (New in InDesign CS3: Low-res image preview data is always included in the “Assigned/All Spreads” types of Assignments. No more grey boxes for InCopy users!)
When they’re done, they can use Assignment panel commands to either re-package it for another remote InCopy user (“Forward for InCopy”) or for the designer who sent it to them (“Return for InDesign”). As in InDesign, InCopy users may choose one of the “…and E-Mail” options to have the program automatically attach the new package file to an outgoing e-mail at the same time.
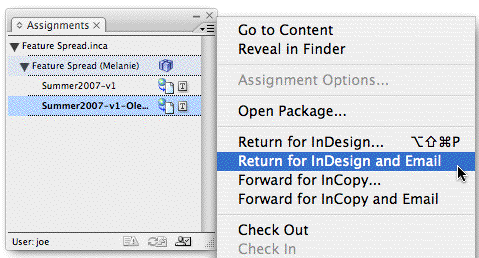
If the off-site editor packages the Assignment for another off-site editor, the package has the same .incp extension. If they’re returning it to InDesign, the package is of a different type (.indp) that can only be opened by InDesign.
Step 4: Update Stories in InDesign
Updating existing layouts with an off-site editor’s changes is wonderfully simple. The designer just needs to double-click the .indp (InDesign Package) file the editor sent them, or choose Open Package from the Assignments panel menu and double-click on it from there.
If the layout the Assignment belongs to is not already open, InDesign opens it itself (!), checks the stories back in, and flags any modified stories the Assignment contains with the usual yellow triangles. The designer can update the stories and proceed with their next task as though nothing miraculous had just happened.
Behind the Scenes
What makes a lot of this automation possible is how InDesign CS3 automatically names exported stories and Assignments and saves them into default locations, even creating and naming folders on the fly to store Assignments, Content (exported stories and images), and Packages. (And InCopy CS3 has default locations for expanded Packages too.) It’s pretty cool, but it’s a topic for another post!
This article was last modified on December 18, 2021
This article was first published on March 27, 2007
Commenting is easier and faster when you're logged in!

Recommended for you

Use the CS3 Video Workshop to Learn InDesign CS3
On the day that Adobe started shipping InDesign CS3 (and the other CS3 applicati...
Gravity is Finally Fixed!
The Gravity feature fundamentally broke in CS3. Fortunately, it's finally fixed...
Scaling vs. Resizing in InDesign CS3
We've been getting a lot of questions from folks who?ve upgraded to CS3, asking...