


Imagine you have a large Excel spreadsheet, and you need to import sections of the spreadsheet into InDesign as separate tables. Rather than saving multiple copies of the spreadsheet, each containing the specific fragment you need, or laboriously copy and pasting into InDesign, there’s a better way.
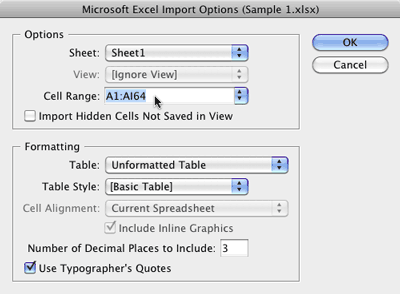
When you choose File > Place and click the “Show Import Options” button, the dialog below appears. Normally, you’d have to use a “Cell Range” such as B6:F18 to designate which of the cells in the larger spreadsheet you want to import. But finding and remembering those coordinates can drive you batty.
A better way is to use a “named range”. In Excel, just select the cells that you want to place into InDesign, and then choose Insert > Name > Define (Mac Excel 2008) or right-click and choose Name a Range (Windows Excel 2007). Then type a name for the range and click the OK button. You can have as many different named ranges as you want in a single spreadsheet.
Then, in InDesign, choose File > Place and click Show Import Options. In the “Cell Range” drop down list you will see each of your named ranges, ready to place in your layout.
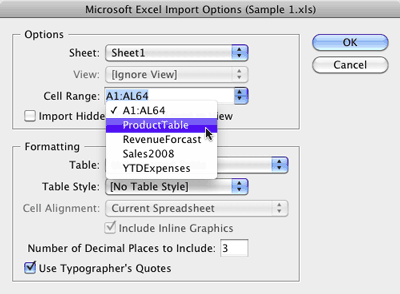
One caveat: InDesign can place spreadsheets saved in either the new .xlsx format, or the older .xls format. But named ranges will only appear in InDesign if you save the file in the older .xls format.
This article was last modified on December 20, 2021
This article was first published on April 20, 2010
Commenting is easier and faster when you're logged in!

Recommended for you

Turn Off Image Embedding When Placing a Word File into InDesign
How to place text only from a Microsoft Word file into InDesign.

Excel Charts in PowerPoint: Embedding vs. Linking
See how to avoid a common problems that can occur when you combine Excel chart d...
How to Preserve the Appearance of Text When Updating Tables
It is always frustrating when a table formatted in InDesign needs to have its co...