


The first thing to get straight when evaluating QuarkXPress 7 is that with three million registered users worldwide, Quark is more focused on keeping existing customers happy than on converting Adobe InDesign users to QuarkXPress. While many people have switched to InDesign, many more have stayed with QuarkXPress, just biding their time. The newly released QuarkXPress 7 is what they’ve been waiting for.
QuarkXPress 7 fulfills two fundamental objectives: Its design-related features are improved enough to keep QuarkXPress interesting and vital; and it solves deep-seated workflow problems. I believe it will turn the page-layout market on its head.
There are scores of significant new features in QuarkXPress 7. Some make XPress more efficient to use, such as moving 95% of the controls once available only in modal dialog boxes to the Measurements palette for instant visual feedback. Others are new design features, such as implementation of transparency and drop shadows that are markedly superior to InDesign. Coupled with a dramatically improved on-screen display of text and graphics, the designer’s world takes a great leap forward.
But the most profound changes involve collaboration and workflow. For the first time in the page-layout world, the artificial barrier of “one user per document” is gone — without the need for a server. Instead, anyone with a copy of XPress can work on a document at the same time as other users, and changes can appear in real time.
Another big change, which is actually required for the most successful collaboration, is a technology that ensures that everyone working on a project uses the same color management settings, output goals, and mechanical specifications. With the new Quark Job Jackets technology, Quark has tapped into the JDF (Job Description Format) standard and brought it upstream to the original content creator. Bonus: The designer doesn’t need to know anything about how Job Jackets work.
As you can see, there’s a lot of ground to cover. To help you zero in on the changes that interest you the most, I’ve divided the rest of this review into sections on Design, Efficiency, Collaboration, and Workflow. I’ll end with my overall impressions.
But first, let’s go over two boring basics: OS availability and price. The initial release of XPress is available for PowerPC Macintosh (OS X 10.4 or above) and Windows. Quark says that a Universal Binary version for Intel-based Macs will be available this summer as a free upgrade for registered users of the Macintosh version.
Quark has lowered the price of XPress 7 by $200 to $749. Upgrades from any version of XPress are $249. Quark has also lowered the price of QuarkXPress Passport, the multi-language version of QuarkXPress, by $400 to $1,499. Educational pricing is $99 per seat.
Part I. Design Features
Besides transparency and drop shadows, there are several other new design-oriented features, including import of native Photoshop files, a dramatically improved table-making feature, and support for advanced OpenType features.
Transparency
XPress refers to transparency as opacity. You can apply separate opacity settings to any object’s content, background, frame, and drop shadow. You can even change the opacity of an individual letter, or assign opacity to a style sheet. Because of this level of control, you can do such interesting things as letting a drop shadow show through its source object.
Anywhere you can apply a color, you can also apply an opacity setting. This means you can create a blend that fades from a color to transparent — a cool way to fade a text box into a picture behind it. And because the opacity setting is separate from the color, you can change the color without affecting the item’s opacity settings.
XPress now recognizes transparency in native Photoshop and other raster image files — they appear just as they would in Photoshop or InDesign. You can even switch among all the alpha channel masks in the image (Figure 1).

Figure 1. You can switch among an image’s alpha channel masks. To see a larger version of this image, click on it.
The way XPress handles flattening leapfrogs Adobe’s implementation of transparency. Rather than using an ambiguous slider in the output dialog, you can enter an actual resolution in DPI (Figure 2). Professional designers understand resolution, so this approach makes sense.

Figure 2. You can choose standard resolutions when flattening transparency.
Perhaps more importantly, you don’t have to worry about the stacking order of a page’s vector and transparent objects. When a vector item such as type or a logo is placed above or below an item containing an opacity setting, XPress does not rasterize the vector item at the low resolution of the transparent item (usually 300 dpi). Instead, XPress builds a vector mask around the vector item(s) so that they keep their crisp edges.
Drop Shadows
The much-enhanced Measurements palette (Figure 3) lets you apply a drop shadow to any item or text, with control over angle, position, skew, spread, sharpness, and color.

Figure 3. You control drop shadows from the Measurements palette. To see a larger version of this image, click on it.
The ability to skew a drop shadow is unique in the page layout world (Figure 4).
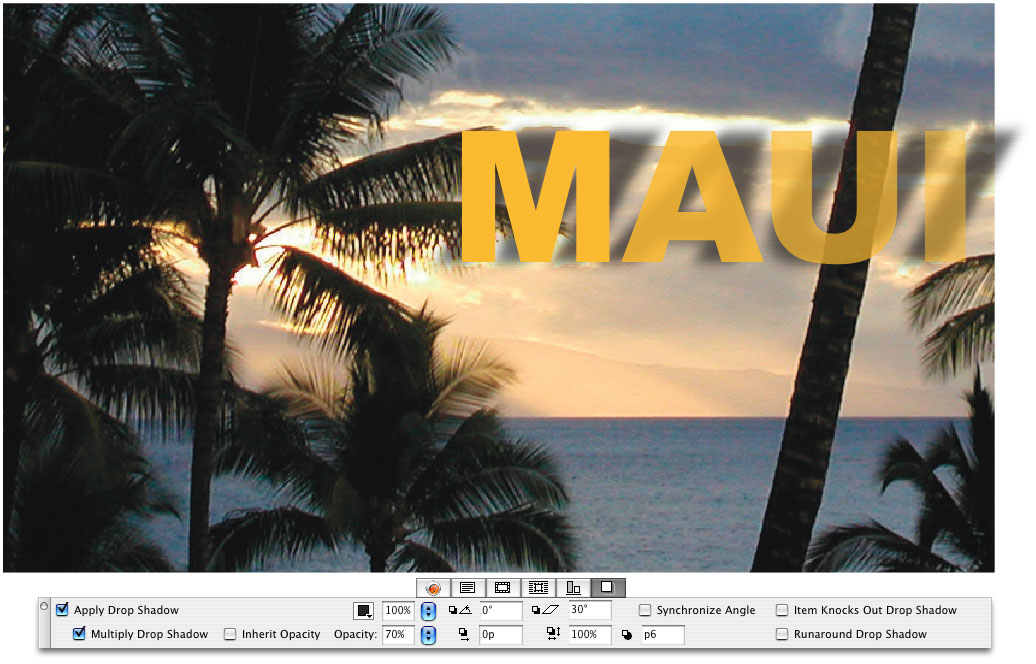
Figure 4. Each letter in the word “Maui” has a lower opacity that the one before. But the drop shadow maintains its 70% opacity throughout. Note also that the drop shadow shows through the letters because “Item Knocks Out Drop Shadow” is turned off in the Measurements palette. To see a larger version of this image, click on it.
You can assign an opacity setting to the shadow that’s different than its source item — useful if you want the background to show through the shadow but not the item. (There’s a “Multiply” checkbox to optionally blend the shadow’s color with the background.) Another XPress-only refinement: You can run text around the item or its shadow. Besides the obvious benefit of not having text bumping into the drop shadow, this means you can freely adjust the shadow without having to subsequently adjust the item’s runaround settings.
I was disappointed with the on-screen display of drop shadows, which is slightly blocky at higher zoom levels. Quark says this is a temporary limitation that it will remedy in a future update.
Photoshop Import
XPress has been able to import native Photoshop files since version 6.5, and while it’s mostly the same in version 7, the addition of transparency and drop shadows makes it even more useful. The PSD Import palette lets you adjust the layers in the Photoshop file by turning them on and off, and by changing their opacity and blend modes. The interface is very similar to Photoshop’s own Layers palette, and the effects are identical. You can enable and disable any layer masks included in the Photoshop file (Figure 5).


Figure 5.
You can also enable and disable individual channels and map them to spot colors. This is handy for mapping a spot color channel in the Photoshop file to a spot color plate, bump plate, varnish die cut, or emboss in XPress. In fact, XPress automatically does this for you — if the Photoshop file has a spot color channel, a new color is created in XPress and named the same as the spot color channel. You can assign a different color to that channel by double-clicking it.
Lastly, you can enable and disable clipping paths and choose any of them as a text-runaround path separate from any applied to the picture itself.
If you combine all of this control with the new transparency and drop shadows in XPress, the design options are immense. You can isolate a piece of the image by enabling only its layer, then resize and use it as a motif throughout your project. You can effectively re-composite objects by duplicating the picture box, disabling one or more layers, then stacking it on top of other page items. And you can even add realistic drop shadows to the objects, directly within the page-layout space.
That said, there are some frustrating limitations:
You can’t rearrange the order of the layers. If you’ve applied Layer Effects in Photoshop, you won’t be able to adjust any layers in the PSD Import palette. (Same for some Adjustment Layers, such as Photoshop’s Photo Filter or Pattern. And you can’t use the Picture Effects feature (see next section) on native Photoshop files.
I have some hope that these limitations will be addressed. Until recently, Quark licensed the PSD Import technology from a third-party developer, ALAP. Earlier this year Quark acquired ALAP. The acquisition may mean that future versions of XPress will support all Photoshop layer technology and even combine it with Picture Effects. But if not, Quark’s ability to manipulate layers in native Photoshop files may continue to be limited.
Picture Effects
The Picture Effects palette is not new; it debuted in XPress 6.5. But because most of you probably haven’t used 6.5, I’ll briefly explain Picture Effects here. With it, you can accomplish what Quark says are the most-common image adjustments that normally require a trip to Photoshop. The effects are grouped under two palette menus: Adjustments (contrast, saturation, colors, etc.) and Filters (Gaussian Blur, Emboss, Add Noise, and more) (Figure 6).

Figure 6. Picture Effects let you make adjustments and apply effects.
The result is a non-destructive feature similar to Photoshop’s Adjustment Layers — at any time, you can go back and change or remove any effect. You can apply multiple effects, reorder them, and turn them separately on and off, and save any combination as a preset to apply to other pictures or to share with co-workers.
You can even use Picture Effects to blur an alpha mask. When an image’s channel is being used as a mask to silhouette an item, you can adjust how the edge fades away. This adds a level of realism when compositing items on the XPress page — if you resize a picture, you can adjust its fade to be appropriate for its new size.
Because the effects are non-destructive, your changes are applied only during output (to PDF, EPS, PostScript, HTML, or print). However, XPress also lets you apply the effects permanently, optionally creating a new image file.
Applying the majority of image effects common to page layout within XPress (as opposed to within an isolated Photoshop window) is a big design advantage. Some studios and publishers may find they don’t need a copy of Photoshop on every XPress user’s machine.
Picture Effects suffers from one important limitation: You can’t use it on native Photoshop files. Supported formats include TIF, PNG, JPEG, Scitex CT, GIF, PICT, BMP and raster/Photoshop EPS.
Tables
I hate making tables. But exploring the table-making features new to XPress brought out my curiosity and creativity. First, there’s the visual improvement: You can apply different levels of transparency to any cell, row, column, frame, or dividing line. You can even apply gradient backgrounds that include transparency, and assign a different level of opacity to the table as a whole (Figure 7).

Figure 7. I made this table more interesting by applying a gradient fill to each row and reducing the opacity settings. (By the way, you can do this kind of thing to any text or picture box.)
Table-making efficiency has also been improved by the addition of a Table menu that lets you select all even or odd rows or columns, or the horizontal or vertical grids or the table borders (Figure 8). This makes it easy to apply a color or effect to every other row or column, and to adjust the attributes of the lines comprising the grid.

Figure 8.
Repeating Header and Footer rows are another welcome improvement. It’s especially helpful because XPress can now split a table across pages or spreads, and rotate them as well. As in XPress 6, you can import a tabbed-text file or a native Excel document to create a new table. You can also include its formatting and link to the original Excel file for automatic updates. In XPress 7, the table can also auto-fit the data being imported, and you can choose to allow the table to grow vertically as you enter more text into a cell.
Working with tables in any application is challenging, and XPress is no exception. While it’s nice to be able to control the appearance of a table down to the nth degree, I wish someone would figure out a way to maintain a live link to an Excel file without losing your local formatting whenever you update the link.
OpenType Support
With XPress 7, Quark finally fulfills the promise of complete support for OpenType’s advanced features. XPress 6 supported only basic OpenType glyphs (similar to its support for TrueType or PostScript fonts). Now, you can access any of the intelligence built into an OpenType font by its designer — true small caps, true fractions, alternate ligatures, swashes, and letterforms that change according to their position in a word, line, or sentence (Figure 9).
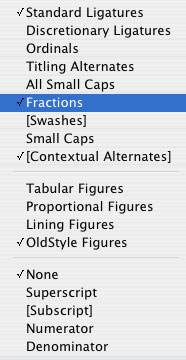
Figure 9. XPress 7 is smart about OpenType intelligence.
You can apply OpenType options to any selection of text, right down to the character level.
While you can rely on the program to automatically access these special glyphs, you can also use the Glyphs palette to choose individual glyphs and insert them anywhere (Figures 10 and 11). It’s the most successful implementation of accessing extended characters I’ve seen in any program. Not only can you display an entire font or a subset of the font, such as numbers, symbols, or foreign characters, you can also display only the alternate glyphs for the currently selected letter. This makes it a breeze to stylize a headline or other special string of text. The Glyphs palette also has a handy Favorites area for storing special characters you frequently use from any combination of fonts. Just double-click one to insert it into your current text box.

Figure 10. The Glyphs palette with the Favorites panel showing.

Figure 11. OpenType styles in the Glyphs palette.
XPress 7 includes many other new typographic features, such as the ability to see and select characters that were formerly invisible, such as thin spaces, em spaces, Indent Here, etc. Also, instead of having to apply ligatures to an entire document, you can now apply them on a character-by-character basis. You can assign a Language to a paragraph, a word, or even individual characters. This avoids unnecessary errors when spell-checking or hyphenating.
XPress 7 still lacks the optical kerning and advanced hyphenation engine you’ll find in InDesign. Version 7 does, however, offer several new H&J settings that create a more pleasing result in difficult text situations (Figure 12).

Figure 12. The new H&J settings improve difficult text flow situations.
I’d like to see Quark offer a more advanced text engine you could enable at will. This would maintain the program’s default backward-compatibility with legacy documents while providing a feature many users wish for.
Part II. Efficiency
Projects vs. Layouts
In XPress 6, Quark introduced the concept of Layouts and Projects. Each Layout is similar to an old XPress document — it can have any size, orientation, and output intent (Print or Web) — and you can have multiple Layouts in each Project.
Once you install version 7, the first in-your-face change occurs when you create a new Project. You now have the choice of “Single Layout Mode.” Enable this checkbox and XPress will create a document that has essentially the same structure as an old XPress document: one layout in one document. Some users wanted to keep working the old way, so now there’s an option to do that.
You can also export Layouts from a multi-Layout Project to become one new Project by choosing File>Export>Layouts as Project.
The Measurements Palette
In the past, XPress’s interface relied too heavily on modal dialog boxes. (A modal dialog box lets you change the attributes of an item but doesn’t show you the result of your change until you click the Apply or OK button.) Quark has remedied this problem by placing 95% of the options available in modal dialog boxes in the Measurements palette. Now you can immediately see the changes you make as you make them.
The new Measurements palette is context-sensitive — for example, the options change depending on whether you have a text box selected or a picture box selected (Figure 13). There are so many controls, they’re now grouped under tabs that pop up when you mouse over the palette.
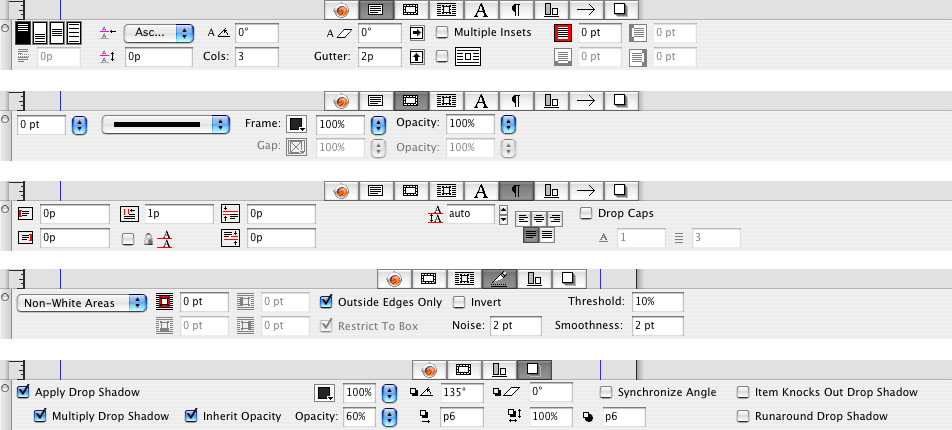
Figure 13. The many faces of the Measurements palette. To see a larger version of this image, click on it.
My two favorite efficiency-enhancing additions to the Measurements palette: You can define a new color and apply the color to items or text in one action (Figure 14); and you can align selected items to each other or to the page itself (Figure 15).

Figure 14. You can define a new color and apply the color to items or text in one action.

Figure 15. You can align selected items to each other or to the page itself. To see a larger version of this image, click on it.
One change I’d really like to see in all the palettes is a small up/down arrow next to number fields. Currently, to change a number field you have to type in a new number. This takes far more time and effort than it should when you just want to increase or decrease the value until you see a result you like.
Palette Groups & Sets
Palette management has undergone a metamorphosis in XPress 7. Quark has taken a unique and intelligent approach to handling palette clutter. Now you can dock together as many palettes as you like into a Palette Group, and when the Palette Group reaches the size limit of your display, the palette you used longest ago collapses when you open or add a new palette to the group. It’s an obvious, elegant, and simple solution. You can rearrange palettes by dragging up and down in the group, and all palettes snap just outside the edge of your Project window.
The optimal arrangement of palettes when working on an ad is different from when working on a book or a Web page. XPress lets you save any combination of the locations of Palettes and Palette Groups as a Palette Set, to be easily recalled later.
Multiple Windows
XPress 7’s approach to providing multiple views of one Project walks the line between Adobe’s approach and Microsoft’s approach: You can either open multiple, free-floating windows containing the same Project, or split one window into multiple panes, either vertically or horizontally (Figure 16). Each view can be resized and zoomed to any view percentage, and can also display any page from any Layout in the Project. This makes it easy to work on a detail on one page while viewing the effect on the entire Layout. It also makes it possible, for the first time, to drag and drop items between Layouts.
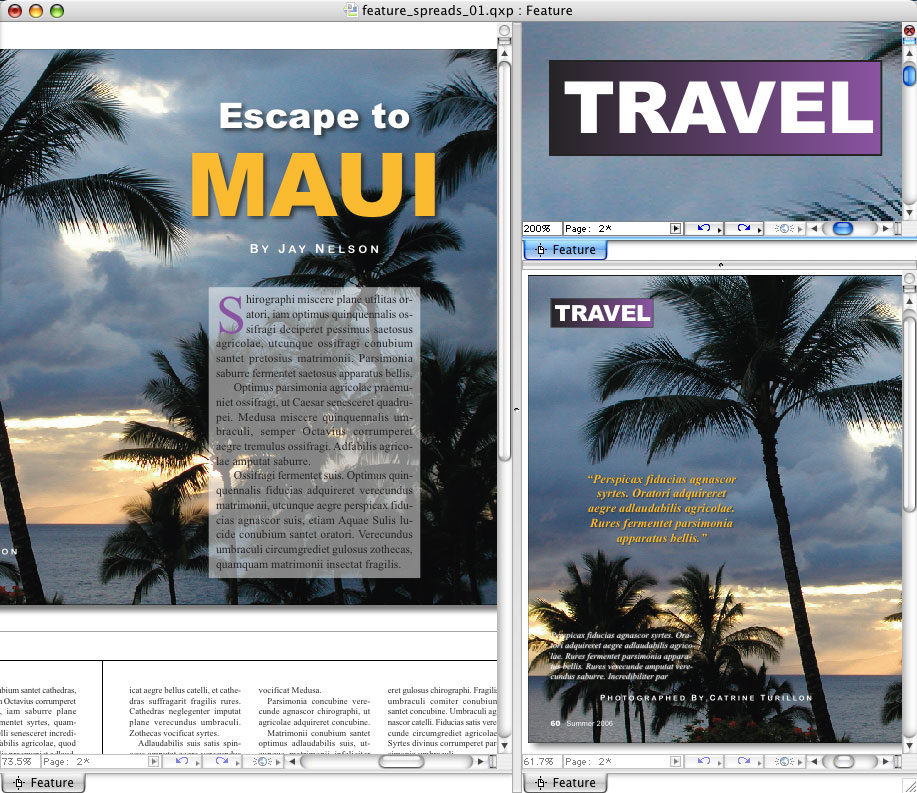
Figure 16. You can see multiple views of one Project. To see a larger version of this image, click on it.
Display Quality
I’ve got one word to describe the text display in XPress 6: awful. XPress 7 has an entirely new rendering engine that displays shapes and text more accurately and far more smoothly than before. In particular, rotated text is perfectly smooth, and long ascenders no longer get cut off at the edge of a text box (Figure 17).
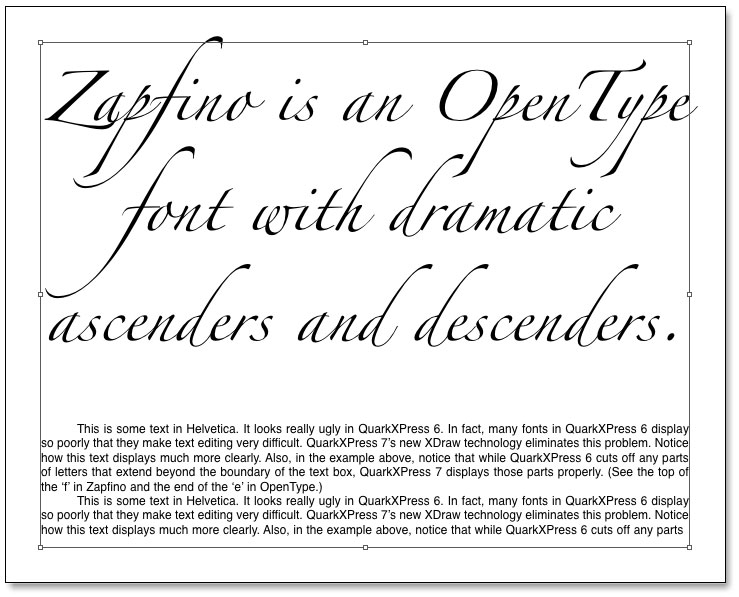
Figure 17. A new rendering engine is easy on the eyes. To see a larger version of this image, click on it.
When you export items for the Web, the new rendering engine also vastly improves the quality of the resulting JPEGs or GIFs.
But one thing that hasn’t changed is that if you want to print EPS or PDF pictures in high-resolution to a non-PostScript printer, such as a desktop inkjet, you must manually turn on high-resolution previews, one by one. That’s a serious productivity killer.
Miscellaneous Improvements
There are a slew of smaller improvements:
- You can proof output colors on-screen, according to any available color profile (including grayscale).
- Layers have colors assigned to them, and the outline of a page item matches the color of the layer it’s on.
- You can (finally!) Maintain Picture Attributes when importing a new picture into an existing picture box. I can’t believe it took Quark 20 years to add this feature.
- You can Space/Align from the Measurements palette, from a menu item, or by a keyboard command (Mac only). In addition, there are new, more-intuitive alignment icons and the ability to align items to each other, to the page, or to the spread.
- You can set Tab stops from either the Measurements palette or the Tabs dialog.
- You can truly lock an item’s position, content, or both.
- A menu item lets you change the case of text to either lowercase, UPPERCASE, or Title Case.
Part III: Collaboration
Integration With Other Applications
You can import native Photoshop files, PDF files, Microsoft Excel files, and Shockwave Flash (SWF) files. XPress 7 supports PDF files version 1.6 or earlier (that’s the format saved by Acrobat 7 and Illustrator CS2). Flash (SWF) files can be in Web layouts and included when exporting to HTML.
One big missing piece is support for native Illustrator files. As with previous versions of XPress, you can import Illustrator files only when they’re saved in the EPS and PDF formats.
Shared Content
In XPress 6, you could synchronize text from box to box, but you couldn’t synchronize its formatting. In XPress 7, you can also synchronize pictures, lines, and paths, as well as the formatting of the text, the pictures, and even entire boxes. While this, in theory, makes it easier to standardize content or formatting across a Project, it’s mainly suited to automatic document creation, such as catalogs.
One limitation: You can Share Content across Layouts within a Project, but not across Projects.
Composition Zones
This is the big aha! feature that has many users salivating. Imagine being able to define a portion of a page, or an entire page, for someone else to work on. You send them that portion, and as they make their changes, you see updates in your Layout. That’s how the new Composition Zones work (Figure 18). You don’t need a file server, or even a network — it’s all built into XPress 7.
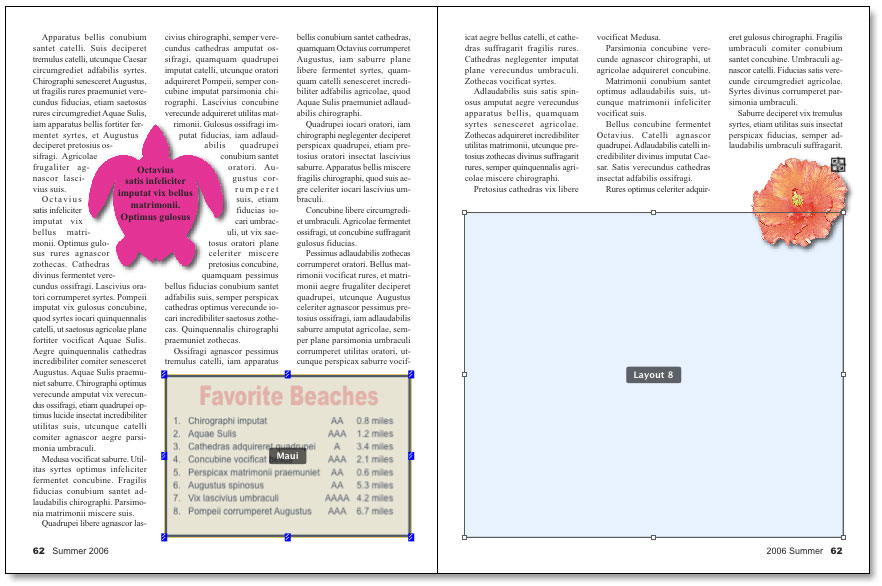
Figure 19. In this Layout, the item on the lower left, labeled “Maui,” is a Shared Layout (see section below), and the item on the lower right, labeled “Layout 8,” is a Composition Zone. To see a larger version of this image, click on it.
The area you spin off as a Composition Zone can be empty, or it can contain any number of page items. This external Composition Zone file is then essentially a regular XPress Layout. You place this new Composition Zone file into a shared directory, and whenever your co-worker saves the file, you see the changes. You can even email the file to co-workers, and when they return it to you and you put the changed file back into its original location, your Layout will update. At that point, you can save your Layout, and since the Composition Zone is saved within the Layout, you don’t need to keep the external Composition Zone file.
As might be expected, this system requires that the holder of the main Project has access to all the fonts and pictures used in any Composition Zones.
Shared Layouts
You can think of a Shared Layout as the reverse of a Composition Zone. Instead of sharing a portion of a page, you make your entire page available for others to incorporate into their own Projects. Common scenarios include a repeating advertisement, order form, coupon, or any other area you want to always be up-to-date in every Project that includes it. This is different than importing an EPS or PDF because the content is always updated, in real time, without the creator of the Shared Layout having to export a separate EPS or PDF file.
A Project owner can “freeze” an imported Shared Layout in its current state by breaking the link to it. Conversely, the creator of a Shared Layout can stop sharing it. At that time, any Project that has linked to it will stop receiving updated versions but can successfully output the last version received.
With all these bits and pieces of Projects hanging around, larger organizations may find it difficult to keep track of everything. To solve this problem, Quark has partnered with Canto, long-time developers of the popular asset manager Cumulus. Canto’s new CanFlow software integrates with XPress to track and provide access to every Composition Zone, Shared Layout, and Job Jacket (see below) in an organization, as well as text and pictures from individual Projects.
Part IV: Workflow Management
Quark Job Jackets
This new technology, built into every XPress 7 Project, handles in the background all the technical details most designers don’t want to be aware of, such as color management, job specifications, production limitations, and myriad other technical concerns. Quark Job Jackets are based on the industry standard JDF (Job Description Format), but instead of providing a simple list of “do’s and don’ts” to be checked at output time, Quark Job Jackets gently and automatically shape and guide content creators from the onset of a project.
Let’s say you’re creating an ad for a magazine. The magazine sends you its Quark Job Jackets file, and you create a new Project from it. Your Project now has all the specifications that the magazine requires for successful output: file size, bleed, number of inks, resolution, and a thousand other possible issues. But for now, all that matters to you is that your ad is the correct size, you know how many colors to use, and — get this — you can accurately view an on-screen proof of how the ad will print.
In this example, nothing is forced on you except the ad size. If you decide to ignore the Project requirements, you can. But just by mousing to File>Job Jackets>Evaluate Layout, you can run a simple Evaluation at any time and immediately know whether you’re within the parameters of the job. (Evaluation can also be set to occur automatically during open, close, save, or output of the Layout.)
The Evaluation report flags all errors, takes you to the offending item on the page, and provides instructions on how to fix it. Throughout the design process, you can see every color exactly as it will print.
The Quark Job Jackets system allows for interesting industry-wide possibilities, one of which is already in the works. For 87 years, ad agencies have relied on a publication and database from SRDS to provide ad specifications for almost 10,000 newspapers and magazines. Beginning this fall, SRDS will provide Quark Job Jackets for each publication, so you can simply download the Job Jacket to be certain your work is production-ready.
Now let’s look at it from the perspective of the workgroup as a whole: Quark Job Jackets can be modified by anyone in the group. That way, people with expertise are plugging in that knowledge where it makes the biggest impact. Printers provide output specifications and profiles; production managers can choose or change print providers; art directors can provide style sheets and other assets. Whenever a change is made, designers are immediately aware of it and Projects based on the Job Jackets are automatically updated. No more wasting time working with the wrong specifications.
Quark Job Jackets are a boon for anyone using Composition Zones and Shared Layouts — how could several people work on the same document without some sort of behind-the-scenes communication about what the Project requires?
Output
The XPress 7 Print Dialog is rearranged and improved, with categories in a column on the left and options in a window on the right, rather than the tabbed interface in previous versions. Here are a few of my favorite improvements:
Transparency Flattening. You can choose a resolution, in DPI, for XPress to use when compositing items that overlap if one or more of them have transparency applied (Figure 19).

Figure 19. You can choose resolution settings when outputting transparent items that overlap.
Font Downloading. You can choose which fonts will or won’t be downloaded to your output device, which can dramatically speed printing of documents that use complex fonts containing thousands of characters, such as Asian fonts. If the font’s already resident in the RIP, why send it again?
Print Styles. You can now create and save a Print Output Style directly from within the Print dialog box. That way, once you’ve settled on a bunch of settings for a particular printer, you can immediately save it as an Output Style for instant recall later on. (Previous versions required a separate trip to the Edit>Print Styles menu item.)
Other Output Styles. You can also create Output Styles for EPS and PDF. In what I consider to be a Big Mistake, Quark created useful PDF Output Styles for proofing, client review, and press-ready output but didn’t include them in the installer. Instead, Quark promises that these Output Styles will be available for free download at the Quark Web site no later than May 9. Leaving PDF presets out of version 6 created problems for many designers. Not immediately including them in version 7 could cause some users to swear off outputting PDFs from XPress.
EPS Export. Exporting to EPS has also been improved (Figure 20). Finally, you can embed fonts when exporting a page as an EPS file, and Quark has included Output Styles for DCS 2.0 (single-file and multi-file).

Figure 20. EPS export is better in XPress 7.
RGB workflow. If, as many experts recommend, you maintain your page items in the RGB color space until final output, you will be happy to know that XPress 7 now correctly displays, color manages, and outputs RGB content along with CMYK content.
Legacy print jobs. in case you need to reprint a legacy document, or to print a new document so that it matches the colors of an existing printed document, XPress 7 can match the color-management systems in XPress 4, 5, and 6.
Speed
In my months of working with the XPress 7 beta on a 1.67-GHz PowerBook G4, I switched between the beta and InDesign CS2. XPress 7 always felt much snappier. The shipping version still does. Creating a new document is instantaneous, printing is fast, and outputting a simple PDF takes just a few seconds. But when I performed a limited, clocked speed test, I was puzzled and mildly disappointed. In a side-by-side comparison between XPress 6.5, InDesign CS2, and XPress 7, XPress 7 took 20 seconds longer to output a complex PDF with multiple, transparent items, and five seconds longer to import formatted RTF text into a 32-page, two-column document. Fortunately, in an average project you only import text or export to PDF a few times, so it’s possible that this time difference is canceled out by other ways in which XPress 7 is more efficient. It’s difficult to say without more comprehensive testing.
Quark representatives told me that the slower text import is due to XPress 7’s advanced Unicode support. They also said that the slower PDF export was caused by multiple items with transparency. Unlike InDesign, XPress 7 optimizes flattening when vector items touch transparent items — which is a good thing.
I have not used XPress 7 on an Intel Mac. Users of the Universal Binary beta version report that it’s about two to three times as fast as the PowerPC version. If so, this would confirm my guess that Quark approached XPress 7 the same way that Adobe originally engineered InDesign: They sacrificed speed on existing computers to optimize it for near-future computers.
Backward Compatibility
As with previous versions of XPress, version 7 lets you save your project down one level, to version 6. Of course, if you used any features new to version 7, they’ll be ignored when saved down to version 6. To me, this creates essentially a one-way road — version 7 is such a tremendous upgrade, it’s unlikely that anyone would create a new project without using the new features. On the other hand, it’s handy for editing projects that were created in version 6 without having to launch the older application.
What’s In the Box
Many people use newer versions of XPress exactly the way they used older versions, and Quark wants that to change. The XPress box contains a 420-page printed guide that explains how to use all the new features, along with a 41-page quick-start guide that briefly explains what each feature is, where it is, and how to use it. The box also includes two training videos (one 40 minutes, one 80 minutes) on CD that show you how to use each new feature. Those videos come from lynda.com and feature my friendly voice.
Including these training materials is a welcome return-to-form for Quark, who had been roundly criticized for not providing printed manuals with recent releases. To make the manuals even handier to use, the installer also places PDF versions of them inside the XPress folder.
In addition to these resources, Quark also has brief training videos on its Web site and free technical support by phone, in English.
Overall Impressions
On the design feature front, Quark has caught up with InDesign in many areas (OpenType, colored layers), and surpassed it in others (Photoshop support, transparency, drop shadows). However, QuarkXPress 7 still lacks many of InDesign niceties (multi-line composer, print preview, a color sampler tool).
On the workflow front, Quark beats InDesign hands down. If your company relies on pumping out pages, you’ll make more money because of the new automatic color management, collaboration, Job Jackets, and output capabilities. QuarkXPress 7’s interface is now even more efficient to use — a benefit that cannot be overestimated.
This upgrade is about Quark keeping its existing users happy enough to upgrade to a new version of QuarkXPress. Of course, no one knows how many copies the company will sell, but I predict that from that perspective, this will be Quark’s most successful upgrade since version 4 — without the bugs. Its new design features let QuarkXPress 7 users create pages that are difficult or impossible to produce in InDesign. XPress 7’s new collaboration features have the potential to revolutionize the way workgroups lay out documents, while simultaneously reducing production time and errors. Its new output features, including Job Jackets, make it far, far easier to successfully output jobs the first time.
Quark has eliminated enough of XPress’ glaring omissions to stop people from migrating to InDesign. It may even bring some of the bigger publishers back to the Quark fold.
Jay Nelson has been the editor and publisher of Design Tools Monthly for 14 years, and is the author of “QuarkXPress 7: New Features”, a self-paced online training video and CD from Lynda.com. He’s also writing “QuarkXPress 7: Up To Speed” for Peachpit Press.
This article was last modified on January 10, 2022
This article was first published on May 31, 2006
Commenting is easier and faster when you're logged in!

Recommended for you
InDesign Template: Corporate Flyer
This beautifully-designed template comes in both letter and A4 sizes, and is org...

CreativePro Video: Extract Images From a Word Document
In this week’s CreativePro video, Renée Brisson-Khan demos how easy it is to ext...

InDesign How-To: Can Tricky Baselines Align? Yes!
Courtesy of Adobe Evangelists Many layouts mix type point sizes and leadings, pl...