

On January 10, Quark released the first public beta of QuarkXPress 7, the biggest upgrade in the product’s history. I’ve been working with it and previous versions of the beta for months, and I can now share my impressions in this in-depth exploration. Just be aware that this is not a review — that will have to wait for the final shipping version, which Quark promises in early 2006.
A Tale of Two Toolboxes
To help you visualize this upgrade, consider a Sears Craftsman toolbox. QuarkXPress 6 and earlier are similar to the four-drawer metal Craftsman toolbox, which solidly and conveniently provides access to the important tools you use every day. Now, add a few drawers to that toolbox to hold some new design- and efficiency-enhancing features, then place it all on top of a stack of even larger drawers containing new collaboration and workflow technology. That’s the QuarkXPress 7 public beta.

For a brief history of QuarkXPress and its place in the page-layout world, read the sidebar “That Was Then…”
Before I tell you about the new features and technologies, let’s take care of the technical details. The current beta runs natively on Mac OS X and Windows XP. The shipping version will run on Windows XP or on Mac OS X 10.4 and above as a universal binary; that is, it will run natively on Macs that use either a PowerPC or Intel processor. Quark has promised to deliver a universal binary public beta before February.
As in every previous version of QuarkXPress, version 7 lets you save a document down by one version level. (Effects created by new features in version 7 are ignored when saving down to version 6.)
If this article piques your interest, you can download your own beta copy at https://www.quark.com/7beta. The beta is functional through March 31, 2006.
I’ve divided the rest of this article into five parts. While you can skip to the one that most interests you, the sections are best read in order:
I. Efficiency
II. Creativity
III. Collaboration
IV. Workflow Management
V. What’s Missing
Part I: Efficiency
Most of the changes in this area are improvements to features that existed in earlier versions of QuarkXPress, but there are some brand-new goodies, too.
Projects vs. Layouts: QuarkXPress 6 introduced the concept of a Project with one or more Layout Spaces, which could have any size or orientation and an intended output to either print or the Web. Many users felt that this additional level of complexity didn’t suit their workflows, so QuarkXPress 7 now offers an optional Single Layout mode when you create a new document. Single Layout Mode uses the same single-layout structure as documents created by QuarkXPress 5 and earlier.
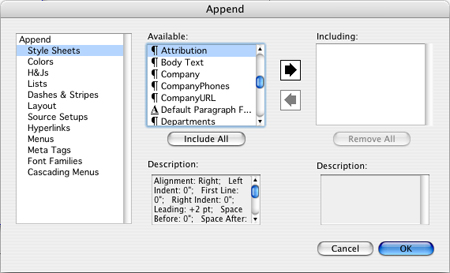
Another important request from users was to be able to append Layouts from other Projects. Without this, adding all the pages of a Layout to another Project required the tedious process of opening both Projects, creating a new Layout in one of them, and then dragging all the pages from the old Project’s Layout into the new Layout. In QuarkXPress 7, the Append menu item lets you copy entire multi-page Layouts from other Projects, as well as document-specific assets such as Style Sheets, Colors, and Dashes & Stripes (see below).
Maintain Picture Attributes on Import: In previous versions of QuarkXPress, importing a new picture into an existing picture box would reset the picture’s position, scale, rotation and skew. In version 7, a checkbox in the Import Picture dialog lets you keep the existing picture box settings when importing a new picture into it.
This option — about 15 years late in coming — will save many hours of work for many users.
The Measurements Palette: Modal dialog boxes let you adjust and preview the attributes of items but don’t allow access to any other tools until you commit your changes and dismiss the dialog box by clicking its OK button. Users complained about this in older versions of XPress, so almost all of the options in version 7 dialog boxes are directly available in the Measurements palette (see below), and you can immediately see the changes you make to an item as you make them. Quark likes to point out that the features available in the new Measurements palette require 11 separate palettes in InDesign.

Click the image for a full-sized view.
The new Measurements palette is context-sensitive. For example, if you’ve selected text, the text and text box options appear in the palette. Because the Measurements palette now includes so many controls, they’re grouped under tabs that reveal their content when you mouse over or click on them. You can choose among several behaviors for the Measurements palette. By Control-clicking the left end of the palette, you can choose to always show the tabs, show the tabs when you mouse over the palette, or never show the tabs — in which case the palette behaves and displays options similar to previous versions of QuarkXPress.
Two of my favorite efficiency-enhancing additions to the Measurements palette are the ability to define a new color, as well as apply colors to items or text; and the ability to align items to each other or to the page itself.
Space/Align: QuarkXPress 7 has an improved, more intuitive visual interface for aligning objects to each other or to the page. You can access the controls from either the Measurements palette (see below) or a menu item.

Click the image for a full-sized view.
Tabs: You can now set tab stops from the Measurements palette as well as in the Tabs dialog box. When you move a tab stop, a vertical line appears in your text to indicate where the tab stop will be applied.
Locking: You can now lock an item’s position so that it can’t be changed by dragging the item or entering new position values into the Measurements palette or the Modify dialog box. You can also lock the item’s content, with or without also locking the item’s position.
Palette Groups: Quark has come up with an intuitive method of managing multiple open palettes. You can dock together as many as you like into a Palette Group (see below), and once your group reaches the size limit of your display, the individual palettes will expand and collapse based on which ones you most recently used.
You can drag palettes up and down to reposition them in the palette group. When you drag a palette or palette group alongside the edge of a Project window, the palettes snap just outside the edge of that window. This makes it much less likely that you’ll obscure the window’s scroll bars with the palettes. These are small features, but two of many that make work faster and more enjoyable.
Palette Sets: The palettes you need when working on an advertisement may be different from the palettes you need when working on a book or Web page. In QuarkXPress 7 you can save the locations of palettes and palette groups by name for later recall. And because Palette Sets can include a QuarkXPress Library, the often-used objects you need for a particular client can be instantly available along with the palettes appropriate for their jobs. You can even assign a key command to switch to a Palette Set, which also means that you can open a Library by using a key command.
Split Windows: You can split a window vertically or horizontally for multiple views of your Project (see below). Each view can be resized, can display any page from any Layout in the Project, and can have its own view percentage and color proofing setup. You can even split a split window — I split one window into 18 different views.
Click the image for a full-sized view.
Multiple views can be helpful in several situations. For example, say you’ve zoomed into a page to adjust a small detail. Once you split the window, you can simultaneously view the detail and a larger area to gauge the effect your adjustments are having as you make them. Also, you can immediately see the effect a color change will have under multiple output conditions, such as CMYK printing on coated and uncoated stock, with and without spot colors, or in grayscale. Multiple views are also handy when adjusting a Synchronized item because you can see how your change will affect other instances of the item. (More on Synchronized items later.)
And thanks to Split Windows, you can now drag and drop items from one Layout to another.
Proofing Output On-screen: As I mentioned above, you can choose any output profile and QuarkXPress 7 will simulate that output on your display. This preview affects all items on the page, including imported images.
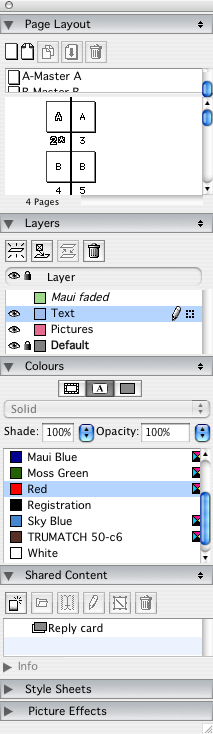
Layers: Layers now have colors assigned to them. When you select an item, its outline appears in the color of the layer it belongs to.
Part II: Creativity
QuarkXPress had some catching up to do with InDesign on the creativity front. But Quark says that being second to the party has its benefits. In QuarkXPress 7, Quark has improved on Adobe’s implementation of transparency, drop shadows, display quality, and OpenType support.
Transparency: Unlike Adobe products, where a transparency setting applies to an entire object, items in QuarkXPress 7 can have separate opacity settings for their frame, content, background, and drop shadow. Anywhere you can apply a color, you can also apply an opacity setting. (Quark refers to this as Opacity instead of Transparency. After all, 90% opaque is mostly opaque, not mostly transparent, and our brains tend to think in terms of how much is there, not how much is missing.)
Unlike InDesign, QuarkXPress 7 lets you create a blend that goes from solid to transparent, so that items seem to fade gradually into the background, or a solid color fades into an image. Also, you can apply an opacity setting to a group of items so that the group as a whole shows opacity against a background, but each individual item can also have its own opacity setting against the other items.
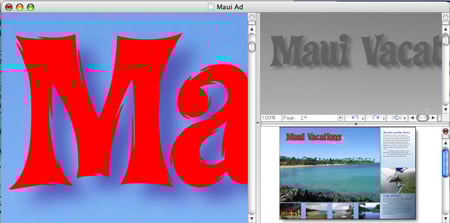
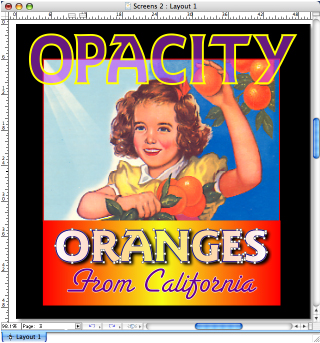
All of this control creates an almost limitless array of transparency possibilities, such as each text character having a separate opacity setting, or a drop shadow allowing more of the background to show than the item does. In the example below, the word “Opacity” has been assigned a transparent fill of purple and a solid outline of yellow. The highlighted word “oranges” is filled with a mid-linear blend where white is both the first color (at 100%) and the second color (with opacity set to 33%). This allows the background color to show through at the center of the word, but not at the edges.
When you want to apply an opacity setting to text in many places, simply assign opacity to a Style Sheet. (Again, anywhere you can apply a color, you can also apply an opacity setting as well as a color percentage.)
Support for Alpha Channels (Masks): Another new feature related to transparency is support for alpha channels in TIFF and native Photoshop files. When an image contains an alpha channel (mask), perhaps to cut out a background or create a fade, the mask appears in QuarkXPress 7. This allows seamless layering of almost any imaginable combination of items. Besides supporting transparency through alpha channels, QuarkXPress 7 also supports the old-fashioned kind of transparency in TIFF and Photoshop files, where an image has been erased or faded to a transparent background. This is useful when the image has transparent areas but no manually created masks.
Quark’s implementation of this feature is better than in other page-layout apps for two reasons. First, if an image has more than one mask, you can choose among them by selecting them in the Measurements palette and instantly see the result. Second, by using the Picture Effects feature (Utilities > Picture Effects), you can nondestructively blur the mask in a TIFF image. This lets you adjust the transition between an object and the background page elements.
If you use the same masked image more than once, you can fade the mask differently in various areas of your Project.
Drop Shadows: Any item or text can have a drop shadow, and you can independently adjust the shadow’s attributes. As in other applications, you can adjust the color, angle, position, spread and sharpness of the shadow. But you can also adjust how the shadow interacts with the item it’s attached to. For example, you can choose to let the shadow be knocked out by its item (the usual approach), but you can also let the shadow show through the object it’s attached to. So, if you’ve applied a low opacity setting to the item, you’ll see its shadow show through it. Another option, Inherit Opacity, lets you decrease the opacity of the shadow as you decrease the opacity of the item. And finally, the shadow can have its own opacity setting, which lets items beneath it show through.

Click the image for a full-sized view.
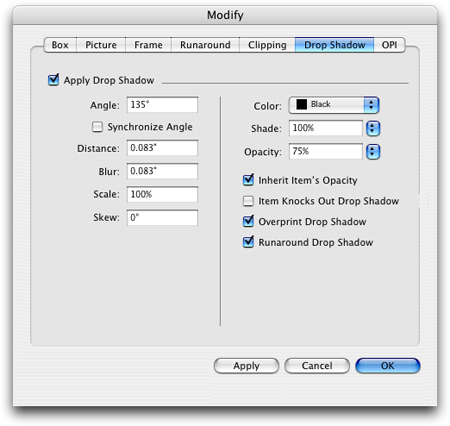
I don’t know of other applications that let you force text to run around the shadow (not just the item), as version 7 does. Besides the obvious benefit of preventing text from bumping into the drop shadow, this means that you can adjust the shadow without having to subsequently adjust the runaround settings. Also unique is the ability to synchronize the angle of all shadows throughout a layout.
QuarkVista/Picture Effects: This image-manipulation feature has been available since QuarkXPress 6.2 and has been enhanced in version 7. Since few people make use of this creativity booster that can replace multiple visits to Photoshop, I’ve explained its basic uses in the sidebar “QuarkVista Primer“.
If you do use it, you probably know it as Picture Effects. You won’t see the term QuarkVista appear in the QuarkXPress interface. It only appears as Picture Effects in the Window menu and in the Picture Effects palette.
In version 7, Quark made a few small improvements to Picture Effects, such as being able to adjust curve points by numerically editing them rather than dragging them with the mouse. Also, Picture Effects applied to one picture box that’s synchronized with other picture boxes will update in all the picture boxes if you adjust effects in any of these boxes. This is an easy way to apply and standardize Picture Effects on multiple images.
There’s one limiting caveat about Picture Effects. You can use it on TIFF and raster EPS files (including continuous tone and line art), but not on native Photoshop files. (QuarkXPress 7 added support for EPS files; QuarkXPress 6.2 only supports TIFF files.) But with Quark’s acquisition of ALAP (a lowly apprentice production) in December, the company now owns the technology and employs the brain trust that created the ImagePort XTension. Perhaps in the near future Picture Effects will support native Photoshop files.
Display Quality: The on-screen display of text and graphics in previous versions of QuarkXPress was terrible. In some cases, text display was so poor that it was painful to edit text. The rendering of objects was inconsistent, making it difficult to judge exactly what your design would look like, and sometimes rendering it impossible to use the Picture Effects feature. Version 7 solves these problems with a technology Quark calls XDraw.
XDraw displays shapes and text beautifully, with greatly improved anti-aliasing and much clearer display of rotated text — and it does it faster than before. XDraw also vastly improves the quality of text and other items exported from a Web layout to HTML.
XDraw accurately simulates transparency by tapping into the system-level drawing capabilities of each operating environment (Quartz on Mac OS X and GDI+ on Windows). Because XDraw is a separate graphics layer, QuarkXPress can more easily adapt to new graphics systems as they appear in future operating systems.
Typography: QuarkXPress 6 supported the OpenType font format, but only its basic characters — it treated OpenType exactly the same way it treated PostScript and TrueType fonts. QuarkXPress 7 adds support for OpenType’s advanced features, such as Character Sets and Unicode, which, aside from cross-platform compatibility, are the real reasons to use OpenType fonts.
An OpenType Character Set is a set of alternate characters that can be automatically applied to appropriate characters on the fly; for example, true small caps and fractions, ligatures beyond the usual fi and fl variants, swashes and other contextual alternates.
You can apply OpenType options (in the Measurements palette) to any selected range of text, from a single character to an entire story. You can also assign OpenType options to Style Sheets. You can’t assign OpenType options to an entire document.
OpenType’s support for Unicode means that QuarkXPress can perform amazing tricks. For example, Font Fallback is useful when importing or pasting text that uses characters not included in your current font. Normally, these characters appear as empty boxes, giving no indication of their original content. With Font Fallback enabled, QuarkXPress replaces those boxes with characters from an active font that does include those characters.
Another trick made possible by Unicode is that characters can be combined from different language encodings in the same document — even in the same text box — regardless of your QuarkXPress 7 language version. This means you can now input non-Roman glyphs, such as those from Chinese, Korean, Japanese, and Middle Eastern fonts. Users of the multi-language QuarkXPress Passport can now also assign languages to individual words, which is helpful for spell-checking.
One other improvement that’s long overdue is the ability to turn ligatures on and off for selected text, as opposed to an entire layout. Now, you can control whether a particular ligature appears in any typographically important location, such as a headline.
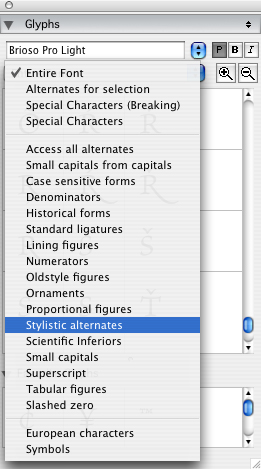
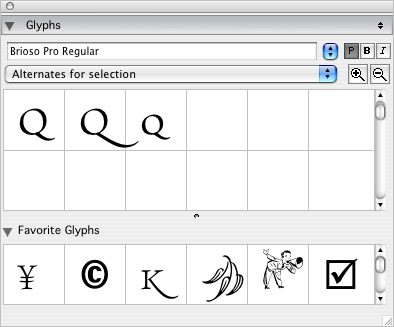
The Glyphs Palette: The potential of an OpenType font to contain thousands of glyphs requires a way to access and organize those glyphs. The new Glyphs palette helps you find special characters and insert them with a double-click. You can choose to display all the glyphs in a font; only the symbols, numbers, European characters, etc.; or only the alternate versions of characters you’ve selected on your page (see below).
A Favorites panel (see below) lets you store your favorite glyphs from multiple fonts for easy access at any time. When you mouse over any glyph in the Favorites panel, XPress displays the glyph’s font information.
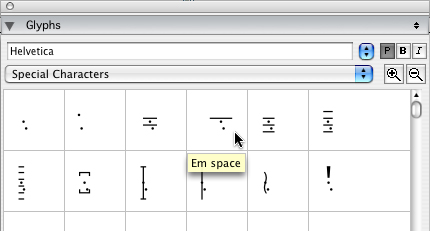
Invisible Characters: In previous versions of QuarkXPress, you had to memorize arcane key commands to insert special characters such as Indent Here, Page Number, Nonbreaking Space, Discretionary New Line, Right Indent Tab, En-dash, and Em-dash. Now you can not only insert them from a menu item (see below), you can see them and search and replace them.
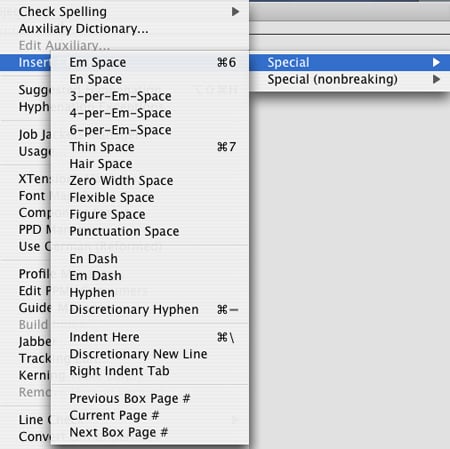
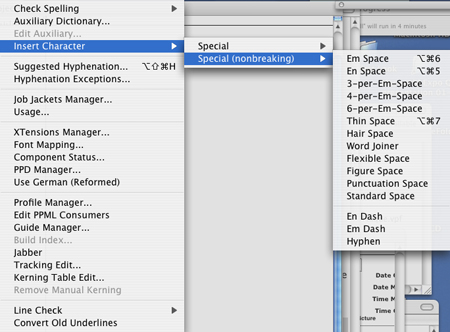
Quark commissioned Ascender Corp., a company founded by former Monotype Typography leaders, to create a new font that presents a sort of visual shorthand for each special character (see below).
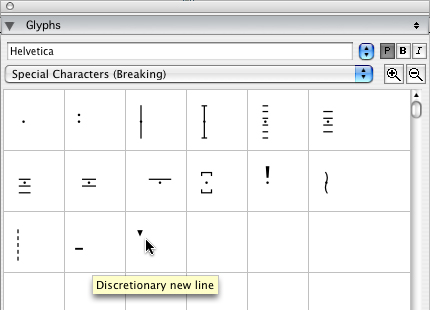
When you scale text or change zoom levels, the invisible characters change size along with the text. It’s a relief to zoom in to see spaces, tabs, and paragraph returns more clearly.
Tables: QuarkXPress 7 makes several important improvements to the Table feature. You can now auto-fit imported data and auto-resize cells as you type (see below).
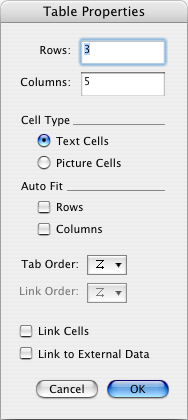
The new Table menu provides access to table tools (see below).
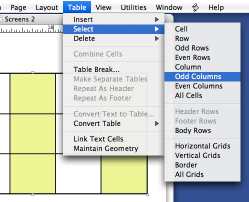
From the Table menu, you can split a table across multiple pages and add automatically repeating header and footer rows that synchronize across split tables. For faster formatting, you can also instantly select all even or odd rows or columns.
In the Measurements palette, you can rotate a table to any arbitrary angle. Unfortunately, all the tables created by splitting an existing table must be rotated to the same angle. You can also group a table just like any other page item.
Part III: Collaboration
Hold on to your hats. You’ll start to see some serious innovation in the collaboration tools and technologies. But first, let me deal with the checkered success of version 7’s integration with other programs.
Integration With Other Applications: In addition to the text and picture file formats imported by previous versions of QuarkXPress, QuarkXPress 7 adds additional support for native files from Photoshop and Illustrator, PDF, Flash (SWF), and Excel files. Unfortunately, the Photoshop Import capability is disabled in the public beta of QuarkXPress 7, so I can’t show you how it works. But here’s a description of the process for all of the file formats I just mentioned.
Photoshop: You can import a native Photoshop file into a QuarkXPress 7 picture box. But unlike other page-layout applications, you can also control the blending mode and opacity of each layer that exists in the Photoshop file. This is a powerful feature because you can use one Photoshop image in several areas of your document, adjusting its layers in each instance to create different effects — all from one Photoshop file.
When compositing Photoshop images in QuarkXPress, transparent areas in the Photoshop image behave as they do in Photoshop or InDesign; that is, items on lower levels show through. If the Photoshop image has an alpha channel, it appears as a named mask in the QuarkXPress Measurements palette. You can choose to enable or disable the mask, or choose any other mask that’s included in the image. You can even apply nondestructive Picture Effects to masks to create new compositing effects.
Another Photoshop file capability unique to QuarkXPress is that it maps spot colors and alpha channels in imported Photoshop files to colors and inks in the QuarkXPress Layout. This makes it much easier to include things such as varnishes, embosses, and bump plates in the QuarkXPress Layout.
Illustrator: When you need to import Illustrator files, you can create a picture box in QuarkXPress 7 and then import a file in PDF 1.5, 1.4, 1.3, 1.2, 1.1 or 1.0 format. Since Illustrator CS and CS2 by default save their documents with PDF compatibility enabled, those files can be imported directly into a QuarkXPress 7 picture box.
Excel: You can import a native Excel document into a table in QuarkXPress 7, including images. The XPress table will resize to accommodate the cells in the Excel document.
Flash: You can import Shockwave Flash (SWF) files directly into Web layouts and export SWF files into HTML files. This new capability vastly increases the usefulness of QuarkXPress’s Web page-layout ability.
Shared Content: QuarkXPress 6 introduced the concept of synchronizing text used in several places in a Layout. The idea was that if you repeated text in several places, you would probably want the text to change everywhere when you changed it anywhere. The text’s formatting wouldn’t change, only the text itself.
QuarkXPress 7 expands this concept to include text formatting, pictures, picture boxes, lines, and paths.
So, for example, you can use the same text in several places, and when you change the text or its formatting, other instances of that text will update, optionally updating its formatting, too. If you chose to synchronize its box attributes as well, then changing the background color, frame, and shape will also change those attributes of the other boxes. This same concept applies to pictures. If you skew, resize, rotate, or reposition a picture inside its box, all other synchronized pictures can mirror those changes. And if you synchronize lines or paths, making any change to one of its instances will change all instances.
Yes, that’s right: if you change ANY instance, all other instances also change. You don’t have to track down the original item to make the change.
The new Shared Content palette lets you view the properties of synchronized items, stop individual instances from being synchronized, and much more. For example, you can drag an item from the palette to add a new instance to the page. You can even import a picture or text directly into the Shared Content palette without first having to import it into a box.
You can Share Content across Layouts within a Project, but not across Projects. This limitation could get in the way of some workflows, but when you use Shared Content in combination with Composition Zones and Shared Layouts, you can still achieve the effect of sharing content across Projects.
Shared Layouts: Now we’re getting into the Big Bottom Base Unit of the Sears Craftsman Mechanic’s Toolbox. Shared Layouts is a radical new feature that, along with Composition Zones and Quark Job Jackets, may cause you to fundamentally change the way you create documents — for the better.
QuarkXPress 7 lets you place an entire multi-page Layout into any number of separate Projects, and the Layout will update in real time in those other Projects. (Remember: a QuarkXPress Project can include any number of multi-page Layouts, of any size and orientation). This allows multiple users to collaborate in real time on the same Project. Take a moment to let this sink in.
Sharing a Layout (or a Composition Zone, below) does not require any special server software, magic networking protocols, or anything else. Just a copy of QuarkXPress 7 for each user. Once you’ve defined a Layout in your Project as Shared, other team members can edit it any way they like. Again, take a moment to consider how this might affect your own workflow.
Composition Zones: Sharing a complete Layout is an earth-wobbling new concept. It may help to think of a Composition Zone as a smaller version of the same thing. A Composition Zone is an area of a page that you choose to share. This shared area spins off a version of itself as a separate QuarkXPress Layout document that any user of QuarkXPress 7 can edit. Their changes are updated in your Project in real time. You control the frequency that your Composition Zones or Shared Layouts are updated in your Project — anywhere from every few minutes to only when opening or outputting (see below).

So when would you use a Composition Zone? One obvious place is in magazine production. An art director or editor (let’s call her Terri) can define areas of a page by either using the new Composition Zone tool to select an area of a page, or by selecting an item or several items on a page, then choosing Item > Composition Zone. Terri’s Composition Zone can already contain text, pictures, and other page elements, or it can be empty.
Terri can then export that Composition Zone for another person to work on. The resulting file is a normal QuarkXPress Layout, editable in all the usual ways. Terri can then share that file on the network, or email that file to the person responsible for that area of the page — let’s call him Jay. When Jay returns that file to Terri, as soon as it’s placed into the same location on the network, QuarkXPress will synchronize its contents at whatever frequency Terri has defined. When Terri saves her Project, the updated Composition Zone is saved within it, just as if she had edited it herself. She may then trash the external file if she likes.
External Composition Zone files have the same requirements as any QuarkXPress file: Placed graphics must be available for final output, as must fonts. The person editing the Composition Zone can perform a Collect For Output and send the result back to the owner of the Composition Zone.
You can combine Shared Layouts and Composition Zones. Here’s an example:
ABZ Studio specializes in designs for music CD covers and related ads. One team member is creating a CD cover. He Shares that Layout. Another team member is creating an ad and places the shared CD cover Layout into it. A third team member is creating a point-of-purchase display and also places that CD cover into it. Any time team-member one saves the CD cover, it’s updated in the other team members’ Projects.
You can even share content with yourself. Say you have a house ad that you drop into your publication on a regular basis. By placing the ad as shared content in your publication, when the ad updates, so does the ad in your publication. Always, without having to keep track of an exported EPS or PDF. In an all-QuarkXPress workflow, this can replace the use of EPS and PDF files exported from QuarkXPress. I know it’s a stretch, but that’s what these new concepts are about — stretching the way we think about our workflows.
Part IV: Workflow Management
Quark Job Jackets
This is the final Big Drawer in the Craftsman Mechanic’s Toolbox. With all these collaboration features, how can a project team make sure that everyone is using the same project requirements, such as allowed colors, fonts, style sheets, color spaces, and color-management profiles? For that matter, even without using all these collaboration features, how do you ensure that a project’s specifications are consistently used?
In many workflows they aren’t, and the whole mess is cleaned up at the end. What if all those details were handled in the background, and the design team members didn’t even have to know about it? That’s the concept Quark is promoting with Quark Job Jackets.
Quark Job Jackets are based on industry-standard, open Job Definition Format (JDF) specifications. In QuarkXPress, a Job Jacket is a combination of input and output requirements, usually for a particular client. Think of it as a style sheet for the entire Project.
Any number of project team members can contribute to the Job Jacket, at any time. Team members can include profiles of input and output devices, number of colors or plates that can be used, image resolution minimums and maximums, allowed fonts and color spaces, and just about every other technical detail that can trip up a project during its creation and outputting. A Job Jacket can even include instructions to control printing presses, bindery equipment, and mailing systems.
When you create a new Project, QuarkXPress 7 generates a new Job Ticket from the Job Jacket, specifically for the Project. This Job Ticket automatically travels along with the Project in the background. The Job Ticket can automatically populate a new Project with colors, style sheets, device profiles, and other shared information.
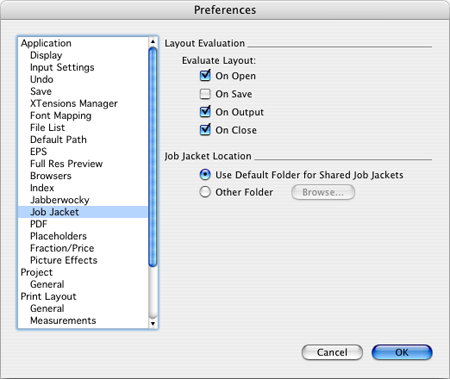
You can evaluate Projects for adherence to the Job Ticket at several different times, including when Opening, Closing, Outputting, or Saving a Project (see below).
One mind-bending feature of Quark Job Jackets is that you can update them at any time, and all projects based on them will then update as well. For instance, it’s not uncommon for a project to change output providers. By updating the Job Jacket with a profile provided by the new output provider, you can immediately determine if you need to make changes (color saturation, bleed settings, and so forth) to the Project. And you’ll see the result of using the new provider on your display (View > Proof Output).
Quark Job Jackets also solve a big problem publishers face: Outside ads that don’t fit a magazine’s production limitations. Now, the publisher can create an advertising Job Jacket and give it to an advertiser. When an advertiser creates an ad from the publication’s Job Jacket, the ad is limited to the specs allowed by the magazine.
There’s nothing like this in the Creative Suite2. CS2 does let you share your default color settings among the Adobe applications on one computer, but you can’t share them easily from computer to computer. Also, using those settings requires knowledge and active involvement from each user — not something you want to rely on.
Quark’s Job Jacket system is also extensible. Developers and in-house scripters can create wizards to build Job Jackets and generate Projects from them.
But Does It Print?
We won’t know the complete answer to that question until the final shipping version is used to produce final projects. But there is one hope-inspiring example of successful output: X-Ray magazine used QuarkXPress 7 to create and print their most recent issue (volume 3, number 5).
Meanwhile, let’s look at the output enhancements in QuarkXPress 7.
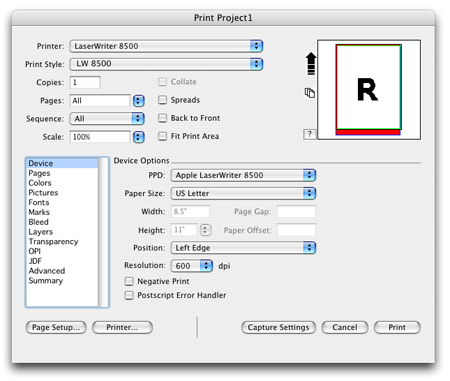
Print Dialog: A modern page-layout application has to contend with many kinds of items imported into its pages and to optimize those items for many kinds of output devices. In QuarkXPress 6, the Print dialog used a horizontal row of tabs to categorize the various aspects of printing that require user attention. In QuarkXPress 7, those aspects are arranged in a scrolling vertical column of categories, similar to how Adobe products present them (see below).
With all these settings to remember, it always astonished me that QuarkXPress 6 and earlier forced the user to go outside the Print dialog to create a new Print Style. The more logical place for that is inside the Print dialog when you discover an appropriate group of settings for a particular use. QuarkXPress 7 now lets you create a Print Style within the Print dialog. Whew.
As you can see from the Output Styles dialog below, Quark has beefed up the concept considerably.
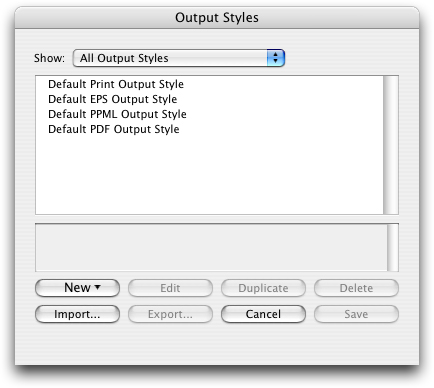
Now, along with creating and using Print Styles, you can also create Output Styles for EPS, PDF and PPML. PDF Output Styles are particularly welcome because while options for outputting PDF files are fewer than those for Printing, they’re just as complex (see below). Finally, remembering all those confusing PDF settings can be a thing of the past.
To generate PDFs, Quark is still licensing the Jaws PDF engine from Global Graphics rather than writing its own.
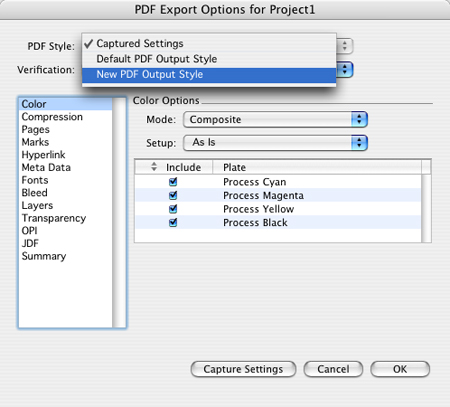
PDF/X support: QuarkXPress 7 can generate PDFs that meet the requirements of the PDF/X-1a and PDF/X-3 standards.
Quark has taken a much more sensible approach regarding PDF/X than other applications. Instead of only checking for PDF/X compatibility when generating output, it can check your document on a regular basis for items that don’t meet your intended requirements, and warn you of any errors. You have a choice of when QuarkXPress 7 verifies your documents: when you Open it, Close it, Save it, or Quit the application. You’ll have a much better chance of correcting errors than if they popped up only when you’re dying to print.
Quark licensed their PDF/X-checking engine from Callas Software, a world leader in PDF/X technology.
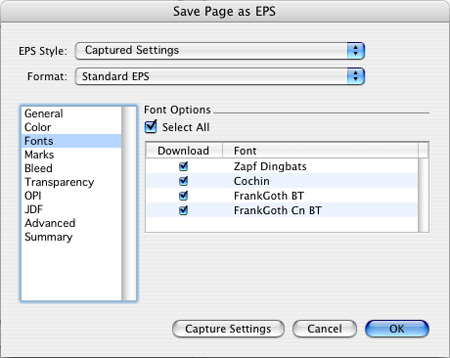
Embedded Fonts: When you export a page as a separate document in EPS format, you can now embed its fonts.
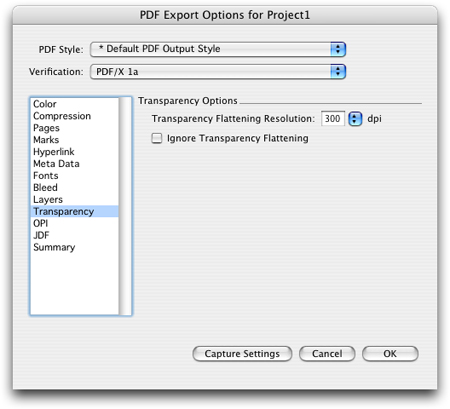
Transparency Flattening control: Ever since Adobe introduced their version of Transparency in Illustrator 8, I’ve wanted to control how this potentially infinite-resolution feature is tamed when printing to a particular output device. That’s why I was so relieved to see a control in the new Print dialog for flattening transparency.
Rather than providing an ambiguous slider for flattening as you find in Adobe products (“Do you want this flattened a little, or a lot?”), version 7 lets you choose an actual resolution to flatten your transparency effects (see below).
RGB workflow: Many experts recommend keeping all page items in the RGB color space for as long as possible — ideally up until output. The first benefit is that RGB has a wider gamut than CMYK, so you have more color data to work with when editing images. Second, RGB image files are 25% smaller than CMYK image files. And third, you don’t have to commit to a particular CMYK conversion until you’re ready to print — a much more flexible way to maintain and archive your projects.
Because of its new display and color-management features, QuarkXPress 7 lets you work completely in an RGB workflow, accurately converting colors on-the-fly for your display and when printing. This isn’t magic, just the correct use of the ICC color profiles that are embedded into pictures and that describe your current display or intended output device. If you need to print a job and it has to match a job you printed with a previous version of QuarkXPress, you can even choose to use the included profiles that match the color management systems used in QuarkXPress 4, 5, or 6.
V. What’s Missing
The page-layout arena has recently begun to feel like middle school. For many, the biggest challenge of middle school is discovering, rediscovering, or holding on to who you really are while being pushed around by others with loud demands for you to become something else.
I admire Quark for taking a long, deep, difficult look into the reasons its customers appreciate QuarkXPress, and to remain committed to the qualities that made the software the market leader for so many years. The changes in QuarkXPress 7 only increase its creative possibilities, efficiency, and value in a publishing workflow.
Still, I’m disappointed by a few oversights.
No Picture Effects on Photoshop files: Although you can import native Photoshop files and manipulate them in many ways, you can’t apply the same Picture Effects you can apply to TIFF and EPS images. I hope this changes now that Quark has acquired ALAP, the company that developed the ImagePort XTension upon which Quark’s own PSD Import XTension is based.
Same Old Type Engine: Some users will knock Quark for not improving their type engine, and I agree. The multi-line composer and optical character spacing in InDesign can produce visibly superior text. While I understand Quark’s goal of remaining backward-compatible with the millions of existing QuarkXPress documents, it would be nice to have an option. Why not build a new type engine that a user can choose to employ in new documents (or use on important older documents), while still maintaining the old type engine for legacy documents?
No Item Styles: I would prefer a simple feature that lets you define the appearance of an item as a Style, apply that Style to multiple items, and then be able to change them all by changing the Style definition. QuarkXPress 7 does provide an alternative, however: By synchronizing the attributes of a box across multiple boxes, a kind of Item Style is created.
No Drag-and-Drop: With all this image-editing power, why is it that we still can’t drag and drop pictures from the desktop onto a Layout? This capability has been available in various XTensions for more than 10 years.
Better Illustrator Support: Being able to import PDF 1.5 files is great, since by default, Illustrator CS and CS2 save documents in that format. But it would be much better to be able to import native Illustrator documents, since any Illustrator document created before Illustrator CS can’t be imported into QuarkXPress 7.
Editing Numeric Fields: I’d like up-and-down arrows next to the numeric fields in the Measurements palette and in dialog boxes, so you could increase or decrease values without typing in numbers.
What It All Adds Up To
This is a giant upgrade to QuarkXPress. The public beta is stable (as betas go), so I’m assuming that the new features in the final shipping version will work as advertised and won’t cripple the workflows of millions of existing users. Even if the final version 7 has no glitches, Quark’s challenge will be to educate customers on how to use XPress’ new architecture. If the company succeeds, QuarkXPress will continue to have a solid position in the page-layout market.
This article was last modified on January 18, 2023
This article was first published on January 26, 2006
Commenting is easier and faster when you're logged in!

Recommended for you
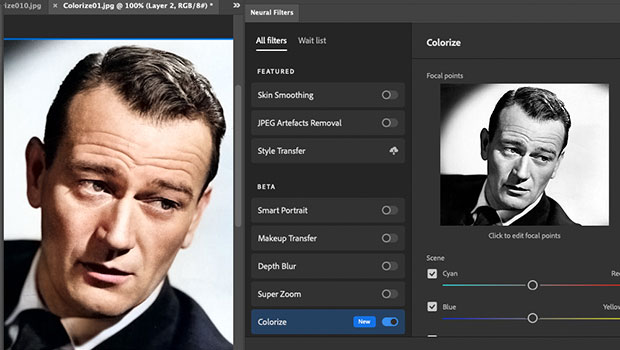
Colorizing Images in Photoshop with Neural Filters
See the strengths and limitations of Photoshop's ability to automatically colori...
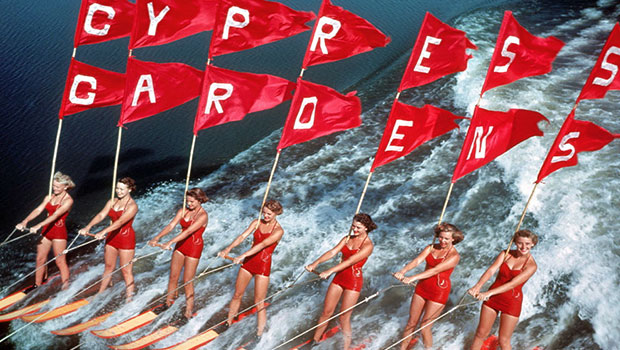
Scanning Around With Gene: Just Another Roadside Attraction
Despite growing up with a small speed boat that my dad built, I never got the ch...
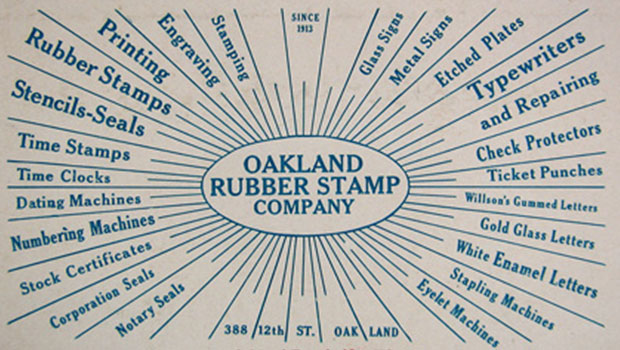
Scanning Around With Gene: 108 Years of Dust
How an industry dies says a lot about how it lived. Some, like coal mining or st...