
Many InDesign features are hard to miss and easy to understand. But others are hidden gems, unknown or poorly understood. One of my favorites is InDesign’s powerful Story Editor. Many InDesign users that I teach have never heard of it.
Your usual way of working with InDesign stories is be called Layout view. You see the story on screen as it will appear in the final document displaying any applied formatting. You also see the story in the context of any other stories on the page, graphics, interactive elements, or whatever.
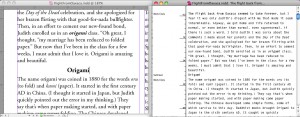
But sometimes, it’s useful to just focus on the text of a story, and that’s what the Story Editor lets you do. Any time you have your cursor in a story, choose Edit > Edit in Story Editor (Cmd/Ctrl-Y) and a new Story Editor window opens. This view shows just the text in that story. Only basic formatting (bold or italic) is displayed. Optionally, paragraph style names can appear to the left of the text. This is another window into the story, and any changes made in either the Story Editor or Layout windows will be reflected in the other. In many cases, it may be handy to view both windows side-by-side. (Tip: In InDesign CS4, use the Arrange Documents menu on the Application Bar to easily arrange them side-by-side. This is shown in the illustration below.)
Best Reasons to Use the Story Editor
Here are some of my favorite reasons to use the Story Editor:
1. When text is difficult to view or select. You may be working in a newsletter story which jumps from page to page. Editing the story in the Story Editor lets you work with the entire story at one time in one continuous stream. Sometimes the text may be small or reversed out, and it’s hard to view or select. The Story Editor will make it much more readable and easier to edit.
2. When text is overset. If not all the text fits in a story’s frames, a red + sign appears at the bottom of a story. (If text or an object doesn’t fit in a table cell, it shows as a red dot.) But in the Story Editor, all the text of the story, even the portion that is overset, is visible. You can easily edit the story to fit the frames. Text that is overset displays below a red overset marker in the Story Editor as shown below.

3. To work with footnotes or notes in the context of the story. When you insert a footnote in a story, the text of the footnote appears at the bottom of the column or page. In the Story Editor, the footnote appears as a marker in the context of the story. You can click the marker to expand and view or edit the footnote. (You can also choose View > Story Editor > Expand All Footnotes.) Similarly, you can insert notes (Type > Notes > New Note in CS4). These notes can also be expanded or collapsed in context in the Story Editor.

4. To easily work with markers for anchored objects, text variables, cross references, and so on. InDesign displays markers in the Story Editor for a large number of the specialized features used in a text flow. These can include anchored objects, index markers, hyperlinks, cross reference source and destination, conditional text and hidden conditional text, text variables, and XML tagged text. Sometimes, if you need to move these objects, it’s easier to select them and copy or move them within the Story Editor than in Layout view. Below an anchored object is selected in the Story Editor.

5. To work with overset text or embedded graphics in a table (in CS4). In InDesign CS3 and before, you couldn’t view the text in a table within the Story Editor; you could only see a marker that was a stand-in for the table. Beginning in InDesign CS4, you can view and edit the text in tables in the Story Editor. (You can also click the table marker found at the beginning of the table to hide this display.) The table text is displayed arranged either by rows or columns (you can toggle between them by Control/right-clicking on the table marker and choose Arrange by Rows or Arrange by Columns from the contextual menu. David and Anne-Marie demonstrated working with the new table display in a video podcast.
Two things are definitely easier to work with in the Story Editor: One is when you have an overset object (which displays the red dot). It’s much easier to select and work with in there. The other is when you have embedded graphics in a table and need to move them from cell to cell.

6. To view paragraph styles applied or to do a depth count on text. By default, the names of paragraph styles are displayed to the left of the text. A depth counter is also displayed which shows the total depth of text in the story in the current ruler units. You can turn those features on and off in the View > Story Editor submenu.
Check out these features and you’ll find the Story Editor can make a great addition to your InDesign workflow.
This article was last modified on December 20, 2021
This article was first published on October 23, 2009
Commenting is easier and faster when you're logged in!

Recommended for you

Project Octopus Offers Free Scripts for InDesign
A collection of free and powerful scripts for Adobe InDesign

ITIP Releases Readabilities 1.5 Plug-in for InDesign
Many companies and governments now standardize on specific readability levels...

Pantone Color Libraries Are Leaving the Adobe Apps
The process and cost of accessing Pantone spot colors in Creative Cloud applicat...