

 Excerpted from The Adobe Illustrator WOW! Book for CS6 and CC, 2nd Edition (Peachpit Press), All Rights Reserved. Copyright © 2020 by Sharon Steuer.
Overview: Create a pattern or edit an existing one; work in Pattern Editing Mode with the Pattern Options panel to adjust repeats, varying spacing, offset, and overlap; duplicate patterns and experiment with offsets and settings to create and save pattern variations to the Swatches panel.
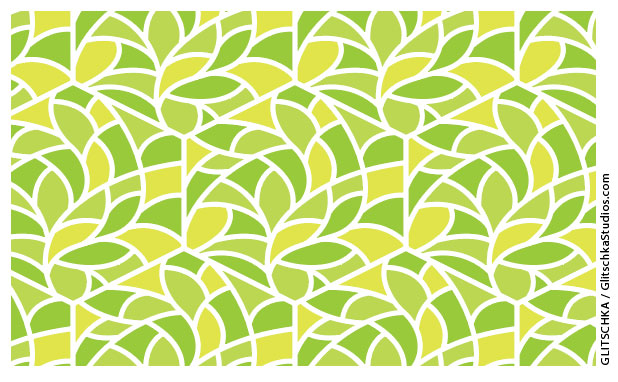
To create one “Garden Walk” tile, Von Glitschka used primarily the Polygon and Pen tools to create individual elements, expanded white strokes with Pathfinder filters, and filled objects with global colors. Bringing the grouped tile into Pattern Options, he chose Hex by Row with gaps set to half of the white “stroke” width; when gaps double in the pattern repeat, they equal the tile “stroke” width. Experiment with transforming your own graphic objects into patterns by exploring all Pattern Option parameters and by adjusting settings both numerically and manually.
1 Creating the first pattern repeat
To follow along using Glitchka’s “Garden Walk” pattern, first protect the original by copying it (drag the pattern in the Swatches panel to the New Swatch icon) and then double-click the copy to automatically open the Pattern Options panel and enter Pattern Editing Mode (PEM).
Using the Pattern Tile tool (top-left corner of Pattern Options) and experimenting with settings
To use your own artwork instead, select it and choose Object> Pattern> Make.
In PEM, changes to settings immediately update, so when you adjust settings for Copies, be aware that with complex artwork, increased repeats can slow down screen redraw.
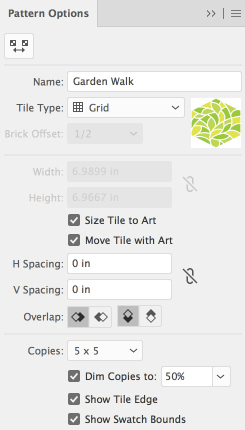
When you open an existing pattern in PEM, PEM loads the Tile Type saved with the pattern.
If you create a new pattern, then the default Tile Type will be Grid. You control the space between repeats by adjusting the size of the tile’s bounding box, either with Size Tile to Art enabled and numeric input for H and V Spacing or interactively by using the Pattern Tile tool.
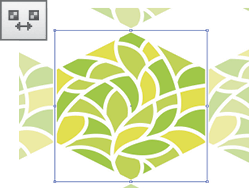
Using the Pattern Tile tool to change the gap between repeats with a Grid layout
With the Pattern Tile tool selected, use the square anchors to enlarge or reduce the gap between repeats. To create an overlap, make the tile bounding box smaller and choose the desired Overlap features. As your pattern progresses, you might want to evaluate it by zooming out, temporarily disabling both Dim Copies and Show Tile Edge and increasing the repeats.

Viewing multiple repeats with both Dim Copies and Show Tile Edge disabled
Undo/Redo is available while in PEM and can even back you out of PEM. At any time you can save the current version of the pattern as a swatch, but stay in PEM to create more variations by clicking Save a Copy and naming it. Now you can continue editing and experimenting with the pattern.
To save this version as the final one and exit PEM, click Done. If you click Cancel, no changes are saved to your original pattern in the Swatches panel.
The Pattern isolation bar showing the pattern name, controls for saving the current state to the Swatches panel, and ways to exit PEM
2 Experimenting with pattern offsets
To experiment with pattern offsets, you can stay in PEM or start over with a new copy. Make sure that both Show Tile Edge and Show Swatch Bounds are enabled. Any artwork that is within, overlaps, or touches the Swatch Bounds will be included in the pattern. To make your tile resize to the exact size of your art, enable Size Tile to Art (if it’s enabled, you may have to disable and then re-enable it).
Glitschka offset “Garden Walk” using the Hex by Row tile type, which naturally fits this design with little manipulation, but you can also use Brick by Row with a Brick Offset of ½ to tuck the repeats close together.

Using Hex by Row to start an offset repeat of the pattern, adjusted with the Pattern Tile tool to make the repeats fit with a slender gap between them
Brick Offset controls the position of each repeat relative to the others. With the Pattern Tile tool active, you can adjust the Brick Offset in fixed intervals by dragging the diamond widget on the Tile Edge to the right or left.

Resizing the Tile Edge by dragging a corner down until it “snaps” (before and after figures above); you can also slide the diamond widgets to change the pattern repeat offset at fixed intervals from 1/4 up to 4/5 the distance of a full repeat
Switch to Brick by Row as your Tile Type (shown at right), grab a corner anchor, and drag straight down until it “snaps.” Your pattern should match the Hex by Row results.
When dragging a corner with the Pattern Tile tool, hold Option/Alt to symmetrically adjust spacing on opposite sides. Hold Shift to constrain spacing to a square. Disable the tool to scale your art within the tile-spacing box or to edit your art and objects with normal vector tools.
This article was last modified on June 29, 2021
This article was first published on September 30, 2019
Commenting is easier and faster when you're logged in!

Recommended for you

TypeTalk: Hung Punctuation & Optical Margin Alignment
Learn how to create the appearance of a more optically-aligned edge for your tex...
How to Use the New AI Features in Illustrator
Learn how to use Illustrator’s new AI features to use a prompt to create vector...
From Paper to PDF: Vectorizing Hand-Drawn Artwork with Photoshop and Illustrator
I have a close friend, Mike Manoogian, who is a brilliant lettering and logo des...