
InDesign has always been capable of drag-placing files: You can drag a file of any format that InDesign supports (for example, a PSD or Word file) from the Desktop into an InDesign document. Or, you can drag files from Adobe Bridge onto a page. But this isn’t always easy to do because you have to reduce the size of your InDesign window so you can see the file(s) to be dragged and the InDesign window at the same time. Or, if you’re using Bridge you need to figure out how to use Compact mode so you can see files and the InDesign page simultaneously.
Now, if you’re an Mac user who has upgraded to Snow Leopard (Mac OS X 10.6), you can use the enhanced features of Expose to drag-place files into InDesign. This trick works with at least InDesign CS3 and CS4 (the versions I was able to test).
Expose, introduced in Mac OS X 10.3, provides a way for a user to quickly view open windows in all applications, or display windows in the current application, or hide all windows to reveal the Desktop. Until Snow Leopard, the feature was invoked by a function key for each of its three modes.
In Snow Leopard, there are some enhancements: Windows no longer all scale by the same amount; smaller windows aren’t shrunk as much as larger one, making them more readable. They align neatly on a grid (or staggered if an odd number). Minimized windows in the Dock appear too – they appear in a separate bottom bar on the screen, with a line dividing them from the normal windows. And all windows get titles – no more need to scrub over each one to learn its name!

Even better, you can show the windows for an application by clicking and pausing over its Dock icon. Every other application shrinks away to nothing in the background, and your chosen application’s windows tile themselves out. Meanwhile in the Dock, your app is dramatically spotlit, and a little popup menu appears with the options to hide or quit the app, or set some of its Dock options.

This method now makes it easy to drag-place files into InDesign documents:
1. Select the file(s) you want to place. Of course, InDesign CS2 and greater can place multiple files at the same time.
2. Drag over the InDesign icon on the Dock, and all its open or minimized windows appear. (The smaller window indicates a file that has been minimized to the Dock.)
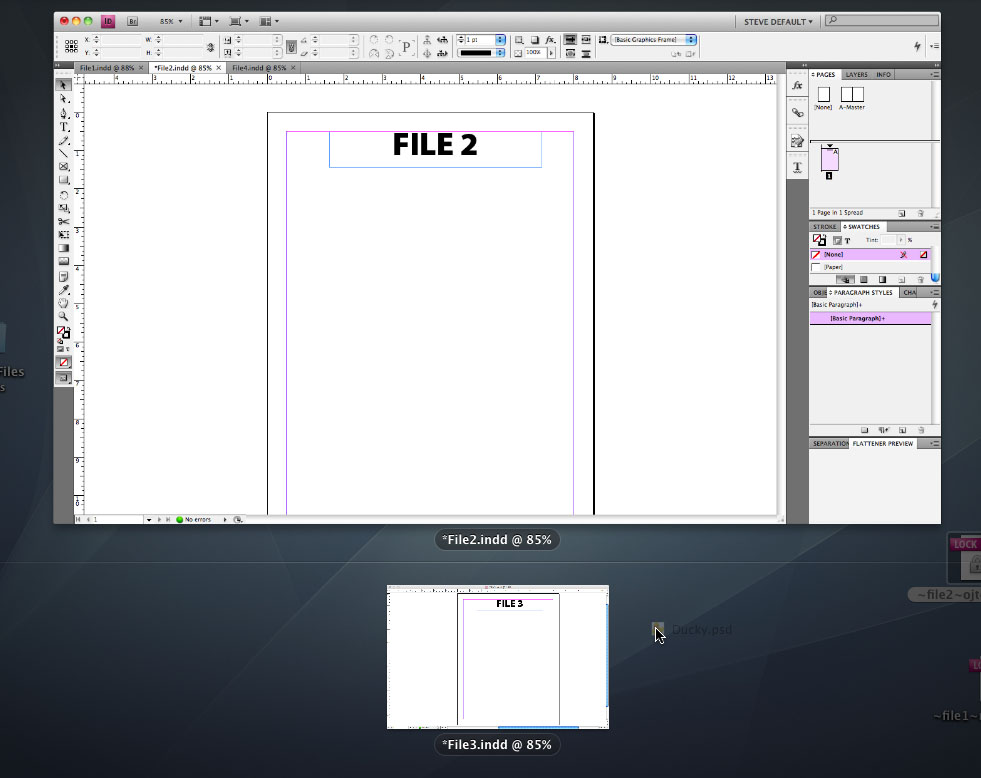
3. Drag over the window of the InDesign file in which you want to place your files.
4. That window will come to the front. If you’ve selected more than one file, you’ll see the multi-place cursor so you can place the files where you like.

This article was last modified on December 19, 2021
This article was first published on September 3, 2009
Commenting is easier and faster when you're logged in!

Recommended for you

Changing sizes… mixing scaling and sizing
This is a story about scaling and sizing objects? InDesign CS5 introduced the ab...
Migrating vs. Syncing Settings in InDesign CC 2014
When InDesign CC 2014 was released, it introduced a new feature called Seamless...
Getting Accurate Colors When Printing Proofs from InDesign
J.K. wrote: I am in the process of printing a postcard out of InDesign CS3. The...