

Folds are commonly used in print production. They’re found in many places?direct mail pieces, brochures, inserts and more. Yet creating them properly is a knotty problem. They require an intimate knowledge of the finishing process used for the print job, accurate calculation of panel widths, and the proper creation of the InDesign file with fold and trim marks that the printer will need to produce the job accurately. This is one of the topics I’ll cover in this week’s eSeminar (or “webinar”), Preparing for Print: InDesign Best Prepress Practices. The session will be held live Wednesday, July 1, and it will be available later as a downloadable recording.
While preparing the topic of constructing InDesign documents for print, I came upon an extremely useful plug-in for InDesign CS3 and CS4 which make the process much easier. It’s called FOLDRite Template Master, and it’s available from foldfactory.com. Originally designed for InDesign CS3, version 2.0.3 works equally well with InDesign CS4. (The website reports that there is also a CS2-compatible version of the plug-in.) The plug-in allows you to build an unlimited number of custom templates. Originally sold for $299, it’s now available for $99. If you do many projects with folds, I’m sure this would pay for itself quite quickly.
To create a fold manually, you’d normally perform these steps:
- Pick the correct for folding style for your audience, budget, content and distribution.
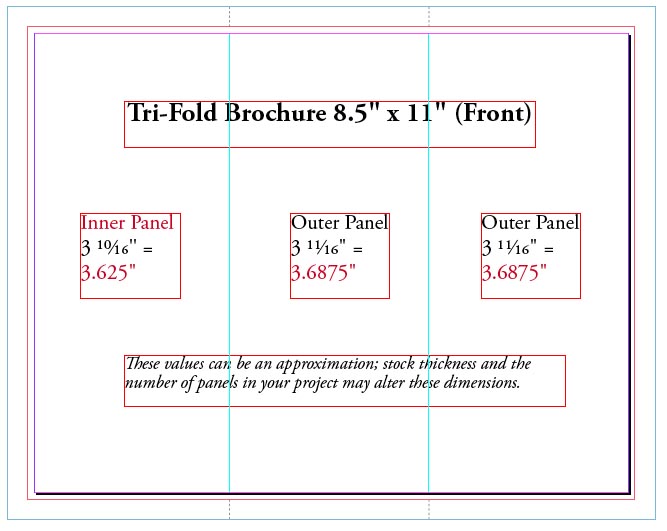
- Calculate the exact dimensions of each panel for the outside and inside out the printed piece.
- Create guides in the proper location on each flat, and reverse them on the opposite side.
- Create fold marks in the slug area of the document.
The FOLDRite Template Master interface is simple and intuitive (below). You start by picking a folding style (there are up to 85 to choose from). Information about the difficulty of the style, and other helpful production information is provided for each you. To help you decide, you can preview animations that show each style in three dimensions.
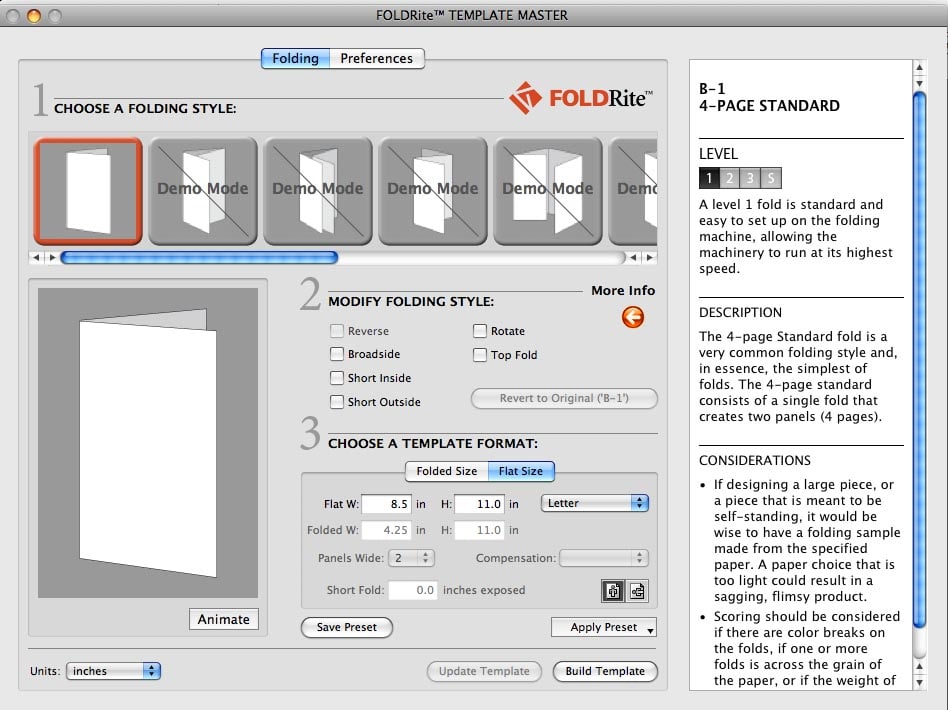
You can optionally customize the folding style with choices for reverse, broadside, short inside, short outside, and so on. You select the dimensions for the flat size (trim size of the document), the folded size (panel size), the number of panels. There are three levels of compensation: This is adjustment for panel width based on type of stock, for example. Finally, you click Build Template and the plug-in constructs an InDesign template (below) using those settings. It will do all the calculations, eliminating the possibilities of error, and reducing production time. It will build a print-ready template with the marks and guides on separate, locked layers.

Check out the plug-in if this is something you need to do frequently, and check out my webinar for more tips and tricks for creating print-ready InDesign files. The webinar is for both Mac and Windows users of all versions of InDesign.
This article was last modified on December 19, 2021
This article was first published on June 28, 2009
Commenting is easier and faster when you're logged in!

Recommended for you

New Book on Fast Food Marketing Design and Photography
After receiving a flyer from a fast food restaurant that featured the suggestion...

How to Filter and Sort Photoshop Layers
Learn how to easily organize and find your Photoshop layers.

Scanning Around with Gene: Holy Word Balloons, Batman!
I was trying to figure out why so many ads I see in magazines from the 1930s thr...